Posted on

The Angler’s Sanctuary: A Comprehensive Guide to Choosing the Perfect Ice Fishing Shelter

The piercing wind whips across a vast, frozen expanse. Your line is down, but the biting cold seeps into your bones, making it hard to focus on the subtle dance of your rod tip. This is where an ice fishing shelter transforms the experience from an endurance test into a genuine pleasure. More than just a tent on the ice, a quality shelter is a portable sanctuary, a base of operations that shields you from the harshest elements, allowing you to fish longer, more comfortably, and ultimately, more successfully.

Choosing the right shelter, however, can be as complex as deciphering a fish finder’s display. The market is filled with various styles, materials, and features, each catering to a different type of angler. This guide will navigate the frozen landscape of ice fishing shelters, providing the detailed information you need to select the perfect model for your angling adventures.


Understanding the Core Styles: Hub vs. Flip-Over

The first major decision in your shelter journey is choosing between the two dominant styles: hub-style and flip-over shelters. Each has a fundamentally different design philosophy, leading to distinct advantages and disadvantages on the ice.

1. The Hub-Style Shelter: The Communal Fortress

Hub-style shelters are the modern evolution of the classic ice tent. Their design is characterized by a framework of flexible poles integrated into the fabric, which “pop out” from central hubs on the walls and ceiling. This creates a stable, cube-like structure with near-vertical walls.

How They Work: To set up a hub shelter, you simply pull out on the fabric handles attached to each hub. The poles snap into place, tensioning the fabric and creating a rigid, freestanding structure. Anchoring it to the ice with ice screws, especially in windy conditions, is a crucial final step.

Benefits of a Hub-Style Shelter:

  • Unmatched Interior Space: The primary advantage of a hub is its exceptional space-to-weight ratio. The near-vertical walls eliminate the sloped, unusable areas common in other tent designs. This allows for more fishable area, room for multiple anglers, heaters, electronics, and even cots for overnight trips. A 4-person hub truly feels like it can fit four people and their gear.
  • Excellent Portability (When Packed): When collapsed, hub shelters pack down into a surprisingly compact duffel-style bag. This makes them easy to transport in the trunk of a car or on the back of an ATV, leaving more room in your sled for other essential gear.
  • Cost-Effective: Generally, hub shelters offer more square footage per dollar than their flip-over counterparts, making them an excellent value for anglers on a budget or those who need to accommodate groups.
  • Versatility: Their open-concept design is ideal for social fishing, family outings, or serving as a central warming station for a group of anglers spread out over a wider area.

Considerations for Hub-Style Shelters:

  • Setup in Wind: While setup is generally quick, it can be challenging for a single person in high winds. The large fabric panels can act like a sail before the first anchor is set.
  • No Integrated Seating: Hubs do not come with built-in seats. You will need to pack and carry separate chairs, which adds to the gear you need to haul onto the ice.
  • Less Mobile Once Deployed: Once a hub is set up and anchored, moving it to a new fishing spot is a process of taking it down, packing it, and redeploying it. This makes them less ideal for “hole-hopping” anglers who move frequently.

2. The Flip-Over Shelter: The Mobile Fishing Machine

Flip-over shelters, often called “flip-shacks” or “sled shelters,” are designed for mobility and rapid deployment. They are built around a heavy-duty plastic sled that serves as the base, transport vessel, and gear hauler. Integrated seats are mounted inside the sled, and the shelter’s framework of telescoping poles and fabric is attached to the sled’s perimeter.

How They Work: To set up a flip-over, you simply stand behind the sled and pull the framework up and over your head, much like folding down the convertible top on a car. The poles extend and lock into place, creating an instant shelter around you and your seats.

Benefits of a Flip-Over Shelter:

  • Unbeatable Mobility: This is the defining feature. If the fish aren’t biting, you can be packed and moving to a new hole in under a minute without ever leaving your seat. All your gear stays in the sled, making the entire operation incredibly efficient.
  • Integrated Seating and Gear Sled: The all-in-one design is a massive convenience. The sled base not only provides a waterproof and durable floor but also hauls all your equipment—auger, rods, bait, heater—in one trip. The seats are typically robust, often padded or swivel-style, and perfectly positioned for fishing.
  • Extreme Durability: The robust sled base and heavy-duty pole structures are built to be dragged across rough ice and snow, making them exceptionally tough.
  • Fastest Setup and Takedown: In calm conditions, a flip-over can be deployed or packed away in seconds, making it the ultimate tool for anglers who want to maximize their fishing time.

Considerations for Flip-Over Shelters:

  • Heavier and Bulkier: The integrated sled and sturdy frame make flip-overs significantly heavier and more cumbersome than a packed hub shelter. Transporting them often requires a pickup truck or a large SUV.
  • Less Fishable Area: The sloped front wall and fixed seating arrangement result in less usable interior space compared to a hub of a similar angler rating. A 2-person flip-over can feel cramped compared to a 2-person hub.
  • Higher Cost: The complex design, integrated sled, and seating systems mean flip-overs typically come with a higher price tag.

Key Factors to Consider Before You Buy

Beyond the basic style, several critical features will determine a shelter’s performance and your satisfaction.

1. Capacity and Size

Manufacturers rate shelters by the number of anglers they can hold (e.g., 2-person, 4-person). It’s wise to consider this a maximum capacity. If you value comfort and have a lot of gear (heater, fish finder, underwater camera), consider “sizing up.” A 3-person shelter is often perfect for two anglers and their equipment. Always check the “fishable area” in square feet for a more accurate comparison of usable space.

2. Insulation: Thermal vs. Non-Thermal

This is one of the most important decisions.

  • Non-Thermal Shelters: Made of a single layer of wind-breaking fabric (typically 300-600 denier polyester). They are lighter, less expensive, and pack smaller. However, they are prone to condensation buildup on the inside, which can drip on you and your gear.
  • Thermal Shelters: Feature a multi-layer, quilted fabric that traps a layer of air, much like a winter jacket. This insulation provides three major benefits:
    1. Heat Retention: A thermal shelter requires a much smaller heater (or sometimes none at all on milder days) to stay warm, saving significant propane over a season.
    2. Condensation Reduction: The warm inner wall of the fabric prevents moisture from condensing, keeping the interior dry and comfortable.
    3. Noise Dampening: The quilted fabric significantly reduces wind noise, creating a more peaceful environment.

While heavier and more expensive, the benefits of a thermal shelter are almost always worth the investment for any serious ice angler.

3. Material and Durability

  • Fabric Denier: This is a measure of the fabric’s thread thickness. A higher denier number (e.g., 600D, 900D, or even 1200D) indicates a tougher, more tear-resistant fabric that will better withstand wind and wear.
  • Poles: Look for sturdy, large-diameter poles. Fiberglass poles are common in hubs, while flip-overs often use a combination of steel and aluminum for strength and weight management.
  • Windows and Zippers: Ensure windows are made of cold-crack-resistant material. High-quality, robust zippers are essential, as they are a common failure point in extreme cold.

4. Portability and Weight

Consider how you get onto the ice. If you walk long distances pulling a sled by hand, every pound matters. A lightweight, non-thermal hub might be your best bet. If you have an ATV or snowmobile, the heavier weight of a large, thermal flip-over becomes a non-issue.

5. Additional Features

  • Seating (in Flip-Overs): Look for comfortable, durable seats. Options range from simple bench seats to padded swivel seats with backrests.
  • Storage: Interior pockets for gear, overhead cargo nets, and well-designed sleds with molded-in compartments add immense value.
  • Ventilation: Proper vents are crucial for safety when using a propane heater, as they allow for air exchange to prevent carbon monoxide buildup.
  • Anchoring System: Quality shelters come with heavy-duty ice anchors and tie-down ropes. Self-tapping ice anchors are much easier to use than older screw-style anchors.

Which Shelter is Right for You? Angler Profiles

  • The Hole-Hopping Solo Angler: Mobility is your priority. You drill dozens of holes, looking for active fish. Your Choice: A one-person thermal flip-over. It offers the fastest possible setup and takedown, allowing you to move in seconds while keeping all your gear contained in the sled.
  • The Social Angler or Family: You fish with friends or take the kids out. The experience is as much about camaraderie as it is about fishing. Your Choice: A 4-person (or larger) thermal hub-style shelter. It provides maximum space for multiple people, gear, and a heater, creating a comfortable and social base camp on the ice.
  • The “Run and Gun” Duo: You and a partner fish aggressively but want more comfort than a solo flip-over offers. Your Choice: A two-person thermal flip-over. It provides the mobility to chase fish effectively while offering comfortable seating and complete protection from the elements for both anglers.
  • The Budget-Conscious Beginner: You’re just getting into the sport and want a shelter without a major financial commitment. Your Choice: A 2- or 3-person non-thermal hub shelter. It offers the best value and will provide essential protection from the wind, allowing you to stay out longer and decide if you want to invest more heavily in the future.

In the end, choosing an ice fishing shelter is about honestly assessing your personal style of fishing. Consider how you fish, who you fish with, and how you travel on the ice. By weighing the unique benefits of each style against your individual needs, you can confidently invest in a shelter that will become your most valued piece of gear, your personal sanctuary on the hard water for years to come.

Posted on

The Cutting Edge: A Technical Head-to-Head of Ice Auger Titans

In the world of ice fishing, the auger is the great equalizer, the tool that grants access to the frozen world beneath our feet. The difference between a day of frustration and a day of triumph often begins with the efficiency, power, and reliability of the machine that cuts the hole. Four brands have risen to dominate this space: Ion, Jiffy, Eskimo, and StrikeMaster. Each brings a unique engineering philosophy, mechanical design, and technological prowess to the ice. This is a detailed, technical breakdown of these four giants, putting them head-to-head to help you understand what truly makes them tick.


ION: The Electric Pioneer

Ion stormed the market by committing fully to the electric platform, forcing a seismic shift in the industry. Their identity is built on lightweight design, clean operation, and cutting-edge battery technology.

Power Source and Motor Technology: Ion’s ecosystem is built around its 40V lithium-ion battery platform. Over the years, this has evolved through multiple generations (Gen 1, Gen 2, Gen 3), with each iteration offering improved cold-weather performance and energy density. The core of an Ion auger is a high-torque, brushless DC motor. The brushless design is critical; it offers superior efficiency over brushed motors, meaning more of the battery’s stored energy is converted into rotational force. This design also eliminates wearable parts like carbon brushes, significantly increasing the motor’s lifespan.

Transmission and Gearing: To convert the motor’s high speed into hole-cutting torque, Ion utilizes a planetary gear transmission. This compact system allows for a significant gear reduction in a small, lightweight package. The precise gear ratio is a closely guarded specification but is optimized to balance cutting speed with the torque necessary to avoid binding, especially when breaking through the final inches of ice.

Auger and Blade Design: Ion has primarily used a composite flighting system. This high-strength polymer is engineered to remain flexible and impact-resistant in frigid temperatures, which is a major contributor to the auger’s remarkably low weight. The blade system is a “shaver” style, designed for a smooth, fast cut in relatively clean ice. Their latest models, like the Alpha, feature a re-engineered cutting head and a more aggressive blade pitch for improved speed. A key feature is the center-point blade, which guides the cut and keeps the auger stable, preventing it from “walking” when starting a hole.

Technical Summary:

  • Philosophy: Ultimate lightweight convenience and clean, quiet operation.
  • Powerplant: Brushless DC Motor powered by a 40V Lithium-Ion battery system.
  • Drivetrain: Planetary gear transmission.
  • Cutting System: Lightweight polymer flighting with shaver-style blades and a centering point.
  • Key Advantage: Unmatched portability and ease of use. No gas, no fumes, no complex startup procedure. Their reverse function for flushing slush is a significant quality-of-life feature.
  • Ideal User: The mobile angler, the shelter fisherman, and anyone prioritizing weight and convenience over the raw, limitless power of gas.

Jiffy: The Heavyweight Champion of Torque

Jiffy is the old guard, a brand built on a reputation for uncompromising power and durability. Their machines are heavy, loud, and revered for their ability to chew through the thickest, dirtiest ice without hesitation.

Power Source and Motor Technology: Jiffy’s heritage is in the 2-stroke gasoline engine, and their modern 52cc engines are powerful, high-torque units. However, their most significant innovation has been the perfection of the 4-stroke propane powerhead. This system uses a standard 1-pound propane cylinder, eliminating the need for mixing gas and oil. The 4-stroke design provides high torque at lower RPMs compared to a 2-stroke, resulting in a smoother, quieter (though still loud) operation. The propane fuel system is also inherently cleaner burning and less prone to the carburetor issues that can plague gasoline engines.

Transmission and Gearing: Jiffy employs what they call their HTT (High-Torque Transmission). This is a heavy-duty, ball-bearing transmission with a gear ratio optimized for maximum torque delivery. The goal of a Jiffy is not necessarily speed, but unstoppable cutting force. This robust drivetrain is what gives Jiffy its signature feel and ability to power through challenging conditions.

Auger and Blade Design: Jiffy is famous for its “Ripper” blade system. This is a serrated, chipper-style blade. Unlike a shaver blade that peels away ice in thin layers, a chipper blade, as the name implies, chips and shatters the ice. This design is exceptionally durable and excels at reopening old, frozen holes and cutting through “dirty” ice that may contain sand or debris that would quickly dull a shaver blade. Their drill assemblies are heavy-gauge steel, adding to the unit’s overall weight but also its durability and the downward pressure it exerts during drilling.

Technical Summary:

  • Philosophy: Unmatched power and durability for the most demanding conditions.
  • Powerplant: 2-stroke gas, 4-stroke gas, and most notably, 4-stroke propane engines.
  • Drivetrain: Heavy-duty transmission (HTT) geared for maximum torque.
  • Cutting System: Heavy steel flighting with serrated “Ripper” chipper-style blades.
  • Key Advantage: Raw, unstoppable torque. The chipper blade design is ideal for dirty ice and reopening holes. Propane models offer incredible convenience over gasoline.
  • Ideal User: Anglers who routinely face exceptionally thick ice (30+ inches), deal with dirty ice conditions, or prioritize brute force and reliability over weight savings.

Eskimo: The All-Around Contender

Eskimo has built its brand on finding the perfect balance between power, reliability, and price. They offer a wide range of products, from gas and propane to electric, with a focus on proven, cold-weather-tested components.

Power Source and Motor Technology: Eskimo’s gas-powered augers are built around their proprietary “Viper” 2-cycle engines, ranging from 33cc to 51cc. These are reliable, high-compression engines designed for easy starting in the cold, featuring mitten-grip recoil handles and primer buttons. Eskimo has also made a strong entry into the propane market and, more recently, the high-voltage electric market with their 40V E40 model, which competes directly with Ion and StrikeMaster.

Transmission and Gearing: Eskimo utilizes an all-metal, sealed ball-bearing transmission. Their gear ratios vary by model, but generally strike a balance between cutting speed and torque. For example, a smaller 33cc model might have a 49:1 ratio for adequate torque, while a larger 51cc model might use a 30:1 ratio for faster cutting speed, confident in the engine’s power to handle the load.

Auger and Blade Design: The hallmark of an Eskimo auger is the “Quantum” auger bit. This steel flighting is designed with a unique centering ring at the point, which, like Ion’s system, keeps the auger stable and makes it particularly effective at re-drilling old holes without binding. Their blades are typically a dual, flat-blade shaver style, designed for a fast, smooth cut.

Technical Summary:

  • Philosophy: Balanced performance, reliability, and value across a wide range of power options.
  • Powerplant: Viper 2-cycle gas engines, propane models, and a growing line of 40V electric units.
  • Drivetrain: All-metal, sealed ball-bearing transmission with model-specific gear ratios.
  • Cutting System: Steel Quantum auger bits with a centering ring and dual shaver blades.
  • Key Advantage: A strong “all-around” performer. The Quantum bit’s centering ring is a significant feature that provides stability and makes reopening holes easier than with traditional shaver-blade augers.
  • Ideal User: The angler who wants a reliable, powerful machine without necessarily paying the premium for the lightest electric or the heaviest gas model. A great choice for those who do a bit of everything.

StrikeMaster: The Innovator of Speed and Lightness

StrikeMaster has a long and storied history, famously partnering with Mora of Sweden for their legendary hand augers. They have consistently pushed the boundaries of cutting speed and, in the modern era, have become the dominant force in the high-performance electric market.

Power Source and Motor Technology: StrikeMaster has a diverse power portfolio. They have used Solo 2-stroke engines for decades, known for their reliability and high RPMs. They also offer their own 2-stroke and 4-stroke gas models. However, their identity is now defined by their 40V Lithium electric system. Partnering with a leading battery and motor manufacturer, StrikeMaster’s 40V brushless motor and battery management system are engineered for maximum power output and efficiency, often considered the benchmark for electric performance.

Transmission and Gearing: Like the others, a planetary gear system is used. StrikeMaster has always prioritized cutting speed, so their gear ratios are often aggressive, designed to translate the powerhead’s energy into the fastest possible cut. This is a key differentiator; where Jiffy gears for torque, StrikeMaster gears for speed.

Auger and Blade Design: This is where StrikeMaster has truly innovated. They are famous for their Swedish-made “Lazer” blades, which are curved, razor-sharp shaver blades that are incredibly fast and efficient. Their most significant recent development is the “Lite-Flite Lazer” drill. This unit combines a steel hex shaft with molded synthetic flighting, creating an auger bit that is drastically lighter than traditional steel but retains the strength where it’s needed. This Lite-Flite system, paired with their 40V powerhead, creates one of the lightest and fastest high-performance auger packages on the market.

Technical Summary:

  • Philosophy: Unparalleled cutting speed and cutting-edge lightweight technology.
  • Powerplant: High-performance 40V brushless electric system, alongside legacy Solo engines and modern 2-stroke/4-stroke gas options.
  • Drivetrain: Planetary transmission geared for high-speed cutting.
  • Cutting System: Legendary Lazer shaver blades paired with the revolutionary Lite-Flite synthetic/steel hybrid drill.
  • Key Advantage: Cutting speed. A StrikeMaster Lazer auger is arguably the fastest-cutting auger on the ice. The Lite-Flite drill offers a massive weight savings without a significant compromise in durability.
  • Ideal User: The run-and-gun angler, the tournament fisherman, or anyone who values speed and efficiency above all else and is willing to invest in top-tier performance.
Posted on

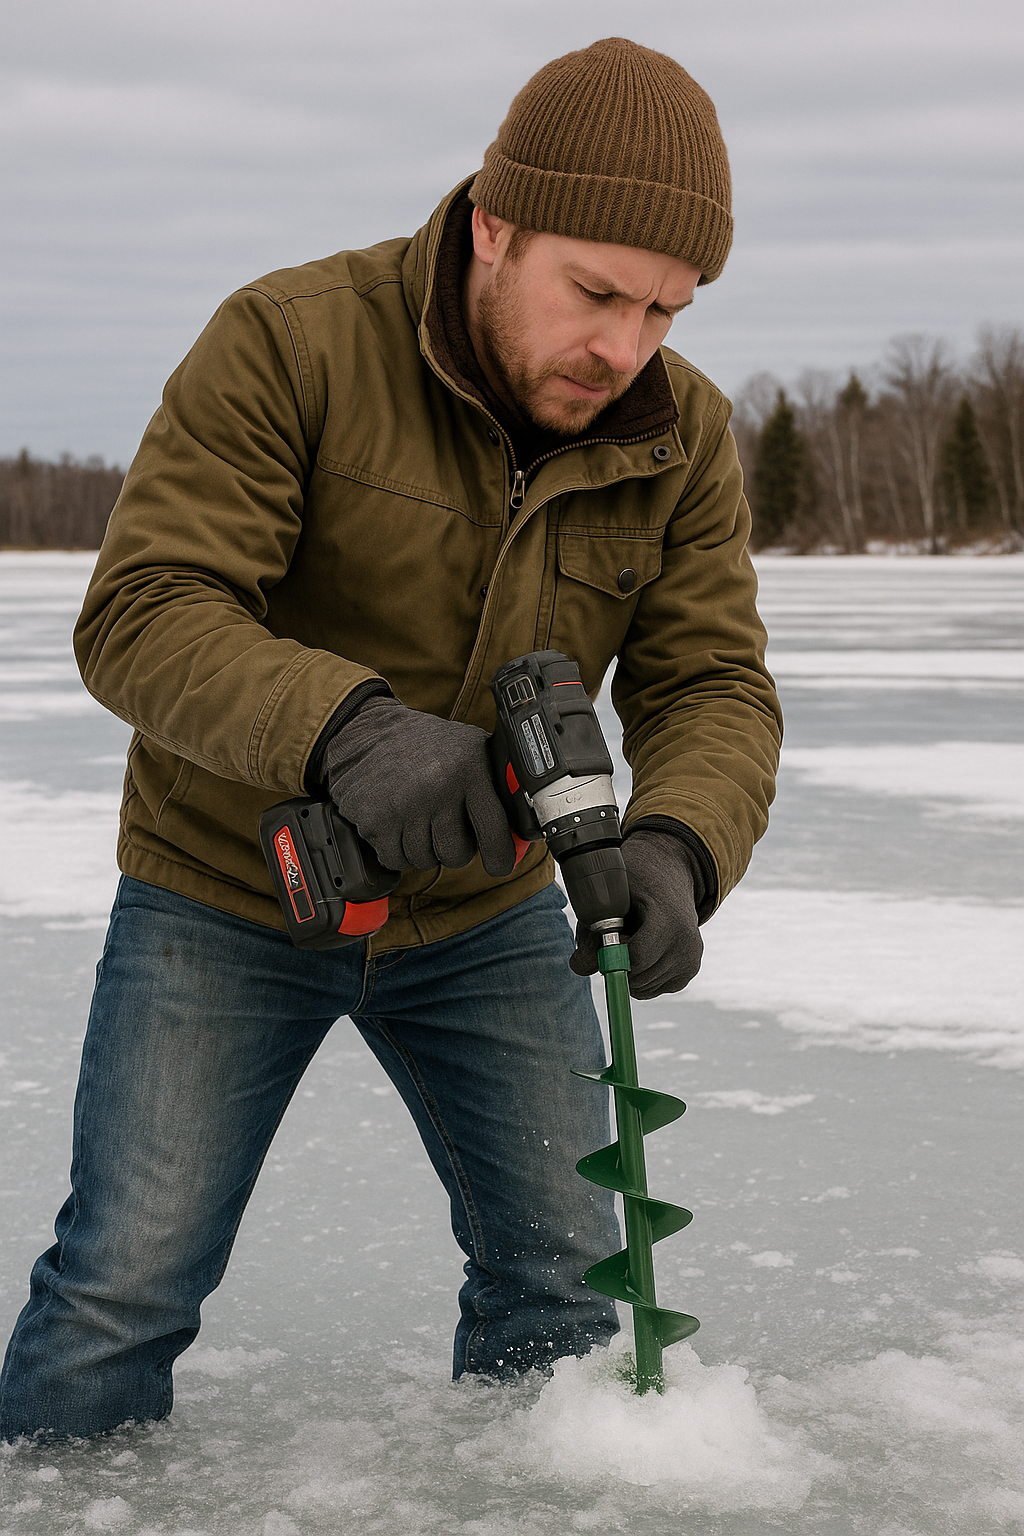
The Power Play on Ice: A Technical Comparison of Electric vs. Gas Ice Augers

For the modern ice angler, the choice of how to cut a hole through the frozen surface is no longer a simple one. The long-reigning dominance of the gas-powered auger is now being seriously challenged by advanced electric models, each offering a distinct set of advantages and operational characteristics. Choosing between them is not merely a matter of preference, but a technical decision based on mechanics, power delivery, and, most critically, the specific ice conditions an angler will face throughout the season. This detailed analysis explores the internal mechanics of both systems and provides a technical guide to selecting the right tool for the job.

The Mechanics of Power: Combustion vs. Current

To understand which auger excels in which condition, one must first appreciate the fundamental differences in how they generate and apply torque.

The Gas-Powered Auger: Unbridled Torque via Internal Combustion

A gas auger is a self-contained internal combustion powerhouse. The majority of models utilize a compact, high-RPM two-stroke engine, though four-stroke models are also available.

  • Engine Mechanics (2-Stroke): A two-stroke engine combines the intake, compression, power, and exhaust strokes into just two piston movements. This design is mechanically simple, lightweight for its power output, and can operate in any orientation without issue—a key advantage when laying an auger on the ice. The engine operates at very high RPMs, often exceeding 8,000 RPM.
  • The Transmission: This high-speed, low-torque output from the engine is unusable for drilling. A planetary gear transmission is employed to convert this energy. This system consists of a central “sun” gear, multiple “planet” gears orbiting it, and an outer “ring” gear. This configuration allows for a significant gear reduction, typically in the range of 40:1 to 100:1. This reduction multiplies torque dramatically, transforming the engine’s high speed into the low-speed (around 100-250 RPM), high-torque force required to turn the cutting blades through solid ice.
  • Power Delivery: The power curve of a gas engine is not linear. It produces its maximum torque and horsepower within a specific high-RPM band. This means it operates most efficiently and powerfully when the throttle is wide open. The power is raw, visceral, and, for the most part, continuous as long as there is fuel in the tank.

The Electric Auger: Instantaneous Torque via Brushless DC Motors

Modern electric augers are a marvel of electrical engineering, centered around high-capacity lithium-ion batteries and advanced brushless DC motors.

  • Battery Technology: The heart of the system is the battery pack, typically rated from 40V to 80V with capacities from 4Ah to 8Ah (Amp-hours). The voltage (V) is analogous to horsepower—it dictates the potential power output. The amp-hours (Ah) are analogous to the size of the fuel tank—it determines the total energy storage and thus, the number of holes that can be drilled on a single charge. Cold weather performance of modern lithium-ion batteries has improved dramatically, but extreme cold can still temporarily reduce their efficiency and output.
  • Brushless DC Motor: Unlike older brushed motors, brushless motors have their windings on the outside and magnets on the spinning rotor. An electronic controller rapidly switches the electric field in the windings, causing the rotor to spin. This design has several key advantages:
    1. Efficiency: No energy is lost to friction from brushes, meaning more battery energy is converted into rotational force.
    2. Durability: No brushes to wear out, leading to a much longer motor lifespan.
    3. Torque Curve: This is the most significant advantage. A brushless DC motor produces 100% of its available torque from 0 RPM. There is no need to “spool up”; the moment the trigger is pulled, the motor delivers maximum twisting force directly to the drivetrain.
  • The Transmission: Like its gas counterpart, an electric auger utilizes a planetary gear transmission to step down the motor’s RPM and multiply the torque to levels required for drilling. The efficiency of the brushless motor allows for a very compact and lightweight gear case.

Performance Under Pressure: Matching the Auger to the Ice

The choice between gas and electric becomes clearest when analyzed through the lens of changing ice conditions throughout a typical season.

Early Ice (4-10 inches)

  • The Ice: Generally clear, consistent, and relatively “soft” as it has not yet undergone repeated freeze-thaw cycles that harden it.
  • Analysis: This is the domain where electric augers shine brightest. The ice is not thick enough to seriously tax the battery reserves, and drilling dozens of holes is easily achievable on a single charge. The instantaneous torque allows for clean, fast starts without the “bogging” a gas engine might experience before it hits its power band. The lighter weight of electric models is a significant advantage for mobility when anglers are constantly on the move, searching for fish. Furthermore, the quiet operation is less likely to disturb spooky fish in the shallow, clear water often found during early ice.
  • Verdict: Electric. The combination of low weight, instant torque for clean hole-starting, and quiet operation makes it the superior tool for early-season conditions.

Mid-Season (12-30+ inches)

  • The Ice: Thick, dense, and often layered with hard, refrozen slush. This is the most demanding condition for any auger.
  • Analysis: This is where the raw, unrelenting power of a gas auger demonstrates its value. When drilling through two feet or more of hard ice, a gas engine, operating at full throttle, provides a continuous, high-torque output that is difficult to match. The key concern for an electric auger here is battery consumption. Each inch of ice requires a specific amount of energy to displace, and drilling through 30 inches will consume three times the battery power as drilling through 10 inches. While a high-end 80V electric auger can certainly handle the task, the number of holes it can cut will be significantly reduced. An angler needing to drill 50 holes in 2.5 feet of ice might exhaust multiple expensive batteries. In contrast, a gas auger user can simply carry a small container of pre-mixed fuel to drill indefinitely. The heavier weight of the gas unit also becomes an advantage, helping to drive the cutting head downward with less operator effort.
  • Verdict: Gas. For maximum drilling capability in the thickest, hardest ice, especially when a high volume of holes is required far from a charging source, the sustained power and limitless “re-fueling” capability of a gas auger give it the edge. High-voltage electric models are highly capable, but come with the logistical challenge of managing battery life.

Late Season (Variable thickness, soft/wet ice)

  • The Ice: Often referred to as “honeycombed” or “rotten” ice. It’s saturated with water, soft, and can be deceptively thick.
  • Analysis: This condition presents a unique challenge: the ice is less dense, but it is “grabby.” The wet, slushy shavings are heavier and stickier, increasing the torque required to clear them from the hole. A major concern here is the auger blades catching and binding, especially when breaking through the bottom. The instant torque of an electric auger can be both a blessing and a curse. If the blades catch, the motor can deliver a powerful, wrist-wrenching jolt. However, modern electrics often have anti-binding electronics that will cut power. A gas auger’s clutch system might slip in this scenario, but the momentum of the heavy engine and auger flighting can often power through these sticky spots.
  • A critical issue for gas augers in these conditions is water. Splashing water from a slushy hole can foul the engine’s air filter or carburetor, leading to stalls and difficult restarts. An electric auger, being a sealed unit, is impervious to this issue.
  • Verdict: Slight edge to Electric. While both are effective, the sealed nature of the electric motor, which is unaffected by splashing water, is a major asset in wet conditions. The ability to re-drill old, slushy holes without fear of stalling an engine is a significant quality-of-life improvement.

Intangibles and Final Considerations

  • Maintenance: Gas engines require fuel mixing, spark plug changes, carburetor adjustments, and winterization. Electric augers are virtually maintenance-free, aside from charging batteries and sharpening blades.
  • Noise and Fumes: Electric augers are quiet and produce no exhaust. This is a massive advantage inside an ice shelter and reduces overall angler fatigue.
  • Transport: Transporting a gas auger can result in fuel leaks and fumes inside a vehicle. Electric augers are clean and can be transported in any orientation.

Conclusion

The modern angler is faced with an excellent choice. The decision is no longer about which is “better,” but which is the optimal tool for a specific application.

  • Choose Electric if your primary focus is on mobility, convenience, and fishing during the early and late seasons. If you typically fish in ice under 20 inches and value a quiet, clean, and maintenance-free experience, a quality electric auger is the superior technical choice.
  • Choose Gas if you are a hard-core angler who consistently faces extreme ice thickness (24+ inches) and requires the ability to drill a very high volume of holes without worrying about power reserves. In the depths of mid-winter, the sustained, brute-force torque and logistical simplicity of carrying extra fuel remain the benchmark for ultimate cold-weather capability.
Posted on

The Pistol Bit Ice Auger

Understanding the Pistol Bit System

At its core, the pistol bit system consists of two primary components: a cordless drill and a pistol bit ice auger.

  • The Cordless Drill: The success of this system hinges on a powerful cordless drill. While many drills can spin a pistol bit, an 18V or 20V brushless drill with a high torque rating (typically 700-1200 inch-pounds or more) is highly recommended. Brushless motors offer better efficiency and power delivery, extending battery life and improving performance in cold conditions. Look for drills with two speed settings; the lower speed provides higher torque for starting holes and drilling through thick ice, while the higher speed can be useful for clearing slush. A drill with a comfortable grip and good balance is also crucial for control and reducing fatigue.
  • The Pistol Bit Ice Auger: These are specialized auger bits designed to be chucked directly into a cordless drill. They typically feature a cutting head (often with replaceable blades), a flighting spiral to evacuate ice chips, and a shaft that fits into the drill’s chuck. Pistol bits are available in various diameters, commonly ranging from 4 inches to 8 inches. Smaller diameters are excellent for quick scouting and panfish, while larger diameters are suitable for targeting bigger game fish or for those who prefer wider holes. Some pistol bits also include a safety plate or disc that prevents the bit from falling down the ice hole if it detaches from the drill.

Choosing the Right Components

1. Drill Power and Battery Life: This is paramount. A drill that struggles to cut through ice will quickly drain batteries and frustrate the user. Invest in a drill with ample power. For battery life, consider using high-amp-hour (Ah) batteries (e.g., 5.0 Ah or higher). It’s always advisable to carry at least two fully charged batteries, especially in cold weather, as battery performance significantly diminishes in low temperatures. Lithium-ion batteries are standard and perform well, but keeping them warm (e.g., in an insulated bag) until use can extend their effective life.

2. Auger Diameter: Your target species and fishing style will dictate the ideal auger diameter.

  • 4-5 inch: Ideal for panfish (perch, bluegill, crappie) and for those who prioritize speed and portability.
  • 6-7 inch: A versatile all-around size, suitable for a wide range of species including walleye, pike, and trout.
  • 8 inch: Best for targeting larger fish or if you frequently fish with larger lures and need more room for landing. However, an 8-inch bit will demand more power from your drill and drain batteries faster.

3. Blade Type: Most pistol bits come with either straight or curved blades.

  • Straight Blades: Often found on older or more basic models. They cut well but can sometimes be more prone to binding in slushy ice.
  • Curved/Chipper Blades: More common on modern pistol bits. These blades are designed to efficiently chip away ice, reducing resistance and making drilling smoother, especially in thick or slushy ice.

4. Safety Features: Look for pistol bits that incorporate a safety plate or float. This crucial feature prevents the auger from falling through the ice if it disconnects from your drill, saving you a costly recovery effort and potential danger. Some augers also have a secure locking mechanism to prevent the drill from detaching unexpectedly.

Preparation Before Heading Out

  • Charge Batteries Fully: This cannot be overstressed. Cold weather drastically reduces battery efficiency.
  • Inspect Blades: Ensure blades are sharp and free of nicks or damage. Dull blades make drilling difficult and can strain your drill. Consider carrying a spare set of blades, especially on longer trips.
  • Check Drill Operation: Make sure your drill is functioning correctly, the chuck is secure, and the clutch settings are appropriate (often the drill’s highest torque setting, or a dedicated drill mode).
  • Pack Essentials:
    • Drill and Batteries: As mentioned, at least two fully charged batteries.
    • Pistol Bit Auger: With sharp blades.
    • Blade Guard: To protect the blades and you during transport.
    • Drill Adapter (if needed): Some augers may require a specific adapter for certain drills.
    • Spud Bar or Ice Chisel: For checking ice thickness before drilling your first hole, especially if you’re on unfamiliar ice. This is a crucial safety item.
    • Ice Scoop: To clear slush from your freshly drilled holes.
    • Insulated Bag/Box: To keep spare batteries warm.
    • Small Tool Kit: For blade changes or minor adjustments.

Step-by-Step Guide to Using a Pistol Bit for Ice Augering

1. Assess Ice Conditions Safely: Before even thinking about drilling, always verify ice thickness. Use a spud bar or ice chisel to chip away at the ice near the shore or in an area you know is safe. Never assume ice is safe based on appearance alone. General guidelines for safe ice thickness are:

  • 4 inches for ice fishing (single person)
  • 5-7 inches for small groups
  • 8-12 inches for snowmobiles or ATVs

2. Attach the Pistol Bit to the Drill:

  • Open the drill’s chuck by twisting it counter-clockwise.
  • Insert the shaft of the pistol bit fully into the chuck. Ensure it’s seated all the way.
  • Tighten the chuck securely by twisting it clockwise until it’s hand-tight. Then, give it an extra turn or two for maximum grip. Some drills have an audible click when fully tightened.
  • Wiggle the auger bit gently to confirm it’s firmly locked in place and won’t wobble.

3. Set the Drill Settings:

  • Speed: Select the low-speed setting on your drill. This provides maximum torque and control, crucial for starting the hole and preventing the bit from binding.
  • Clutch/Mode: If your drill has a clutch, set it to the highest torque setting or the dedicated drill mode (often indicated by a drill bit icon). Avoid using the hammer drill setting for ice augering, as it’s unnecessary and can damage the bit or drill.

4. Starting the Hole:

  • Position the auger bit vertically on the ice where you intend to drill.
  • Apply firm, but not excessive, downward pressure.
  • Begin drilling by slowly pressing the drill’s trigger. Allow the blades to bite into the ice.
  • Once the blades have created a shallow indentation and the auger is stable, you can increase the drill speed gradually.

5. Drilling Through the Ice:

  • Maintain consistent, firm downward pressure. Let the drill and auger do the work. Avoid forcing it, as this can strain the drill, drain batteries faster, and potentially cause the auger to bind.
  • Keep the drill and auger as vertical as possible. Leaning the drill too much can cause the hole to be angled and make it difficult to clear slush.
  • As you drill deeper, ice chips will be expelled up the auger’s flighting. If drilling in very thick ice, you may need to periodically pull the auger up slightly to clear accumulated slush and ice chips. This is especially true for longer augers.

6. Breaking Through the Bottom:

  • As the auger nears the bottom of the ice, you’ll feel a decrease in resistance.
  • Maintain control and be prepared for the auger to punch through.
  • Once through, continue spinning the auger for a moment to clear any remaining ice chips from the hole.

7. Clearing the Hole:

  • Remove the auger from the hole.
  • Use an ice scoop to remove any slush and loose ice from the hole. This ensures a clean fishing hole and prevents your line from snagging on ice shards.

8. Repeating the Process (and Battery Management):

  • If drilling multiple holes, monitor your battery level. Swap out batteries before they are completely depleted to avoid being stranded with a dead drill.
  • Keep spare batteries warm in an insulated bag or inside your coat until needed.

Tips for Optimal Performance and Longevity

  • Keep Blades Sharp: This is the single most important factor for efficient drilling. Dull blades are a huge drain on battery life and your patience. Sharpen or replace blades regularly.
  • Keep Blades Covered: Always use a blade guard when transporting or storing your auger to protect the blades from damage and to prevent accidental cuts.
  • Clean and Dry After Use: After each use, wipe down your auger bit and drill. Allow them to dry thoroughly to prevent rust on the auger and corrosion on the drill.
  • Store Batteries Properly: Store batteries in a cool, dry place. Avoid extreme temperatures.
  • Listen to Your Drill: If your drill sounds like it’s struggling or slowing down significantly, it might be an indication of dull blades, a low battery, or too much downward pressure. Back off and assess the situation.
  • Don’t Force It: If the auger binds, release the trigger, clear any ice buildup around the blades, and try again. Forcing it can damage the drill or the auger.
  • Consider an Extension: If you frequently fish in areas with very thick ice (2 feet or more), a drill extension specifically designed for ice augers can make the process much easier by allowing you to stand more upright and apply pressure more effectively.
  • Lubricate the Chuck (Occasionally): A small amount of silicone grease on the drill chuck jaws can help prevent rust and keep them operating smoothly, especially in wet conditions.
  • Safety First: Always prioritize safety. Never drill near other anglers or structures without checking for hazards. Be aware of your surroundings.

By understanding the components, preparing properly, and following these detailed steps and tips, you can effectively use a pistol bit for ice augering, enjoying the portability and efficiency it brings to your ice fishing adventures. Sources

Posted on

More Than Just a Number: A Comprehensive Guide to Ice Thickness and Quality for Ice Fishing

The frozen surface of a lake on a crisp winter morning is a quintessential Canadian scene, beckoning anglers to a world of quiet solitude and the promise of a catch beneath the ice. But beneath this serene veneer lies a dynamic environment where safety is paramount. For the ice fishing enthusiast, understanding the nuances of ice thickness and, just as importantly, ice quality, is a non-negotiable skill. This guide will provide an in-depth look at how to safely assess ice conditions, ensuring your time on the hard water is both enjoyable and safe.

The Golden Rule: Ice Thickness Guidelines

Before stepping onto any frozen body of water, it’s crucial to know the recommended minimum ice thickness for various activities. These guidelines, supported by government agencies and safety organizations across Canada, are based on clear, new ice.

  • Under 4 inches (10 cm): STAY OFF. This ice is considered unsafe for any activity.
  • 4 inches (10 cm): Suitable for ice fishing on foot.
  • 5 – 7 inches (12 – 18 cm): Can support a snowmobile or an ATV.
  • 8 – 12 inches (20 – 30 cm): Can support a small car or a light-duty truck.
  • 12 – 15 inches (30 – 38 cm): Can support a medium-duty truck (¾-ton).

It is imperative to understand that these are guidelines for ideal conditions. The actual strength of the ice can be significantly affected by a multitude of factors.

Beyond Thickness: Deconstructing Ice Quality

The number on your ice chisel or auger measurement is only half the story. The quality and composition of the ice are equally critical factors in determining its strength. Ice is rarely uniform, and understanding its different forms is key to a proper safety assessment.

Clear (Blue) Ice: This is the strongest and most desirable type of ice. It forms when water freezes directly without any trapped air bubbles or impurities. Its translucent, often blueish appearance is a good indicator of its high density and strength. The thickness guidelines are based on this type of ice.

White (Snow) Ice: Often called “snow ice” or “milky ice,” this type is opaque and white. It forms when snow on the surface of existing ice becomes saturated with water and then refreezes. This process traps air bubbles within the ice, significantly reducing its strength. As a general rule, white ice is considered to be only about half as strong as clear ice. Therefore, you would need at least double the thickness of white ice to support the same weight as clear ice.

Grey Ice: Any ice that appears grey or dark is a sign of deterioration. This coloration often indicates the presence of water within the ice, either from melting or from the ice being saturated by the water below. Grey ice is weak, unsafe, and should be avoided at all costs.

Factors Influencing Ice Integrity

No two bodies of water freeze the same way, and conditions can change rapidly. Always consider the following factors:

  1. Water Body Type: Lakes and ponds tend to freeze more uniformly than rivers or streams. The constant current in moving water bodies creates friction and can result in dangerously thin and unpredictable ice, especially in areas with faster flow.
  2. Water Depth and Size: Shallow water bodies tend to freeze faster than deep ones. Similarly, smaller lakes will freeze over before larger ones.
  3. Snow Cover: A layer of snow can act as an insulator, slowing down the freezing process. A heavy snowfall on thin ice can also push the ice down, causing water to seep up and create a layer of weak, white ice.
  4. Temperature Fluctuations: A consistent period of cold temperatures (well below 0°C) is required to form good, thick ice. A mid-winter thaw, even for a short period, can significantly weaken the ice sheet. This freeze-thaw cycle can create internal fractures and reduce the ice’s overall integrity.
  5. Objects in the Water: Rocks, logs, and bridge pilings absorb heat from the sun and can create thin spots around them. Similarly, areas with decaying vegetation on the lakebed can release gas, which can also thin the ice from below.
  6. Inlets and Outlets: Areas where streams or rivers flow into or out of a lake will have weaker ice due to the moving water. These areas should be given a wide berth.

How to Check Ice Thickness: A Practical Guide

Never assume the ice is safe based on a single observation. Diligent and continuous checking is the hallmark of a safe ice angler.

  1. Start at the Shore: Before you even step on the ice, use an ice chisel (spud bar) to strike the ice near the edge. A solid, ringing sound indicates good quality ice, while a hollow or “thud” sound suggests weaker ice.
  2. Drill Test Holes: The most reliable method is to use an ice auger or drill to create a hole. This allows you to visually inspect the ice layers and get an accurate measurement.
  3. Measure as You Go: Your first test hole should be in shallow water near the shore. As you venture further out, continue to drill holes every 50 to 100 feet to ensure you are aware of any changes in thickness. Ice thickness is rarely uniform across an entire lake.
  4. Use Your Tools: An ice chisel is an invaluable tool for constantly probing the ice in front of you as you walk. A few solid strikes with the chisel can give you a good idea of the ice’s integrity. If the chisel goes through easily, turn back.

Essential Ice Safety Gear

Smart ice anglers never venture out without essential safety equipment. This gear can be life-saving in an emergency.

  • Ice Picks: A set of ice picks worn around your neck is arguably the most crucial piece of safety gear. They provide the grip needed to pull yourself back onto the ice if you fall through.
  • Flotation Suit or PFD: A modern floater suit not only keeps you warm but provides buoyancy if you end up in the water. At a minimum, wear a personal flotation device (PFD) over your winter clothing.
  • Ice Chisel (Spud Bar): As mentioned, this is essential for testing ice as you walk.
  • Rope: A bag containing a rope is invaluable for rescuing someone who has fallen through the ice.
  • Whistle: A whistle can be used to signal for help and is much more effective than shouting.
  • Cell Phone: Keep your phone in a waterproof pouch and fully charged.

In Case of Emergency: What to Do

If You Fall Through:

  1. Stay Calm: Panic will expend precious energy. The initial cold shock will be intense, but it will pass.
  2. Don’t Remove Your Gear: Your winter clothing can trap air and provide some initial buoyancy.
  3. Turn Towards the Direction You Came From: The ice you just walked on is the most likely to be strong enough to support you.
  4. Use Your Ice Picks: Place your hands and arms on the unbroken ice surface and use your ice picks to dig into the ice and pull yourself up.
  5. Kick Your Feet: Use a strong flutter kick to help propel you horizontally onto the ice.
  6. Roll Away: Once you are out of the water, do not stand up. Roll away from the hole to distribute your weight until you are on solid ice.

If You Witness Someone Fall Through:

  1. Do Not Rush In: Your first instinct may be to run to the hole, but this will likely result in you becoming a second victim.
  2. Call for Help: Immediately call 911 or your local emergency number.
  3. Reach, Throw, Don’t Go: Use a rope, a long branch, or even a set of jumper cables to reach the person from a safe distance.

Ice fishing is a cherished winter pastime, but it demands respect for the power and unpredictability of nature. By understanding the science behind ice formation, diligently testing for thickness and quality, and carrying the proper safety gear, you can ensure that your adventures on the hard water are memorable for all the right reasons. Never take ice for granted; your life may depend on it.

Posted on

The Silent Sentinel: Mastering the Art of Ice Fishing with a Tip-Up

For many ice anglers, the tip-up is more than just a fishing device; it’s a symbol of winter’s embrace, a silent sentinel standing guard over a hidden world beneath the ice. While modern electronics and active sonar have their place, the humble tip-up offers a unique blend of simplicity, effectiveness, and the exhilarating thrill of a flag flying high.

At ReelSchematic.com, we appreciate the nuances of every fishing technique, and ice fishing with a tip-up is a true art form. This comprehensive guide will delve into every aspect of tip-up fishing, from choosing the right gear to advanced strategies and the sheer joy of watching that flag spring skyward.

The Enduring Appeal of the Tip-Up

In a world increasingly dominated by screens and high-tech gadgets, why does the tip-up remain a cherished tool for countless ice anglers?

  • Simplicity and Accessibility: Tip-ups are incredibly easy to set up and use, making them perfect for beginners and seasoned pros alike. There’s no complex wiring or battery charging required.
  • Versatility: They excel at fishing with live bait, which is often the most effective presentation for many species through the ice.
  • Wider Coverage: With multiple tip-ups spread across an area (within legal limits), you can cover a much larger swath of water than you could with a single rod and reel, increasing your chances of intercepting cruising fish.
  • Stealth: A tip-up presents a virtually undisturbed bait, making it incredibly effective for wary fish.
  • The “Flag Up!” Moment: Few things in ice fishing compare to the adrenaline rush of seeing that flag trip, signaling a bite and the start of a thrilling battle.
  • Cost-Effective: Tip-ups are generally much more affordable than a full ice fishing rod and reel setup, especially if you plan to fish with multiple lines.

Anatomy of a Tip-Up: Understanding Your Tool

Before diving into techniques, let’s understand the basic components of a typical tip-up:

  1. Base: This typically sits over the ice hole. It can be made of wood, plastic, or metal, and some newer designs incorporate insulated bases to prevent holes from freezing over.
  2. Spool/Reel: A large-diameter spool, usually made of plastic or aluminum, holds the fishing line. Its large size prevents line memory and allows for smooth payout.
  3. Trip Mechanism: This is the heart of the tip-up. It’s a spring-loaded or balanced arm that holds the flag down. When a fish pulls the line, it trips this mechanism, releasing the flag.
  4. Flag: A brightly colored flag (often red or orange) attached to a spring or flexible rod. When the trip mechanism is activated, the flag springs up, signaling a bite.
  5. Strike Indicator/Tension Adjustment: Many tip-ups have a way to adjust the tension required to trip the flag. This is crucial for matching the sensitivity to the target species. Some use a “tee” bar, others have a small metal arm that slides under the spool.
  6. Line Guide/Brake: A mechanism to guide the line off the spool and often provides some resistance to prevent overruns when the fish runs.

Essential Gear for Tip-Up Success

While the tip-up itself is simple, having the right accompanying gear will significantly enhance your experience and success.

  1. Ice Auger: A sharp, reliable auger is paramount.
    • Manual Augers: Affordable and good for thinner ice (under 10-12 inches).
    • Propane/Gas Augers: Powerful and fast, ideal for thick ice and drilling many holes.
    • Electric Augers: Quiet, environmentally friendly, and increasingly powerful, a great choice for all conditions.
    • Hole Size: For tip-ups, an 8-inch hole is usually sufficient for most panfish and medium-sized game fish. For larger fish like lake trout or northern pike, a 10-inch hole is recommended.
  2. Bait Bucket/Container: Keep your live bait (minnows, shiners, suckers, worms) alive and lively. An aerated bucket is ideal for minnows.
  3. Bait Dipper/Scoop: Essential for retrieving minnows from your bait bucket without getting your hands too cold.
  4. Fishing Line (Tip-Up Specific):
    • Dacron/Braided Tip-Up Line: This is the most common choice for the main line on your tip-up spool. It’s durable, has very low stretch, and doesn’t retain memory in cold water. Common strengths range from 20-pound for panfish to 50-pound or even 80-pound for large pike or lake trout.
    • Fluorocarbon Leader: Crucial for presenting your bait effectively. Fluorocarbon is nearly invisible underwater, extremely abrasion-resistant, and has a lower stretch than monofilament. Use 8-10 pound test for walleye, 15-30 pound for pike, and heavier for lake trout.
    • Swivels: A quality barrel swivel or ball-bearing swivel should be used between your main line and leader to prevent line twist, especially when using minnows.
  5. Hooks:
    • Treble Hooks: Popular for pike and larger predators, as they offer a good hook-up ratio. Sizes 6-10 are common for smaller baits, while 2-4 for larger.
    • Single Hooks (Circle or Octopus): Excellent for walleye, perch, and panfish. Circle hooks are particularly good for preventing gut-hooking. Sizes 4-10 for walleye/perch, 10-14 for panfish.
    • Quick-Strike Rigs: Specifically designed for northern pike. These rigs use multiple small treble hooks strategically placed to hook the fish immediately upon striking, reducing the chance of deep hooking.
  6. Weights/Sinkers:
    • Split Shot: Small, easily adjustable weights for fine-tuning presentations.
    • Slip Sinkers (Bullet/Egg): Allow the line to slide freely, which can be beneficial for fish that pick up the bait and run.
    • Sinker Stops: Used above slip sinkers to set the depth.
  7. Ice Skimmer/Ladle: For removing ice slush from your holes, critical for preventing line freeze-up.
  8. Pliers/Forceps: For hook removal, especially from toothy critters. Long-nose pliers are a must for pike.
  9. Measuring Tape/Scale: To adhere to regulations and document your catches.
  10. Tackle Box: To organize all your hooks, weights, swivels, and other small items.
  11. Safety Gear:
    • Ice Picks: Worn around your neck, essential for self-rescue if you break through the ice.
    • Spud Bar: To test ice thickness as you walk.
    • Life Vest/Flotation Suit: Highly recommended, especially in early or late ice conditions.
    • Whistle/Signaling Device: For emergencies.
  12. Warm Clothing & Shelter: Ice fishing is an outdoor activity in cold weather. Layers, insulated boots, gloves, and a portable ice shelter (shanty or hub style) are crucial for comfort and safety.

Setting Up Your Tip-Up: Step-by-Step

Proper tip-up setup is key to effective fishing.

  1. Drill Your Hole: Choose your spot carefully. Consider structure, depth, and potential fish holding areas. Drill a hole large enough for your target species.
  2. Clear the Slush: Use your ice skimmer to completely clear the hole of ice slush. This is vital for smooth line payout.
  3. Attach Main Line to Spool: Securely tie your braided tip-up line to the spool of your tip-up. Wind enough line to fish your desired depth plus a substantial reserve for runs (e.g., 50-100 yards).
  4. Add Leader and Terminal Tackle:
    • Tie your main line to a barrel swivel.
    • To the other end of the swivel, tie your fluorocarbon leader. The leader length can vary, but 2-4 feet is a good starting point.
    • Attach your hook or quick-strike rig to the end of the leader.
    • Add weights as needed. For a single hook, a split shot or two crimped on the leader just above the hook works well. For a slip sinker, thread it onto the leader above the swivel, then add a sinker stop to set your desired depth.
  5. Baiting Your Hook:
    • Minnows: Hook minnows lightly through the back (just behind the dorsal fin, above the lateral line) or through the lips. The goal is to keep them alive and swimming naturally. For a quick-strike rig, position the hooks to cradle the minnow effectively.
    • Shiners/Suckers: Similar to minnows, but often larger hooks are needed.
    • Dead Bait (for Pike/Eels): Often nose-hooked or threaded onto a quick-strike rig.
  6. Setting the Depth:
    • Lower your bait down the hole until your weight hits bottom.
    • Reel up a foot or two to suspend your bait just off the bottom. This is a common and effective starting point.
    • Alternatively, if you’re fishing suspended fish or near the top of the water column, set your bait accordingly using your fish finder.
  7. Setting the Trip Mechanism:
    • Carefully pull a few inches of line off the spool and loop it into the trip mechanism (the part that holds the flag down).
    • Adjust the tension. For aggressive fish like pike, you can set it fairly light. For sensitive biters like walleye or panfish, a lighter tension will ensure the flag trips. Many tip-ups have multiple tension settings.
    • Ensure the spool spins freely when the flag is tripped.

Strategic Deployment and Fishing Techniques

The true art of tip-up fishing lies in strategic deployment and understanding fish behavior.

  1. Spreading Your Spread:
    • Vary Depths: Don’t put all your tip-ups at the same depth. If allowed, spread them across different depths along a contour or structure.
    • Structure is Key: Focus on known fish-holding structures: weed lines, rock piles, drop-offs, humps, points, and transition zones.
    • Fan Out: If you’re fishing a flat, fan your tip-ups out in a wide arc to cover more ground.
    • Cover the Water Column: If you don’t know the fish depth, set one tip-up near the bottom, one mid-column, and one shallower.
  2. Targeting Specific Species:
    • Northern Pike: Aggressive predators. Often found near weed lines, ambush points, or shallow flats. Use larger minnows (suckers, shiners) or dead smelt/suckers on quick-strike rigs. Set baits shallower (2-5 feet off bottom) or mid-column.
    • Walleye: Often found near transition zones, rock humps, or basin edges. Use medium-sized minnows (shiners, fatheads) on single hooks or smaller trebles. Set baits near bottom (6 inches to 2 feet up). Walleye can be sensitive, so a lighter trip setting is often best.
    • Lake Trout: Deep water dwellers in large, clear lakes. Use larger minnows (ciscoes, smelt) or cut bait. Fish them off the bottom or suspended over deep water. Consider heavier line and a sensitive trip.
    • Perch/Crappie/Bluegill: While often caught jigging, tip-ups can be effective, especially for larger specimens. Use small minnows (rosy reds, fatheads) or wax worms/grubs. Use small hooks and the lightest possible tension. Fish near bottom or suspended over deep water.
  3. The Wait and Watch Game:
    • Patience is Virtue: Tip-up fishing is a waiting game. Stay alert, keep your holes clear of ice, and watch your flags.
    • The Run: When a flag goes up, don’t immediately rush to the hole. Observe the spool. Is the line peeling off steadily (a “run”) or stopping and starting?
      • Steady Run: This usually indicates the fish has taken the bait and is moving away. Give it a few more seconds to fully commit and turn the bait.
      • Stop and Go: The fish might be mouthing the bait, circling, or just not fully committed. Let it take more line.
    • Don’t Over-Think It: Resist the urge to yank the line prematurely. Let the fish make its move.
  4. The Hookset and Fight:
    • Approach Quietly: When a flag flies, approach the hole slowly and quietly to avoid spooking the fish.
    • Grab the Line: Gently grasp the main line. You’ll feel the fish’s weight.
    • Set the Hook: When you feel a steady pull or resistance, give a firm, upward sweep of the line to set the hook. This is crucial for tip-up fishing, as you’re pulling by hand.
    • Hand-Lining: This is the unique aspect of tip-up fishing. Carefully pull the line in hand-over-hand, maintaining tension. Allow the fish to take line if it makes a strong run – let it peel off the spool.
    • Managing the Fight: Don’t allow slack. Keep constant pressure on the fish. As it nears the hole, be prepared for a final surge.
    • Landing the Fish: For smaller fish, you can often lift them directly. For larger fish, especially pike, a gaff or large ice scoop can be helpful (check regulations for gaff use). Be prepared for the fish to shake its head when it sees the hole.
  5. Re-Setting and Repeating:
    • Once you land a fish, quickly rebait your hook and re-set the tip-up. Productive holes often yield multiple fish.

Advanced Tip-Up Tactics and Considerations

  1. Hole Maintenance:
    • Frequent Skimming: In very cold weather, your holes will freeze quickly. Skim them often to prevent the line from freezing in the ice.
    • Insulated Hole Covers: Some tip-ups come with or you can buy insulated covers that fit over the hole to reduce freezing. A bucket placed over the hole also works.
  2. Using a Fish Finder with Tip-Ups:
    • While tip-ups are often fished “blind,” a portable fish finder (flasher or LCD unit) is an invaluable tool for finding fish and determining depth before deploying your tip-up.
    • Use your flasher to scan potential holes for fish or structure before setting up. This dramatically increases efficiency.
  3. Light Conditions:
    • Low Light Bites: Dawn and dusk are often peak feeding times for many species, especially walleye and pike. Have your tip-ups set and ready during these windows.
    • Mid-Day Lulls: During bright mid-day, fish can be less active. Consider moving your tip-ups to deeper water or experimenting with different depths and baits.
  4. Wind and Ice:
    • Wind Concerns: Strong winds can blow tip-ups over or cause the line to blow off the spool. Secure your tip-ups by banking snow around the base or using anchor pegs.
    • Ice Conditions: Always be aware of ice conditions. Consult local reports, use a spud bar, and fish with a buddy. Never venture onto unsafe ice.
  5. Deadsticking with a Tip-Up:
    • Sometimes a completely still bait is more effective than a live, active one. Consider using a dead minnow or cut bait, especially for pike or if fish are finicky.
  6. Understanding Regulations:
    • Number of Lines: Know your local regulations regarding the maximum number of lines (tip-ups included) you can fish simultaneously.
    • Size and Bag Limits: Adhere to all size and bag limits for the species you are targeting.
    • Licensing: Ensure you have the proper fishing license.

The Zen of the Flag Up

There’s a unique camaraderie that develops when ice fishing with tip-ups. The shared anticipation, the excited shouts of “FLAG UP!” echoing across the frozen lake, and the communal celebration of a landed fish are part of the timeless appeal.

The tip-up teaches patience, observation, and a deeper connection to the environment. It strips away the complexities and brings ice fishing back to its fundamental roots: presenting a bait and waiting for the subtle dance of a fish taking hold.

So, as winter settles in and the lakes begin to harden, dust off your tip-ups, gather your bait, and embrace the silent sentinel. The next time that flag springs skyward, you’ll not only be battling a fish but also connecting with a rich tradition of ice angling that continues to captivate generations. Happy ice fishing!

Posted on

Ice Fishing Shelters: Your Mobile Fortress on the Frozen Frontier

For the dedicated ice angler, the pursuit of hardwater quarry is a year-round passion. But unlike fair-weather fishing, the harsh realities of winter demand a specialized piece of equipment: the ice fishing shelter. More than just a simple tent, a modern ice fishing shelter is a mobile fortress, offering refuge from biting winds, stinging snow, and frigid temperatures, transforming a potentially miserable outing into a comfortable and productive adventure.

At ReelSchematic.com, we understand that maximizing your time on the ice means being prepared and comfortable. This comprehensive guide will delve deep into the world of ice fishing shelters, exploring their various types, key features, setup and takedown strategies, essential accessories, and crucial safety considerations. Whether you’re a seasoned ice veteran or contemplating your first foray onto the frozen expanse, this article will equip you with the knowledge to choose, use, and maintain the perfect shelter for your needs.

The Evolution of Comfort: Types of Ice Fishing Shelters

Ice fishing shelters have come a long way from the basic canvas windbreaks of yesteryear. Today, anglers have a diverse range of options, each designed to cater to different fishing styles, group sizes, and comfort preferences.

1. Flip-Over Shelters (Sled-Style Shelters)

Description: These are arguably the most popular and versatile type of ice fishing shelter. A flip-over shelter consists of a durable sled base that doubles as a storage and transport vessel, to which a fabric shelter is attached. The shelter typically “flips over” and extends from the sled to create an enclosed space.

Key Features & Advantages:

  • Rapid Deployment: One of their biggest selling points is speed. Many models can be set up in under a minute, making them ideal for run-and-gun tactics or quickly escaping a sudden squall.
  • Portability: The sled base allows for easy pulling across the ice, whether by hand, ATV, snowmobile, or even a vehicle. It also keeps your gear contained and organized.
  • Integrated Seating: Most flip-overs come with comfortable, often swiveling, seats attached to a bench or individual frames, providing built-in seating for one or two anglers.
  • Wind and Cold Protection: The fabric, often insulated, offers excellent protection from the elements.
  • Built-in Floor (Sled Base): The sled base acts as a de facto floor, keeping your feet out of any slush or standing water.
  • Storage: The sled base provides ample storage for augers, rods, tackle, heaters, and other essentials.
  • Variations: Available in one-person, two-person, and even larger models (often called “side-by-sides” or “three-person flip-overs”).

Ideal For: Anglers who prioritize mobility, solo missions, or fishing with one partner. Excellent for chasing active bites or moving frequently between spots.

2. Hub-Style Shelters (Pop-Up Shelters)

Description: Hub shelters are freestanding, tent-like structures that “pop up” into a rigid frame using a system of internal hubs and collapsible poles. They are typically square or octagonal in shape and offer significant interior space.

Key Features & Advantages:

  • Spacious Interior: Their vertical walls and expansive footprint provide generous headroom and floor space, making them ideal for multiple anglers, gear, and even cots for overnight trips.
  • Lightweight for their Size: While they can be bulky when packed, their weight-to-interior-space ratio is excellent, particularly for larger models.
  • Easy Setup (Once Mastered): While not as instantaneous as a flip-over, hub shelters can be set up quickly once you get the hang of extending the hubs.
  • Versatility: Many can be used as general-purpose camping tents in the off-season.
  • Insulated Options: Many models come with fully insulated fabric, providing superior warmth retention.
  • No Integrated Sled: This can be a pro or con. While it means you need a separate sled for transport, it also means you can walk through the shelter directly onto the ice, or place a ground cover for added warmth.

Ideal For: Group fishing, family outings, anglers who prefer a semi-permanent base camp, or those who want maximum space for multiple holes and gear.

3. Cabin/Shanty Style Shelters (Permanent/Semi-Permanent)

Description: These are the most robust and often largest shelters, ranging from DIY wooden structures to purpose-built, heavy-duty fabric or hard-sided units. They are designed for extended stays and maximum comfort.

Key Features & Advantages:

  • Maximum Comfort: Often feature solid floors, multiple windows, doors, and even amenities like stoves, bunks, and power outlets.
  • Durability: Built to withstand harsh winds and heavy snow loads.
  • Security: Many offer lockable doors for peace of mind during overnight stays.
  • Customization: DIY options allow for complete personalization.

Ideal For: Anglers who fish the same lake regularly and prefer a dedicated, comfortable base camp for extended trips. Less practical for frequent moves.

4. Windbreaks/Open-Air Shelters

Description: These are the simplest form of shelter, typically consisting of a fabric screen supported by poles, designed to block wind from one or two sides. They offer minimal protection.

Key Features & Advantages:

  • Extremely Portable: Lightweight and pack down very small.
  • Very Affordable: The most budget-friendly option.
  • Minimalist Protection: Best for mild conditions or as a quick block from a brisk breeze.

Ideal For: Minimalist anglers, fair-weather ice fishing, or as a secondary windbreak on larger setups.

Key Features to Consider When Choosing an Ice Fishing Shelter

Once you’ve decided on the general type of shelter, several critical features will influence your comfort, convenience, and overall satisfaction.

  1. Insulation:
    • Uninsulated: Lighter and less expensive, but offer minimal thermal protection. You’ll rely heavily on your heater.
    • Insulated (Thermal): Feature multiple layers of fabric (often three-layer with a dark inner liner) to trap heat and block cold. This significantly reduces heater fuel consumption and interior condensation. Highly recommended for all but the mildest conditions.
  2. Size and Capacity:
    • Number of Anglers: Shelters are rated for 1-person, 2-person, 3-person, 4-person, and even larger capacities. Be realistic about how many people and how much gear you’ll be bringing. Err on the side of slightly larger if space is a priority.
    • Footprint: Consider the overall dimensions when set up and when packed down. Will it fit in your vehicle or on your sled?
    • Headroom: Taller shelters allow you to stand up and stretch, which can be a huge comfort factor on long days.
  3. Fabric Material:
    • Denier Rating: Indicates the thickness and density of the fabric (e.g., 600D, 900D). Higher denier means greater durability and tear resistance.
    • Ripstop: A weave pattern that prevents small tears from spreading.
    • Color: Darker colors absorb more sunlight (a minor benefit) but can feel more enclosed. Lighter colors can make the interior brighter during the day.
  4. Frame Material:
    • Aluminum: Lightweight and corrosion-resistant, but can be more expensive.
    • Steel: Heavier but often more robust and durable. Prone to rust if not properly maintained.
    • Fiberglass: Common in hub shelters, lightweight and flexible. Can become brittle in extreme cold over time.
  5. Windows:
    • Number and Size: More windows offer better visibility outside.
    • Removable/Velcro: Allows for easy cleaning, replacement, or customization.
    • Blackout Panels: Crucial for sight-fishing (watching fish bite the lure), as they block external light.
  6. Doors and Zippers:
    • Large, Easy-Access Doors: Important for getting in and out with bulky clothing and gear.
    • Heavy-Duty Zippers: The most common point of failure. Look for large, robust, self-repairing zippers with cold-weather pulls.
    • Multiple Doors: Beneficial for larger shelters, allowing easier access for multiple anglers.
  7. Ventilation:
    • Vents: Essential for safe use of heaters (to prevent carbon monoxide buildup) and for managing condensation. Look for adjustable vents that can be opened or closed.
    • Chimney Port: If you plan to use a wood stove, a designated stove jack is a must.
  8. Anchoring System:
    • Ice Anchors/Screws: Used to secure the shelter to the ice, preventing it from blowing away in windy conditions. Look for durable, easy-to-use anchors.
    • Ropes/Guy Lines: Provide additional stability in high winds.
  9. Transportability:
    • Packed Dimensions: How small does it pack down? Will it fit in your vehicle?
    • Weight: Can you comfortably pull it (if a flip-over) or carry it (if a hub)?
    • Sled Durability (Flip-Overs): Look for robust, rotomolded sleds that can withstand impacts.
  10. Seating (Flip-Overs):
    • Type: Bench, individual bucket seats, swiveling seats.
    • Comfort: Padding, back support.
    • Adjustability: Height, position.

Setting Up Your Ice Fishing Shelter: A Step-by-Step Guide

Proper setup is crucial for both comfort and safety. While specific instructions vary by model, here’s a general overview:

Flip-Over Shelters:

  1. Position the Sled: Drag your sled to the desired fishing spot.
  2. Unstrap: Release any straps securing the collapsed tent to the sled.
  3. Flip Over: Grab the frame and “flip” the tent over the sled, extending it into its open position.
  4. Extend Poles (if applicable): Some models have telescoping poles that need to be extended and locked into place for full height and tension.
  5. Anchor Down: Crucial! Use the provided ice anchors to secure the shelter to the ice at the designated points. In windy conditions, use all available anchor points and even additional guy lines.
  6. Cut Holes: Drill your fishing holes inside the shelter.
  7. Set Up Heater and Gear: Position your heater safely, ensuring proper ventilation. Arrange your rods, electronics, and other gear.

Hub-Style Shelters:

  1. Lay Out Flat: Remove the shelter from its bag and lay it flat on the ice.
  2. Extend Roof Hubs: Start by extending the roof hubs (usually the ones at the top/center).
  3. Extend Wall Hubs: Proceed to extend the hubs on each wall, pushing them out until the fabric is taut.
  4. Open Door(s): Open the door(s) to allow air pressure to equalize during setup.
  5. Anchor Down: This is paramount for hub shelters! Secure each skirt corner and any additional anchor points with ice anchors. In high winds, extend all guy lines and anchor them as well. A hub shelter can become a kite very quickly if not properly anchored.
  6. Cut Holes: Drill your holes inside.
  7. Set Up Heater and Gear: Place your heater, ensuring vents are open.

Pro Tip: Always set up your shelter before drilling all your holes, especially in windy conditions. This prevents holes from freezing over and provides immediate refuge.

Taking Down Your Ice Fishing Shelter: Efficiency is Key

Just as important as setup is an efficient and safe takedown, especially when fingers are cold.

Flip-Over Shelters:

  1. Remove Gear: Pack up all your fishing gear, rods, and electronics.
  2. Turn Off Heater: Allow your heater to cool down completely before packing.
  3. Collapse Poles (if applicable): Retract any telescoping poles.
  4. Release Anchors: Unscrew or remove the ice anchors.
  5. Flip Over: Collapse the tent back over the sled.
  6. Secure: Use straps or bungee cords to secure the collapsed tent to the sled for transport.

Hub-Style Shelters:

  1. Remove Gear and Heater: As above, pack gear and allow heater to cool.
  2. Release Anchors: Remove all ice anchors and guy lines.
  3. Collapse Wall Hubs: Starting with the lower wall hubs, push them inward to collapse the frame.
  4. Collapse Roof Hubs: Finally, collapse the roof hubs.
  5. Fold and Bag: Carefully fold the fabric towards the center. Many hub shelters have specific folding patterns to fit back into their carry bags. Take your time to fold neatly to avoid damage and make the next setup easier.
  6. Secure Bag: Zip up the carry bag and prepare for transport.

Essential Ice Fishing Shelter Accessories

To truly transform your shelter into a comfortable and efficient fishing base, consider these accessories:

  • Heater: A portable propane heater (e.g., Mr. Heater Buddy) is a must for warmth. Always use with proper ventilation.
  • Carbon Monoxide Detector: Non-negotiable safety item when using a heater in an enclosed space.
  • LED Lighting: Battery-powered LED strips, puck lights, or lanterns provide excellent illumination without the heat of propane lights.
  • Shelter Mat/Rug: A piece of carpet or an insulated mat can make a huge difference in keeping your feet warm and dry, especially in hub shelters.
  • Hole Sleeves/Covers: Prevent holes from freezing over, especially in colder temperatures or overnight.
  • Rod Holders: Attach to the shelter frame for convenient storage and hands-free fishing.
  • Gear Organizers: Netting, pockets, or hanging bags help keep tackle, tools, and other small items organized and off the floor.
  • Sled/Pulk: If you have a hub shelter, a dedicated utility sled makes transporting gear much easier.
  • Auger Caddy/Holder: Keeps your auger secure and prevents it from damaging the shelter fabric or other gear.
  • Propane Tank Insulator: Helps keep propane tanks warm in extreme cold, preventing them from “bottling out” (losing pressure).
  • Repair Kit: Duct tape, seam sealer, and fabric patches are invaluable for quick repairs on the ice.

Safety First: Non-Negotiables for Shelter Use

Your ice fishing shelter can be a lifesaver, but only if used safely.

  1. Ventilation, Ventilation, Ventilation: When using any combustion heater (propane, catalytic, wood stove), ensure adequate ventilation to prevent carbon monoxide buildup. Keep vents open, and crack a window or door slightly.
  2. Carbon Monoxide Detector: Always, always, always use a battery-operated carbon monoxide detector inside your shelter when running a heater. Test it before each trip.
  3. Fire Safety: Keep heaters away from flammable materials (fabric, clothing). Never leave a lit heater unattended for extended periods. Have a small fire extinguisher if possible.
  4. Ice Conditions: A shelter offers no protection from thin ice. Always check ice thickness and conditions before venturing out. Never set up a shelter on questionable ice.
  5. Anchoring: Always anchor your shelter down, even on calm days. Sudden wind gusts can turn an unanchored shelter into a dangerous projectile.
  6. Auger Safety: Be mindful of your auger blades, especially when maneuvering it inside the shelter. Use a blade cover.
  7. Lighting: Ensure you have adequate lighting inside, especially for night fishing, to prevent trips and falls.
  8. Buddy System: Whenever possible, ice fish with a partner, especially when using shelters.

The ReelSchematic.com Perspective

At ReelSchematic.com, we advocate for intelligent investment in your angling gear. An ice fishing shelter is not just an expense; it’s an investment in comfort, safety, and ultimately, your ability to spend more time on the ice, catching more fish. Understanding the nuances of different shelter types, their features, and proper usage will empower you to make an informed decision that enhances your hardwater adventures for years to come.

Take the time to research, read reviews, and consider your typical fishing style and local conditions. A well-chosen and properly maintained ice fishing shelter will become your cherished mobile sanctuary, allowing you to brave the elements and embrace the unique challenges and rewards of ice fishing. Happy hardwater fishing!

Posted on

The Ice Angler’s Essential Tool: A Comprehensive Guide to Ice Fishing Augers

For the passionate ice angler, the frozen expanse of a winter lake represents a world of opportunity, hidden beneath a solid, often intimidating, crust. To unlock this world and access the finned inhabitants below, one tool stands as absolutely indispensable: the ice auger. More than just a drill, an ice auger is the key to mobility, efficiency, and ultimately, success on the hard water.

At ReelSchematic.com, we understand that selecting the right gear is paramount. This detailed guide will delve into the intricate world of ice fishing augers, exploring their various types, key features, maintenance essentials, and advanced tips to ensure you’re punching holes with precision and power all season long.

The Fundamental Purpose: Why an Auger is Crucial

An ice auger’s primary function is simple: to create a hole in the ice, allowing anglers to drop lines, deploy transducers, and eventually, land fish. However, its importance extends far beyond this basic utility:

  • Access to Fish: Without a hole, there’s no fishing.
  • Mobility: Being able to quickly and efficiently cut new holes allows anglers to move, follow fish, and adapt to changing conditions.
  • Safety: A properly cut hole provides a clear opening for landing fish and can be crucial for accessing safety equipment in an emergency.
  • Efficiency: A good auger saves time and effort, maximizing your fishing time.

Types of Ice Fishing Augers: A Spectrum of Power and Convenience

Ice fishing augers have evolved significantly, moving from simple hand tools to sophisticated powerhouses. Understanding the distinct types is the first step in choosing the right one for your needs.

1. Hand Augers: The Traditional Workhorse

The simplest and most affordable option, hand augers rely solely on human power. They consist of a handle, a shaft, and a cutting head with blades.

Pros:

  • Affordable: The most budget-friendly option.
  • Lightweight and Portable: Easy to carry, making them ideal for walk-on anglers, minimalists, or those fishing in remote areas.
  • Reliable: No fuel, no batteries, no mechanical failures. They work every time, as long as you provide the muscle.
  • Quiet: Stealthy operation, which can be an advantage in shallow water or for easily spooked fish.
  • Low Maintenance: Little more than blade sharpening/replacement is needed.

Cons:

  • Labor-Intensive: Requires significant physical effort, especially in thick ice (over 12-18 inches).
  • Slower: Drilling multiple holes can be exhausting and time-consuming.
  • Limited Hole Size: Typically available in smaller diameters (4-8 inches) for easier drilling.

Ideal For: New ice anglers, those on a strict budget, early-season ice (under 12 inches), small fish targeting (panfish, trout), and anglers who prefer minimal gear.

2. Gas Augers: The Powerhouse of the Past (Still Relevant)

Gas-powered augers introduced significant power and speed to ice drilling. They utilize a small internal combustion engine to drive the auger bit.

Pros:

  • Fast and Powerful: Cut through thick ice with ease and speed.
  • Effortless Drilling: Minimal physical exertion required for drilling.
  • Reliable in Cold: Generally perform well in extreme cold, as long as fuel is properly stabilized and the engine is maintained.
  • Range of Hole Sizes: Easily handle larger hole diameters (8-10 inches), necessary for larger fish species or two-line setups.

Cons:

  • Noisy: The engine noise can be disruptive and potentially spook fish.
  • Smelly: Exhaust fumes are unpleasant and can linger.
  • Heavy and Bulky: Less portable than hand or electric augers, requiring more effort for transport.
  • Maintenance: Require fuel mixing, spark plug changes, oil changes, and winterization.
  • Fuel Requirements: Need gasoline (often mixed with oil) and careful storage.
  • Starting Issues: Can be finicky to start in extreme cold or after prolonged storage.

Ideal For: Anglers targeting large fish (pike, lake trout), those who need to drill many holes quickly, guiding operations, and areas with consistently thick ice.

3. Electric Augers: The Modern Revolution

Electric augers have rapidly gained popularity and are arguably the most versatile and convenient option available today. They are powered by rechargeable lithium-ion batteries.

Pros:

  • Quiet and Clean: No noise or fumes, offering a pleasant fishing experience and stealth on the ice.
  • Fast and Efficient: Modern electric augers rival gas augers in drilling speed and power, especially with good batteries.
  • Lightweight (Generally): Lighter than gas augers, making them easier to transport.
  • Easy Starting: Push-button start every time, no pull cords or priming.
  • Low Maintenance: No fuel, oil, or spark plugs. Just charge and go.
  • Environmentally Friendly: No emissions.

Cons:

  • Battery Life: Dependent on battery capacity and ice thickness. Can run out of juice if not properly charged or if drilling excessive holes.
  • Battery Performance in Extreme Cold: While improving, battery performance can degrade in very frigid temperatures. Keeping batteries warm is crucial.
  • Initial Cost: Generally more expensive than hand augers, and often comparable to or slightly more than gas augers.
  • Charging Infrastructure: Requires access to power for charging batteries.

Ideal For: Almost all ice anglers! Especially those who value quiet operation, convenience, ease of use, and who drill a moderate to large number of holes. Excellent for anglers targeting a wide range of species.

4. Drill-Powered Augers: The Hybrid Solution

These systems utilize a standard cordless electric drill (often 18V or 20V lithium-ion) paired with a specialized auger bit and an adapter.

Pros:

  • Extremely Lightweight: Often the lightest power auger option, as the drill itself is easily detached and carried.
  • Versatile: Your cordless drill can be used for other tasks.
  • Affordable (If you own a drill): If you already have a powerful cordless drill, the adapter and auger bit are relatively inexpensive.
  • Quiet and Clean: Similar to dedicated electric augers.

Cons:

  • Drill Limitations: Not all drills are powerful enough. You need a high-torque, brushless drill with a large battery (often 6.0 Ah or more). Standard consumer drills may overheat or struggle in thick ice.
  • Battery Life: Dependent on the drill’s battery system, and can be less efficient than dedicated electric augers.
  • Ergonomics: Holding a drill can be less comfortable than a purpose-built auger handle, especially for multiple holes.
  • Chuck Slippage: The auger bit can sometimes slip in the drill chuck if not properly tightened.

Ideal For: Anglers who already own a powerful cordless drill, budget-conscious anglers who want power without the full investment of a dedicated electric auger, or minimalist anglers who want a multi-use tool.

Key Features to Consider When Choosing an Auger

Beyond the basic type, several features contribute to an auger’s performance and user experience.

  1. Hole Diameter:
    • 4-6 inches: Ideal for panfish (perch, crappie, bluegill), trout, and quick hole-hopping. Easier to drill.
    • 7-8 inches: The most versatile size, good for panfish, walleye, pike, and allows for transducer deployment. A good all-around choice.
    • 9-10+ inches: Necessary for larger species (lake trout, muskies), two-line fishing (where legal), or if you frequently run larger Vexilar/Humminbird ice transducer floats. Much harder to drill by hand.
  2. Blade Type:
    • Straight Blades (Chipper Blades): Common on older augers and some cheaper hand augers. They “chip” away at the ice. Durable and less prone to damage from dirt, but slower.
    • Curved/Shaved Blades: Found on most modern augers. They “shave” the ice, resulting in faster and smoother cuts. More susceptible to damage from hitting sand or rocks, requiring careful handling.
    • Serrated Blades: Offer a very aggressive cut and are excellent for dirty or layered ice.
  3. Blade Material and Durability:
    • High-quality stainless steel or hardened steel blades are essential for sharpness and longevity.
    • Look for models with easily replaceable blades.
  4. Weight and Portability:
    • Consider how far you’ll be walking and whether you’ll be carrying other gear.
    • Gas augers are heaviest, followed by dedicated electrics, then drill augers, and finally hand augers.
  5. Extension Capabilities:
    • If you frequently fish on very thick ice (over 2-3 feet), an auger with an extension option is invaluable. This prevents you from having to kneel or struggle to reach the ice.
  6. Handle Design (Hand Augers):
    • Ergonomic handles reduce fatigue. Offset handles often provide better leverage.
  7. Reverse Function (Power Augers):
    • Many electric and some gas augers have a reverse function. This is incredibly useful for clearing slush out of the hole before lifting the auger, preventing ice “splashes” and making hole clearing much easier.
  8. Battery System (Electric Augers):
    • Voltage and Amp-Hours (Ah): Higher voltage (e.g., 40V, 80V) generally means more power. Higher Ah (e.g., 4Ah, 6Ah, 9Ah) means longer run time. A spare battery is always recommended.
    • Battery Protection: Look for battery systems designed to perform in cold weather and with built-in protection against over-discharge or overheating.
    • Charger Speed: A fast charger is a huge convenience.
  9. Build Quality:
    • Look for robust materials and solid construction. Components like the shaft, handle, and motor housing should feel sturdy.

Maintenance: Keeping Your Auger Ready for the Ice

Proper maintenance is critical for extending the life of your auger and ensuring it performs flawlessly when you need it most.

All Augers:

  • Blade Care:
    • Clean Blades: After each use, wipe down blades to remove water and prevent rust.
    • Blade Protectors: ALWAYS use a blade protector when transporting or storing your auger. This prevents damage to the blades and protects you from their sharpness.
    • Sharpening/Replacement: Dull blades are inefficient and dangerous. Replace or professionally sharpen blades as soon as they show signs of wear (difficulty cutting, chipping, dullness). Some anglers carry a spare set of blades.
  • Inspection: Regularly inspect the shaft, handle, and all fasteners for any signs of damage, wear, or looseness.
  • Storage: Store your auger in a clean, dry place, preferably upright to prevent moisture accumulation in the cutting head.

Gas Augers (Additional):

  • Fuel Management:
    • Use fresh, high-quality gasoline mixed with the correct ratio of 2-stroke oil.
    • Add a fuel stabilizer (e.g., Sta-Bil) to prevent fuel degradation and starting issues, especially for long-term storage.
    • Drain the fuel tank or run the carburetor dry before long-term storage (e.g., off-season).
  • Spark Plug: Check and clean/replace the spark plug as per manufacturer recommendations.
  • Air Filter: Clean or replace the air filter regularly.
  • Winterization: Follow the manufacturer’s instructions for off-season storage, which usually involves fuel drainage, cylinder lubrication, and general cleaning.

Electric Augers (Additional):

  • Battery Care:
    • Store Charged: Store batteries with a partial or full charge (check manufacturer recommendations). Avoid storing completely drained batteries.
    • Keep Warm: In extreme cold, keep spare batteries in a warm place (e.g., inside your jacket, insulated cooler) until ready to use.
    • Charge Appropriately: Use only the charger designed for your battery. Avoid overcharging or deep discharging.
  • Connectors: Keep battery terminals and charger contacts clean and dry.

Advanced Tips for Auger Use

  • Angle of Attack (Hand Augers): Experiment with the angle you apply downward pressure. Often, a slight forward lean can help the blades “bite” more effectively.
  • Clear the Hole: For power augers with a reverse function, use it to clear slush before lifting the auger out of the hole. This keeps your hands and clothes cleaner and prevents ice build-up on the auger shaft.
  • Start Clean: Try to start your hole on clean ice, away from slush or refrozen chunks, which can damage blades.
  • Safety First:
    • Always use a blade protector.
    • Keep hands and feet clear of the blades.
    • Wear appropriate footwear for traction on ice.
    • Be aware of your surroundings, especially with power augers, to avoid hitting other anglers or gear.
    • Never use an auger (especially gas) inside an ice shanty without proper ventilation. Carbon monoxide is a serious hazard.
  • Practice Makes Perfect: If you’re new to a type of auger, practice drilling a few holes near shore to get a feel for its operation before venturing far out.
  • Know Your Ice: Always check ice thickness before drilling. No auger can protect you from unsafe ice.

Conclusion

The ice fishing auger is more than just a tool; it’s an investment in your winter angling success. Whether you opt for the simplicity of a hand auger, the raw power of a gas model, or the modern convenience of an electric or drill-powered system, choosing the right auger and maintaining it diligently will ensure you’re always ready to punch through the ice and get down to where the fish are.

At ReelSchematic.com, we encourage you to research, compare, and select the auger that best fits your fishing style, the conditions you face, and your personal preferences. With the right auger in hand, the frozen landscape transforms from an impenetrable barrier into your personal fishing playground. So, get ready to drill, drop a line, and enjoy the thrill of ice fishing!