- The Angler’s Sanctuary: A Comprehensive Guide to Choosing the Perfect Ice Fishing Shelter
- The Cutting Edge: A Technical Head-to-Head of Ice Auger Titans
- The Power Play on Ice: A Technical Comparison of Electric vs. Gas Ice Augers
- The Pistol Bit Ice Auger
- More Than Just a Number: A Comprehensive Guide to Ice Thickness and Quality for Ice Fishing
- The Silent Sentinel: Mastering the Art of Ice Fishing with a Tip-Up
- Ice Fishing Shelters: Your Mobile Fortress on the Frozen Frontier
- The Ice Angler’s Essential Tool: A Comprehensive Guide to Ice Fishing Augers
Understanding the Pistol Bit System
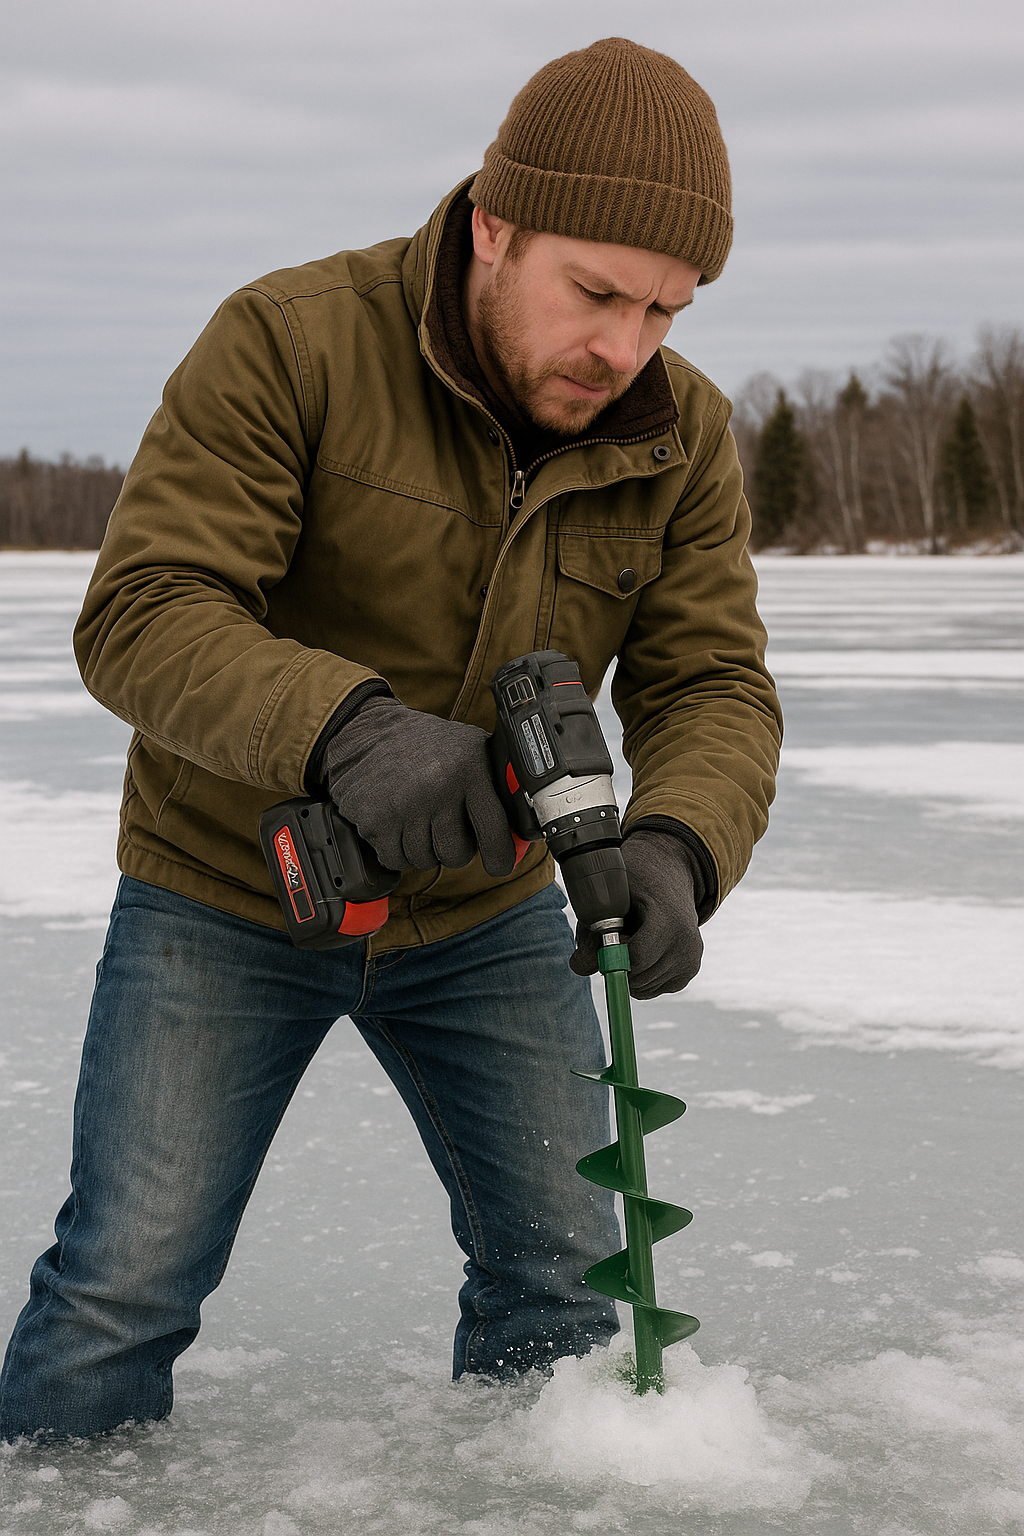
At its core, the pistol bit system consists of two primary components: a cordless drill and a pistol bit ice auger.
- The Cordless Drill: The success of this system hinges on a powerful cordless drill. While many drills can spin a pistol bit, an 18V or 20V brushless drill with a high torque rating (typically 700-1200 inch-pounds or more) is highly recommended. Brushless motors offer better efficiency and power delivery, extending battery life and improving performance in cold conditions. Look for drills with two speed settings; the lower speed provides higher torque for starting holes and drilling through thick ice, while the higher speed can be useful for clearing slush. A drill with a comfortable grip and good balance is also crucial for control and reducing fatigue.
- The Pistol Bit Ice Auger: These are specialized auger bits designed to be chucked directly into a cordless drill. They typically feature a cutting head (often with replaceable blades), a flighting spiral to evacuate ice chips, and a shaft that fits into the drill’s chuck. Pistol bits are available in various diameters, commonly ranging from 4 inches to 8 inches. Smaller diameters are excellent for quick scouting and panfish, while larger diameters are suitable for targeting bigger game fish or for those who prefer wider holes. Some pistol bits also include a safety plate or disc that prevents the bit from falling down the ice hole if it detaches from the drill.
Choosing the Right Components
1. Drill Power and Battery Life: This is paramount. A drill that struggles to cut through ice will quickly drain batteries and frustrate the user. Invest in a drill with ample power. For battery life, consider using high-amp-hour (Ah) batteries (e.g., 5.0 Ah or higher). It’s always advisable to carry at least two fully charged batteries, especially in cold weather, as battery performance significantly diminishes in low temperatures. Lithium-ion batteries are standard and perform well, but keeping them warm (e.g., in an insulated bag) until use can extend their effective life.
2. Auger Diameter: Your target species and fishing style will dictate the ideal auger diameter.
- 4-5 inch: Ideal for panfish (perch, bluegill, crappie) and for those who prioritize speed and portability.
- 6-7 inch: A versatile all-around size, suitable for a wide range of species including walleye, pike, and trout.
- 8 inch: Best for targeting larger fish or if you frequently fish with larger lures and need more room for landing. However, an 8-inch bit will demand more power from your drill and drain batteries faster.
3. Blade Type: Most pistol bits come with either straight or curved blades.
- Straight Blades: Often found on older or more basic models. They cut well but can sometimes be more prone to binding in slushy ice.
- Curved/Chipper Blades: More common on modern pistol bits. These blades are designed to efficiently chip away ice, reducing resistance and making drilling smoother, especially in thick or slushy ice.
4. Safety Features: Look for pistol bits that incorporate a safety plate or float. This crucial feature prevents the auger from falling through the ice if it disconnects from your drill, saving you a costly recovery effort and potential danger. Some augers also have a secure locking mechanism to prevent the drill from detaching unexpectedly.
Preparation Before Heading Out
- Charge Batteries Fully: This cannot be overstressed. Cold weather drastically reduces battery efficiency.
- Inspect Blades: Ensure blades are sharp and free of nicks or damage. Dull blades make drilling difficult and can strain your drill. Consider carrying a spare set of blades, especially on longer trips.
- Check Drill Operation: Make sure your drill is functioning correctly, the chuck is secure, and the clutch settings are appropriate (often the drill’s highest torque setting, or a dedicated drill mode).
- Pack Essentials:
- Drill and Batteries: As mentioned, at least two fully charged batteries.
- Pistol Bit Auger: With sharp blades.
- Blade Guard: To protect the blades and you during transport.
- Drill Adapter (if needed): Some augers may require a specific adapter for certain drills.
- Spud Bar or Ice Chisel: For checking ice thickness before drilling your first hole, especially if you’re on unfamiliar ice. This is a crucial safety item.
- Ice Scoop: To clear slush from your freshly drilled holes.
- Insulated Bag/Box: To keep spare batteries warm.
- Small Tool Kit: For blade changes or minor adjustments.
Step-by-Step Guide to Using a Pistol Bit for Ice Augering
1. Assess Ice Conditions Safely: Before even thinking about drilling, always verify ice thickness. Use a spud bar or ice chisel to chip away at the ice near the shore or in an area you know is safe. Never assume ice is safe based on appearance alone. General guidelines for safe ice thickness are:
- 4 inches for ice fishing (single person)
- 5-7 inches for small groups
- 8-12 inches for snowmobiles or ATVs
2. Attach the Pistol Bit to the Drill:
- Open the drill’s chuck by twisting it counter-clockwise.
- Insert the shaft of the pistol bit fully into the chuck. Ensure it’s seated all the way.
- Tighten the chuck securely by twisting it clockwise until it’s hand-tight. Then, give it an extra turn or two for maximum grip. Some drills have an audible click when fully tightened.
- Wiggle the auger bit gently to confirm it’s firmly locked in place and won’t wobble.
3. Set the Drill Settings:
- Speed: Select the low-speed setting on your drill. This provides maximum torque and control, crucial for starting the hole and preventing the bit from binding.
- Clutch/Mode: If your drill has a clutch, set it to the highest torque setting or the dedicated drill mode (often indicated by a drill bit icon). Avoid using the hammer drill setting for ice augering, as it’s unnecessary and can damage the bit or drill.
4. Starting the Hole:
- Position the auger bit vertically on the ice where you intend to drill.
- Apply firm, but not excessive, downward pressure.
- Begin drilling by slowly pressing the drill’s trigger. Allow the blades to bite into the ice.
- Once the blades have created a shallow indentation and the auger is stable, you can increase the drill speed gradually.
5. Drilling Through the Ice:
- Maintain consistent, firm downward pressure. Let the drill and auger do the work. Avoid forcing it, as this can strain the drill, drain batteries faster, and potentially cause the auger to bind.
- Keep the drill and auger as vertical as possible. Leaning the drill too much can cause the hole to be angled and make it difficult to clear slush.
- As you drill deeper, ice chips will be expelled up the auger’s flighting. If drilling in very thick ice, you may need to periodically pull the auger up slightly to clear accumulated slush and ice chips. This is especially true for longer augers.
6. Breaking Through the Bottom:
- As the auger nears the bottom of the ice, you’ll feel a decrease in resistance.
- Maintain control and be prepared for the auger to punch through.
- Once through, continue spinning the auger for a moment to clear any remaining ice chips from the hole.
7. Clearing the Hole:
- Remove the auger from the hole.
- Use an ice scoop to remove any slush and loose ice from the hole. This ensures a clean fishing hole and prevents your line from snagging on ice shards.
8. Repeating the Process (and Battery Management):
- If drilling multiple holes, monitor your battery level. Swap out batteries before they are completely depleted to avoid being stranded with a dead drill.
- Keep spare batteries warm in an insulated bag or inside your coat until needed.
Tips for Optimal Performance and Longevity
- Keep Blades Sharp: This is the single most important factor for efficient drilling. Dull blades are a huge drain on battery life and your patience. Sharpen or replace blades regularly.
- Keep Blades Covered: Always use a blade guard when transporting or storing your auger to protect the blades from damage and to prevent accidental cuts.
- Clean and Dry After Use: After each use, wipe down your auger bit and drill. Allow them to dry thoroughly to prevent rust on the auger and corrosion on the drill.
- Store Batteries Properly: Store batteries in a cool, dry place. Avoid extreme temperatures.
- Listen to Your Drill: If your drill sounds like it’s struggling or slowing down significantly, it might be an indication of dull blades, a low battery, or too much downward pressure. Back off and assess the situation.
- Don’t Force It: If the auger binds, release the trigger, clear any ice buildup around the blades, and try again. Forcing it can damage the drill or the auger.
- Consider an Extension: If you frequently fish in areas with very thick ice (2 feet or more), a drill extension specifically designed for ice augers can make the process much easier by allowing you to stand more upright and apply pressure more effectively.
- Lubricate the Chuck (Occasionally): A small amount of silicone grease on the drill chuck jaws can help prevent rust and keep them operating smoothly, especially in wet conditions.
- Safety First: Always prioritize safety. Never drill near other anglers or structures without checking for hazards. Be aware of your surroundings.
By understanding the components, preparing properly, and following these detailed steps and tips, you can effectively use a pistol bit for ice augering, enjoying the portability and efficiency it brings to your ice fishing adventures. Sources