Posted on

To Grease or Not to Grease: The Ultimate Guide to Carbon Drag Washers

For any angler who has felt the raw power of a big fish peeling line from their reel, the drag system is no small matter. It’s the critical component that stands between landing a trophy and the heartbreaking ping of a snapped line. At the heart of modern, high-performance drag systems are carbon fiber drag washers. Their ability to dissipate heat and provide smooth, consistent pressure has made them the standard for everything from light inshore spinning reels to heavy-duty offshore conventional reels.

But among discerning anglers and reel tinkerers, a debate has raged for years: should you grease your carbon drag washers? This detailed guide will explore that very question, delving into the pros and cons, and taking a close look at two of the most popular and effective drag greases on the market: the venerable Cal’s Universal Reel and Drag Grease and the innovative Deuthlon Power Drag Grease.

The Great Debate: To Grease or Not to Grease?

Originally, many high-end reels with carbon drag washers were run dry. The theory was that this provided the maximum possible drag pressure. However, the reality is a bit more nuanced.

The Case for a Dry Drag:

Running your carbon drag washers dry can, in some instances, yield a slightly higher maximum drag pressure. For anglers who need to lock down their drag for every last ounce of stopping power, this might seem appealing. However, this approach comes with significant drawbacks. A dry drag system is more susceptible to “start-up inertia,” that initial hesitation or jerkiness when a fish first makes a powerful run. This inconsistent pressure can lead to pulled hooks or broken lines, especially with lighter tackle. Furthermore, dry carbon washers are more prone to absorbing water and debris, which can cause the drag to stick, become erratic, and lead to premature wear of the washers and surrounding metal components.

The Overwhelming Case for a Greased Drag:

The vast majority of experienced reel mechanics and seasoned anglers advocate for greasing carbon drag washers. A light, even application of a quality drag grease offers a multitude of benefits:

  • Ultra-Smooth Performance: Greasing your drag washers virtually eliminates start-up inertia. The line flows off the spool with a consistent, buttery-smooth pressure, protecting your line and knots from the sudden shock of a surging fish.
  • Water and Debris Repellency: A quality drag grease creates a protective barrier, preventing water, salt, and grime from impregnating the carbon washers. This is especially crucial for saltwater anglers, as it helps to prevent corrosion of the metal drag plates that sandwich the carbon washers.
  • Increased Longevity: By reducing friction and preventing contamination, greasing your drag washers significantly extends their lifespan and the life of the entire drag stack.
  • A More Usable and Consistent Drag Range: A greased drag system provides a much more predictable and adjustable range of drag pressures.

The Verdict: For the overwhelming majority of fishing applications, the benefits of greasing your carbon drag washers far outweigh the minimal, often imperceptible, loss in maximum drag pressure. The smoothness, protection, and longevity it provides are invaluable.

The Gold Standard: Cal’s Universal Reel and Drag Grease

For years, Cal’s Universal Reel and Drag Grease has been the go-to choice for anglers and reel technicians worldwide. It’s a Teflon-based grease that has built a reputation for its exceptional performance and reliability.

Key Features of Cal’s Drag Grease:

  • Proven Smoothness: Cal’s is renowned for its ability to create an incredibly smooth and consistent drag with zero start-up inertia.
  • Excellent Heat Resistance: During a long, hard fight, drag systems can generate significant heat. Cal’s grease is formulated to maintain its consistency and performance even under high temperatures.
  • Corrosion Protection: It provides a robust barrier against saltwater and corrosion, protecting the internal components of your reel.
  • Versatility: As the name suggests, Cal’s is a universal grease that can be used on drag washers, gears, and other moving parts of your reel.

How to Apply Cal’s Drag Grease:

The key to a successful application is to use a very light touch. A common mistake is to over-grease the washers.

  1. Start with clean and dry carbon drag washers. If you are replacing old washers, ensure all old grease and debris are removed from the drag stack in your spool.
  2. Apply a small amount of Cal’s grease to your fingertip or a small brush.
  3. Work a very thin, even layer into the weave of the carbon washer, ensuring it is fully coated.
  4. Wipe off any excess grease. The washer should have a sheen, but not be goopy or overloaded with grease. A good rule of thumb is that you should be able to see the weave of the carbon through the grease.
  5. Reassemble your drag stack.

For most anglers, from freshwater enthusiasts to the dedicated saltwater crowd, Cal’s Drag Grease is the perfect choice for achieving a smooth, reliable, and long-lasting drag system.

The High-Performance Challenger: Deuthlon Power Drag Grease

While Cal’s has long been the champion, a newer contender, Deuthlon Power Drag Grease, has been making waves with its claims of not only providing a smooth drag but also significantly increasing drag pressure.

Key Features of Deuthlon Power Drag Grease:

  • Increased Drag Power: Deuthlon’s standout feature is its claim to increase a reel’s maximum drag force by up to 50% or more. It achieves this through a formula that reportedly increases friction under pressure.
  • Smooth and Consistent: Despite the increase in power, Deuthlon maintains a smooth and consistent drag performance, crucial for preventing line breakage.
  • Excellent Water Resistance: Like Cal’s, Deuthlon provides superior protection against water intrusion and corrosion.
  • Adhesion and Durability: Deuthlon’s formula is designed for strong adhesion to the drag washers, ensuring it stays in place and provides long-lasting performance.

When to Choose Deuthlon Power Drag Grease:

Deuthlon Power Drag Grease is an excellent option for anglers who:

  • Need Maximum Stopping Power: When targeting large, powerful species in heavy cover or deep water, the increased drag pressure can be a significant advantage.
  • Want to Upgrade a Reel’s Performance: If you feel your current reel is underpowered in the drag department, Deuthlon can provide a noticeable boost without needing to buy a new reel.
  • Are Meticulous About Their Tackle: Anglers who enjoy fine-tuning their gear to extract the absolute maximum performance will appreciate the benefits that Deuthlon offers.

The application process for Deuthlon is similar to Cal’s, with a light, even coat being the key to optimal performance.

Cal’s vs. Deuthlon: Which is Right for You?

FeatureCal’s Universal Reel and Drag GreaseDeuthlon Power Drag Grease
Primary BenefitUltra-smooth, consistent, and reliable drag performance.Significantly increases maximum drag pressure while maintaining smoothness.
Best ForThe vast majority of freshwater and saltwater applications where smoothness and reliability are paramount.Anglers seeking to maximize their reel’s stopping power for big game or heavy cover situations.
FeelButtery smooth with no noticeable start-up inertia.Smooth and consistent, with a noticeable increase in drag tension at higher settings.
ReputationThe long-standing, trusted industry standard.A newer, innovative product with a growing reputation for high performance.

Application-Specific Recommendations:

  • Light Tackle & Finesse Fishing (Freshwater): Cal’s is the clear winner here. The emphasis is on a perfectly smooth and forgiving drag to protect light lines, and the extra power of Deuthlon is unnecessary.
  • General Saltwater Use (Inshore & Nearshore): Either grease will perform exceptionally well. If you prioritize a silky-smooth drag for species like speckled trout or redfish, Cal’s is a fantastic choice. If you often find yourself needing more backbone to pull fish from structures, Deuthlon is worth considering.
  • Heavy Saltwater & Big Game Fishing: This is where Deuthlon truly shines. When battling powerful tuna, GTs, or other large pelagics, the increased stopping power can be the difference between a landed fish and a spooled reel. However, many seasoned big game anglers still swear by the proven reliability and smoothness of Cal’s.

The Final Word

The debate over whether to grease carbon drag washers is largely settled: a light coat of a quality drag grease is the way to go. The choice between the classic smoothness of Cal’s and the high-performance power of Deuthlon comes down to your specific needs and fishing style.

For most anglers, Cal’s Universal Reel and Drag Grease provides everything you could want in a drag system: flawless, consistent performance that you can trust in any situation. For those who push their tackle to the absolute limit and demand the utmost in stopping power, Deuthlon Power Drag Grease offers a compelling and effective way to upgrade their reel’s capabilities.

Regardless of your choice, taking the time to properly clean and grease your carbon drag washers is one of the most important maintenance steps you can take. It will not only improve your reel’s performance but also give you the confidence to handle that fish of a lifetime when it decides to bite.

Posted on

A Full Teardown and Precision Service of the Abu Garcia Ambassadeur 5500C3

The Abu Garcia Ambassadeur 5500C3 is an icon in the fishing world. Renowned for its robust construction, simplicity, and durability, this Swedish-made round baitcaster has been a favorite of anglers for decades. Its timeless design is not only effective but also remarkably serviceable. A complete teardown, cleaning, and proper lubrication will restore its factory-smooth performance and ensure it remains a reliable tool for years to come. This guide provides a detailed, step-by-step process for a full service.

Phase 1: Preparation and Essential Tools

Before you begin disassembly, proper preparation is key to a smooth and successful service.

Your Workspace: Choose a clean, well-lit area with a flat surface. Lay down a white towel or a non-slip reel servicing mat. This provides a clean background, making small parts highly visible and preventing them from rolling away. A magnetic parts tray is also an excellent addition for securing screws and small springs.

Essential Tools & Materials:

  • Abu Garcia 5500C3 Schematic: This is your most crucial tool. Download and print the correct schematic for your specific model. It is an invaluable roadmap for part identification, orientation, and reassembly.
  • Tools:
    • Abu Garcia Flat Wrench: This multi-tool often comes with new reels and is perfectly sized for the handle nut. A 10mm wrench can also be used.
    • Screwdrivers: A small, high-quality flathead screwdriver is necessary for the side plate screws and other internal components.
    • Pliers: A pair of needle-nose pliers can be helpful, though not always necessary.
    • Small Parts Tweezer or Pick: Useful for handling tiny clips and springs.
  • Cleaning Supplies:
    • Degreaser: A quality degreaser safe for plastics and metals. Common choices include WD-40 (used as a cleaner, not a lubricant), mineral spirits, or specialized reel cleaners.
    • Isopropyl Alcohol (90%+): Excellent for a final cleaning of bearings and other sensitive parts.
    • Cleaning Containers: Small glass or metal jars are useful for soaking parts.
    • Brushes: An old toothbrush and a smaller, stiffer-bristled brush (like a small paintbrush with trimmed bristles) are perfect for scrubbing gears and frames.
    • Cotton Swabs & Lint-Free Cloths: For detailed cleaning and wiping down all components.
  • Lubricants:
    • Reel Grease: A quality, purpose-made fishing reel grease. Popular choices include Cal’s Universal Reel and Star Drag Grease or Penn Precision Reel Grease.
    • Reel Oil: A high-quality, light viscosity oil. Examples include TSI 321, ReelX, or Abu Garcia’s Silicote Reel Oil.

Phase 2: Meticulous Disassembly

Follow a systematic approach. Lay out the parts on your mat in the order they are removed. This creates a visual trail that simplifies reassembly.

Handle-Side Teardown:

  1. Handle Assembly: Unscrew the small handle lock cap retaining screw. Remove the lock cap. Use your 10mm wrench to unscrew the handle nut (note: it is standard right-hand thread). Lift the handle straight off the drive shaft.
  2. Star Drag: Unscrew the star drag completely. As you remove it, be mindful of the audible click-spring mechanism and two curved spring washers underneath. Set these aside carefully.
  3. Right Side Plate (Gear Side): Unscrew the two large, knurled thumbscrews that hold the right side plate to the frame. The side plate may be snug; gently wiggle it to separate it from the frame posts. The entire gear assembly will come off with the side plate.

Spool and Frame Teardown:

  1. Spool Removal: With the right side plate removed, the spool can be lifted straight out of the frame. On the 5500C3, the centrifugal braking system is attached to the end of the spool shaft.
  2. Left Side Plate (Non-Handle Side): The left side plate is held on by three small, flathead screws. Carefully unscrew these and set the plate aside. This exposes the idler gear and the spool cap assembly.
  3. Level Wind Assembly:
    • Unscrew the pawl cap on the front of the reel. The small level wind pawl will drop out. Be careful not to lose it.
    • Look at the left side of the frame where you removed the side plate. You will see a small, white plastic idler gear. Remove it.
    • On the front of the frame, you will see a small C-clip holding the level wind worm gear in place. Use a small pick or screwdriver to carefully pry this clip off. Cup your hand over it during removal, as these clips are notorious for flying into oblivion.
    • With the clip removed, the worm gear can be slid out from the right side of the frame. The line guide can then be removed.

Right Side Plate Internal Teardown:

  1. Bridge and Main Gear Assembly:
    • On the internal side of the right side plate, you will see the bridge assembly held on by two flathead screws. Remove these two screws.
    • The entire bridge assembly, including the main gear, drag stack, and anti-reverse components, can now be lifted off the post.
  2. Drag Stack: Slide the main gear off the gear sleeve. Lay out the drag washers in the exact order they came out. A typical 5500C3 stack (from bottom to top) is: keyed metal washer, carbon fiber washer, eared metal washer, carbon fiber washer, keyed metal washer, and a final thin carbon fiber washer that sits under the main gear.
  3. Pinion Gear and Yoke: The brass pinion gear and its plastic yoke will now be loose. Lift them out. Note the two small springs that sit under the yoke.

At this point, your reel is fully disassembled.

Phase 3: The Deep Clean

Thoroughly cleaning every component is the foundation of a smooth-running reel.

  1. Gears and Metal Parts: Place the main gear, pinion gear, bridge, and other large metal parts in a container and spray them liberally with your degreaser. Let them soak for a few minutes to break down old, hardened grease. Use a toothbrush to scrub the gear teeth and all surfaces until they are spotless. Wipe them clean with a lint-free cloth.
  2. Bearings: The 5500C3 has two main spool bearings. Both are located inside the spool.
    • Do not soak sealed or shielded bearings in harsh degreasers.
    • Clean the exterior of the bearings. If they are open-race bearings, you can flush them with isopropyl alcohol.
    • Hold the bearing by its outer race and spin the inner race. It should spin smoothly and quietly. Any grittiness or noise indicates a bearing that needs replacement.
  3. Frame and Side Plates: Use your degreaser and brushes to clean the inside of the frame and both side plates. Pay special attention to the worm gear channel and the inside of the spool housing. Use cotton swabs to reach into tight corners.
  4. Level Wind System: Clean the worm gear’s grooves meticulously with a brush and degreaser. Any old grease or debris in these grooves will impede level wind performance. Clean the pawl and the line guide as well.
  5. Drag Washers: The stock carbon fiber washers should be wiped clean with a dry, lint-free cloth. There is no need to use a degreaser on them.

After cleaning, ensure every single part is completely dry before proceeding to lubrication.

Phase 4: Precision Lubrication and Reassembly

Lubrication is a case of “less is more.” Over-lubricating will attract dirt and slow the reel down.

Reassembly:

  1. Right Side Plate Internals:
    • Grease: Apply a light, even coat of grease to the teeth of the main gear and the pinion gear. Place a small amount of grease on the gear sleeve post in the side plate.
    • Set the pinion gear into the plastic yoke and place the black plastic position holder over top of the yoke.
    • Drag Stack: If desired, a micro-thin layer of Cal’s or Deuthlon drag grease can be applied to the carbon washers, but they also perform exceptionally well dry. Reassemble the drag stack onto the main gear in the correct order.
    • Place the bridge assembly back into position, ensuring it meshes with the pinion yoke. Secure it with the two bridge screws.
  2. Level Wind System:
    • Oil: Apply a few small drops of light oil into the grooves of the worm gear.
    • Slide the line guide back into position. Insert the worm gear through the frame and line guide, and secure it with the C-clip.
    • Place the plastic idler gear back onto its post on the left side of the frame.
    • Apply a single drop of oil to the level wind pawl and drop it into the line guide. Screw the pawl cap back on until it is snug, but do not overtighten.
  3. Bearings and Spool:
    • Oil: Apply one small drop of high-quality oil directly to each spool bearing. Do not use grease.
    • Place the left side plate back on the frame and secure it with the three screws.
    • Insert the spool back into the frame, ensuring the cog on the end of the spool shaft engages with the idler gear.
  4. Final Assembly:
    • Align the right side plate with the frame posts and press them together firmly. Secure with the two thumbscrews.
    • Place the two curved spring washers over the gear sleeve in a “()” orientation to provide tension for the star drag.
    • Screw the star drag on.
    • Place the handle on the gear sleeve, followed by the handle nut. Tighten it firmly.
    • Install the handle lock cap and its retaining screw.

Final Performance Checks

With the reel fully reassembled, perform these final checks:

  • Free Spool: Click the clutch bar. The spool should spin freely and for a long time with minimal noise.
  • Retrieve: Engage the handle. It should turn over smoothly, and the level wind should travel back and forth without hesitation.
  • Drag: Tighten the star drag and pull line off the spool. The drag should be smooth and consistent, without any jerking.
  • Anti-Reverse: Turn the handle forward and then try to turn it backward. There should be no backward play.

By following this comprehensive guide, you have done more than just clean your reel. You have restored a precision piece of angling equipment to its optimal state, ready for countless more battles on the water. Regular service will ensure your Abu Garcia Ambassadeur 5500C3 remains a treasured and effective part of your arsenal.

Posted on

A Masterclass in Maintenance: A Detailed Guide to Servicing Your Shimano Calcutta 400B

The Shimano Calcutta 400B is a testament to enduring quality and robust engineering in the world of baitcasting reels. A favorite among anglers for its power and reliability, this round reel is a workhorse that, with proper care, can provide a lifetime of service. This comprehensive guide will walk you through a complete, detailed service of your Calcutta 400B, ensuring it remains in peak fighting condition.

Preparation: The Foundation of a Flawless Service

Before embarking on the disassembly of your reel, proper preparation is paramount. Rushing this stage can lead to lost parts and frustration.

Your Workspace: Designate a clean, well-lit area to work. A white towel or a magnetic parts tray is highly recommended. The white background will make small components highly visible, and a magnetic tray will secure any screws or springs that are prone to disappearing.

Essential Tools and Materials:

  • Screwdrivers: A quality set of Phillips and flathead screwdrivers is a must. Ensure they fit the screw heads on your reel perfectly to avoid stripping.
  • Pliers: A pair of needle-nose pliers will be useful for handling small parts.
  • Wrenches: A 10mm wrench will be needed for the handle nut.
  • Schematics: Have the official Shimano Calcutta 400B schematic readily available. This is your roadmap and will be invaluable for identifying parts and their correct orientation. You can typically find this on Shimano’s website or through a quick online search.
  • Cleaning Supplies:
    • Degreaser: A quality, reel-safe degreaser to remove old, gummed-up lubricant.
    • Isopropyl Alcohol: Excellent for cleaning bearings and other sensitive components.
    • Lint-free Cloths and Swabs: For wiping down and cleaning parts.
    • Small Brush: A toothbrush or a small, stiff-bristled brush is perfect for scrubbing gears and other soiled components.
  • Lubricants:
    • Reel Oil: A high-quality, light viscosity oil is essential for bearings and other high-speed components.
    • Reel Grease: A specialized reel grease is necessary for gears and other moving parts that require a more substantial lubricant. A popular and effective choice is Cal’s Universal Reel and Star Drag Grease.
    • Drag Grease: A specialized drag washer grease, such as Cal’s, or Deuthlon, is crucial for ensuring smooth and consistent drag performance.

Pre-Service Inspection: Before you pick up a tool, give your reel a thorough once-over. Check for any obvious signs of damage, corrosion, or malfunction. This will help you focus on any problem areas during the service.

Disassembly: A Methodical Approach

Follow a systematic approach to disassembly, placing parts in the order they are removed on your towel or tray. This will create a logical sequence for reassembly.

1. Handle and Star Drag Removal:

  • Begin by removing the handle nut cap. This can often be done by hand or with a small, flathead screwdriver.
  • Using your 10mm wrench, loosen and remove the handle nut. The handle should now lift off the drive shaft.
  • Slide the star drag off. Be mindful of the two small, curved drag spring washers underneath; they may stick to the bottom of the star drag.

2. Right Side Plate Removal:

  • Locate and loosen the three thumbscrews on the right side plate.
  • Remove the two small screws in the right side plate.
  • Carefully separate the right side plate from the frame. The internal components will now be exposed.

3. Internal Component Disassembly:

  • Main Gear and Drag Stack: Gently lift the main gear off the drive shaft. The drag washers are housed within the main gear. Carefully remove them one by one, paying close attention to their order and orientation. The schematic will be your best friend here. A typical drag stack consists of keyed metal washers, eared carbon washers, and a final metal washer.
  • Pinion Gear and Yoke: The pinion gear and its surrounding yoke will likely lift out along with the main gear. If not, they can be easily removed now. Note the two small yoke springs on top of the yoke.
  • Anti-Reverse System: The Calcutta 400B features a reliable anti-reverse roller bearing. To remove it, gently push it out from the inside of the side plate. The inner tube of the roller bearing will slide off the drive shaft.
  • Drive Shaft: The drive shaft can now be removed from the side plate if so desired.

4. Spool and Left Side Plate:

  • The spool can be easily lifted out of the frame.
  • The left side plate typically does not require extensive disassembly for a standard service unless there is a specific issue with the bearing or the clicker mechanism, or the idler gear.
  • To remove the left side plate assembly, remove two small screws from the inside of the reel. These are the Phillips head screws. Then remove the one slotted screw near the reel seat.
  • The left side plate can now be removed from the reel.

5. Level Wind Assembly:

  • To service the level wind, you will need to remove the pawl cap.
  • Unscrew the pawl cap and carefully remove the pawl.
  • The level wind guide and worm gear can now be accessed for cleaning.

Cleaning and Inspection: The Heart of the Service

With the reel fully disassembled, the crucial process of cleaning and inspection begins.

  • Gears and Metal Parts: Using your degreaser and a small brush, thoroughly clean the main gear, pinion gear, and all other metal components. Remove all traces of old grease and grime. Once clean, wipe them down with a lint-free cloth and set them aside to dry.
  • Bearings: It is generally not recommended to soak bearings in harsh degreasers as this can damage the seals. Instead, clean the exterior of the bearings with a cloth and isopropyl alcohol. A drop of high-quality bearing oil can be applied, and the bearing should be spun to check for smoothness. If a bearing feels gritty or rough after cleaning and oiling, it should be replaced.
  • Drag Washers: If your Calcutta 400B has the stock Dartanium drag washers, they should be wiped clean. If you are upgrading to carbon fiber drag washers (a highly recommended upgrade for improved performance), they will need to be lightly greased with a specialized drag grease like Cal’s or Deuthlon. Apply a thin, even coat to both sides of each washer.
  • Frame and Side Plates: Thoroughly clean the inside and outside of the frame and both side plates. Use a brush and swabs to get into all the nooks and crannies.
  • Level Wind: Clean the worm gear and the pawl with degreaser and a brush. Ensure the worm gear’s grooves are completely free of debris.

Inspection: As you clean each part, inspect it for wear and tear.

  • Gears: Check the teeth of the main and pinion gears for any signs of chipping, rounding, or excessive wear.
  • Drag Washers: Inspect for any glazing or compression.
  • Bearings: Feel for any roughness or play.
  • Pawl: Check the tip of the pawl for wear. A worn pawl can cause the level wind to stick.

Lubrication and Reassembly: Bringing It All Back Together

Proper lubrication is the key to a smooth and long-lasting reel. The general rule is to apply a light coat of grease to gears and moving parts and a drop of oil to bearings and other high-speed components.

1. Level Wind Assembly:

  • Apply a light coat of grease to the worm gear.
  • Place a drop of oil on the pawl and reinsert it into the level wind guide.
  • Screw the pawl cap back on, being careful not to overtighten it.

2. Left Side Plate Assembly:

  • Put the idler gear on the shaft post with a drop of oil. Oil the teeth of the idler with a light oil. Add the small brass washer on top of the idler gear.
  • Install the left side plate assembly into the frame of the reel.

3. Right Side Plate Assembly:

  • Drive Shaft: Apply a light coat of grease to the drive shaft and reinsert it into the side plate.
  • Anti-Reverse System: Lightly oil the anti-reverse roller bearing and its inner tube. Slide the inner tube back onto the drive shaft and press the roller bearing back into its housing in the side plate.
  • Pinion Gear and Yoke: Apply a light coat of grease to the pinion gear and place it in the yoke. Reinstall the two yoke springs.
  • Drag Stack and Main Gear: If you have greased your carbon fiber drag washers, reassemble the drag stack in the correct order within the main gear. Apply a generous coat of grease to the teeth of the main gear.
  • Installation: Carefully place the main gear and drag stack assembly back onto the drive shaft, ensuring it meshes correctly with the pinion gear.

4. Final Assembly:

  • Spool: Place a drop of oil on the spool shaft on both ends and where the pinion gear runs. Reinsert the spool into the frame.
  • Connecting the Side Plate: Carefully align the right side plate with the frame and press them together. The side plate should sit flush.
  • Thumbscrews: Tighten the three thumbscrews on the right side plate.
  • Tighten 2 Phillips head screws in right side plate.
  • Star Drag and Handle: Reinstall the two curved drag spring washers (in a “()()” orientation), followed by the star drag. Screw on the handle nut, and then reattach the handle nut cap.

Final Checks and Adjustments

With your Shimano Calcutta 400B reassembled, perform a few final checks:

  • Handle: The handle should turn smoothly and without any binding.
  • Free Spool: Engage the free spool and give the spool a spin. It should spin freely and for an extended period.
  • Drag: Tighten the star drag and pull line from the spool. The drag should be smooth and consistent.
  • Level Wind: Turn the handle and ensure the level wind travels back and forth across the spool without any hesitation.

By following this detailed guide, you have not only performed a routine service but have also gained a deeper understanding of the inner workings of your Shimano Calcutta 400B. Regular, thorough maintenance will ensure that this legendary reel continues to be a trusted companion on all your fishing adventures.

Posted on

The Angler’s Essential Guide: A Deep Dive into Fishing Reel Greases and Oils

The Great Divide: Grease vs. Oil

At the most basic level, the difference between grease and oil is viscosity and application. Think of it as the difference between a thick, protective balm and a thin, penetrating liquid.

Fishing Reel Grease: The Guardian of Gears

Grease is essentially a sponge-like structure. It consists of a base oil suspended in a thickener (typically a metallic soap or synthetic polymer) and fortified with additives. Its primary job is to stay put, providing a long-lasting, high-pressure lubricating film in areas that experience intense force and friction.

Key Properties of Grease:

  • High Viscosity and Adhesion: Grease is thick and sticky. It clings tenaciously to gear teeth and metal surfaces, resisting the centrifugal force that would fling a lighter lubricant away.
  • Corrosion Resistance: Quality reel greases are formulated with powerful anti-corrosion and anti-rust additives, creating a barrier that protects internal components from both freshwater and the ravages of saltwater.
  • Load-Bearing Capacity: It excels under the extreme pressure found between the main and pinion gears, preventing metal-on-metal wear that can lead to rough, noisy, and ultimately failed reels.

Where to Use Grease:

  • Main and Pinion Gears: This is the most critical application for grease. A thin, even coating on the teeth of these gears ensures a smooth and powerful retrieve.
  • Worm Gears (in Baitcasters): The level-wind mechanism relies on a worm gear that requires a durable lubricant that will stay in the tracks.
  • Shafts and Bushings: Any non-bearing surface where metal slides against metal benefits from a protective layer of grease.
  • Internal Surfaces: A light film of grease on the non-moving interior of the reel’s frame and side plates provides an excellent barrier against corrosion.

Fishing Reel Oil: The Elixir of Speed

Oil is the lifeblood of high-speed components. It is a much thinner lubricant designed to penetrate tight tolerances and create a slick, low-friction surface that allows parts to spin freely with minimal resistance.

Key Properties of Oil:

  • Low Viscosity: Oil flows easily, allowing it to coat parts that spin at thousands of revolutions per minute (RPMs).
  • Friction Reduction: The primary purpose of oil in a reel is to minimize friction, which is paramount for achieving maximum casting distance.
  • Penetration: Its thin consistency allows it to work its way into the tiny spaces within ball bearings and onto handle knobs and line rollers.

Where to Use Oil:

  • Spool Bearings: This is the most important use for oil. A single, small drop of high-quality, low-viscosity oil on the spool bearings of a baitcasting or spinning reel can dramatically increase casting distance.
  • Handle Knobs: A drop of oil will keep handles spinning freely and silently.
  • Line Roller Bearings: This crucial part of a spinning reel must spin freely to prevent line twist.
  • Bail Arm Joints: A touch of oil on the pivot points of a spinning reel’s bail ensures it opens and closes crisply.
  • Anti-Reverse Clutch: This is a special case. Many manufacturers recommend no lubrication on the anti-reverse bearing. If lubrication is needed, it must be an extremely thin, plastic-safe oil to prevent the clutch from slipping.

The Brand Battlefield: A Head-to-Head Comparison

While the principles of “grease for gears, oil for bearings” are universal, not all lubricants are created equal. Different brands formulate their products for different purposes, from all-around durability to outright casting performance.

Shimano: The Factory Standard

Shimano is renowned for its precision engineering, and its lubricants are formulated to maintain that factory-fresh feel.

  • Shimano Star Drag Grease (DG06): This is the quintessential workhorse grease. It is exceptionally smooth, durable, and provides a buttery feel to the gear train. It has excellent water resistance and is the go-to choice for maintaining the main and pinion gears in the vast majority of Shimano reels.
  • Shimano Permalube Grease: A slightly thicker, more tenacious grease often used in larger saltwater reels where corrosion resistance and durability under heavy loads are paramount.
  • Shimano Bantam Oil: A high-grade, light-viscosity synthetic oil. It is perfect for spool bearings, handle knobs, and line rollers. It provides excellent lubrication without bogging down high-speed parts, making it ideal for anglers who prioritize casting distance and a “free” feel.

Daiwa: Precision and Specialization

Daiwa often engineers its reels with highly specific lubrication requirements, particularly with its advanced drag and sealing systems.

  • Daiwa Ultimate Tournament Drag Grease (ATD): This is not a gear grease. It’s a specialized, medium-viscosity lubricant designed specifically for Daiwa’s carbon drag washers. It allows for a low-inertia startup, preventing jerky drags and protecting lines. Using the wrong grease on these drags can severely compromise their performance.
  • Daiwa Reel Guard Grease (Blue Grease): This is Daiwa’s primary gear grease. It’s a synthetic blend known for its excellent adhesion and saltwater corrosion protection. It is slightly more viscous than Shimano’s offering, providing a very protected and “dampened” gear feel.
  • Daiwa Reel Oil: A fine, synthetic oil suitable for all high-speed applications. Daiwa places a strong emphasis on its Magsealed reels, which use a special magnetic oil to form a seal. These reels should only be serviced by authorized technicians, but Daiwa’s standard oil is perfect for lubricating the spool bearings and handles on their non-Magsealed models.

Penn: The Saltwater Sentinel

Penn has built its reputation on creating reels that can withstand the brutal saltwater environment. Their lubricants reflect this philosophy of toughness and durability.

  • Penn Precision Reel Grease (Blue Grease): This is one of the most iconic lubricants in fishing. It is a proprietary synthetic blend renowned for its incredible tenacity and corrosion resistance. It is thicker and stickier than many other greases, making it the top choice for anglers who subject their gear to heavy surf, spray, and punishing battles. While it provides unparalleled protection, it can feel slightly heavier on the retrieve compared to a Shimano grease.
  • Penn Reel Oil: A high-quality synthetic oil that is corrosion-resistant. It’s an excellent all-purpose oil for bearings and handles, formulated to hold up in the saltwater environment where Penn reels thrive.

Abu Garcia: The All-Around Performer

Abu Garcia, famous for its legendary baitcasting reels, offers reliable, no-nonsense lubricants that get the job done.

  • Abu Garcia Reel Grease: Often sold in a convenient tube, this is a Silicote-based grease that provides good lubrication and corrosion protection. It’s a solid, all-around performer that works well for a wide variety of reels and applications, striking a good balance between smoothness and durability.
  • Abu Garcia Reel Oil: A light-viscosity oil that is a staple for many baitcaster enthusiasts. It’s perfectly suited for the spool bearings on Ambassadeur and Revo reels, promoting long, smooth casts.

Rocket Fuel: The Pursuit of Pure Speed

Rocket Fuel is a UK-based brand that has achieved cult status among surf casters and tournament anglers. Their focus is singular: maximizing spool speed for ultimate casting distance. Their products are primarily oils, offered in different viscosities.

  • Rocket Fuel Yellow Label: A very low-viscosity “super-fast” oil. This is for the angler seeking every last yard of distance. It makes spools incredibly free-spinning, but because it is so thin, it requires more frequent application than thicker oils.
  • Rocket Fuel Red Label: A slightly higher viscosity oil that offers a bit more protection and longevity than the Yellow Label. It’s a popular choice for anglers who want a significant boost in casting performance without having to re-oil after every trip.
  • Rocket Fuel Tournament Formula: An even faster, lower-viscosity version of Yellow Label, designed for the competitive casting circuit where performance is measured in inches.

Deuthlon: The High-Tech Contender

Deuthlon is a modern, technology-driven brand that brings advanced chemistry to the reel lubrication market. They focus on synthetic formulations with additives like ceramics and polymers to achieve specific performance goals.

  • Deuthlon Cast Lube (Ceramic): This is an advanced synthetic bearing oil infused with sub-micron ceramic particles. The ceramics act like microscopic ball bearings, further reducing friction and providing a slicker, more durable lubricating film than oil alone. It is a direct competitor to high-performance oils like Rocket Fuel.
  • Deuthlon Power Drag Grease: A fully synthetic grease formulated for extreme temperature and pressure stability. It’s designed to provide consistent performance in carbon fiber drag systems during long, drag-screaming runs from powerful fish.
  • Deuthlon Semi-Fluid Grease: An innovative product that bridges the gap between grease and oil. It’s designed for components like worm gears and bushings where the adhesion of grease is needed, but the fluidity of oil helps reduce friction.

The Application: Less is Always More

Regardless of the brand you choose, the single most important rule of reel lubrication is less is more. Over-lubricating a reel is just as harmful as under-lubricating it.

  • Grease Application: Never “pack” the gearbox with grease. Use a small brush to apply a thin, even layer only to the teeth of the main and pinion gears. The goal is for the teeth to be coated, not for the entire gearcase to be filled. Excess grease will be flung to the sides, where it does nothing but collect dirt and add resistance to the retrieve.
  • Oil Application: For a spool bearing, one single, small drop from a needle-point applicator is sufficient. Too much oil will create “hydraulic resistance,” actually slowing the bearing down and impeding casting distance.

Conclusion: The Right Lube for the Right Job

There is no single “best” fishing reel lubricant, only the best lubricant for a specific application and a specific angler’s goal.

  • For the angler seeking ultimate saltwater protection and durability, the thick, tenacious formula of Penn’s Blue Grease is hard to beat.
  • For the angler who prizes a buttery-smooth, factory-fresh retrieve in their high-end spinning or baitcasting reel, Shimano Star Drag Grease is the benchmark.
  • For the baitcaster or surf angler obsessed with achieving the absolute maximum casting distance, the ultra-low viscosity oils from Rocket Fuel or the advanced ceramic-infused lube from Deuthlon are the clear choices.
  • For the all-around angler who maintains a variety of reels for different applications, the reliable and balanced performance of Abu Garcia or Daiwa lubricants provides a fantastic solution.

Properly cleaning your reel and then carefully applying the correct high-quality grease to the gears and the right oil to the bearings is the most critical maintenance you can perform. It is the secret to a long-lasting, reliable, and high-performing reel that won’t let you down when the fish of a lifetime is on the line.

Posted on

Mastering the Spool: A Guide to Installing Fishing Line on Your Reel

A fishing reel, no matter how technologically advanced, is only as good as the line it holds. Proper installation of that line is a fundamental skill every angler must master. It’s the critical link between you and the fish, and a poorly spooled reel can lead to a frustrating day of tangles, lost casting distance, and heartbreak.

Many anglers, especially beginners, rush this process, only to be met with monstrous tangles known as “bird’s nests” or line that mysteriously springs off the spool. But with a little knowledge and attention to detail, you can learn to spool your reels like a seasoned pro. This detailed guide will walk you through the correct procedures for both spinning and baitcasting reels, ensuring your line is laid perfectly every time.

The Foundation: Tools and Preparation

Before you even think about winding that handle, gathering a few simple items will make the process smoother and more effective.

Essential Tools:

  • Your Reel and Rod: You’ll want the reel mounted on the corresponding rod to provide proper tension and a natural path for the line.
  • Bulk Spool of Fishing Line: The new line you intend to install.
  • A Soft Cloth or Rag: Useful for applying tension.
  • Scissors or Line Cutters: For a clean cut.
  • A Pen or Pencil: An indispensable tool for spooling spinning reels correctly.

Optional but Helpful Tools:

  • Line Spooling Station: A device that holds the bulk spool and applies tension for you.
  • A Friend: An extra set of hands is always helpful, especially for maintaining tension.

Part 1: Spooling a Spinning Reel – The Battle Against Line Twist

Spinning reels are the most popular style for a reason—they are user-friendly and versatile. However, they are also highly susceptible to line twist if spooled incorrectly. This is because the line is wound onto a fixed spool, and if the direction of the winding fights the natural memory of the line coming off the bulk spool, you’re creating a twisted mess.

Step 1: Prepare Your Setup

Mount your spinning reel onto the rod. Open the bail arm and run the tag end of your new fishing line through the first (largest) line guide on the rod, closest to the reel.

Step 2: Tie the Arbor Knot

The arbor knot is the standard, secure way to attach your line to the reel’s spool (the “arbor”).

  1. Bring the tag end of the line around the spool.
  2. Tie a simple overhand knot around the main line.
  3. Tie a second overhand knot in the tag end itself, a couple of inches from the first knot.
  4. Pull the main line. The second knot will slide down and jam against the first, creating a secure, self-tightening loop around the spool.
  5. Trim the excess tag end close to the second knot.

Step 3: Close the Bail and Seat the Knot

Close the bail arm of your reel. Gently pull on the main line to cinch the arbor knot down snugly onto the spool. It doesn’t need to be Herculean tight, just snug.

Step 4: The Most Crucial Step – Line Orientation

This is where most mistakes are made. To prevent line twist, the line must come off the bulk spool in the same direction that the reel’s bail is winding it on.

  1. Lay the bulk spool on the floor or a table with the label facing up.
  2. Begin reeling slowly. Watch the line as it comes off the bulk spool and goes onto your reel. It should be coming off the bulk spool in a counter-clockwise direction, matching the rotation of your reel’s bail.
  3. The “Drop Test”: After you have about 10-15 turns of line on your reel, stop. Drop some slack line from your rod tip towards the reel.
    • If the line twists and coils up on itself, your orientation is wrong. The line is coming off the bulk spool in the wrong direction. Flip the bulk spool over so the label is facing down and try again.
    • If the line is relatively straight with minimal coiling, your orientation is correct. You can now proceed.

Step 5: Apply Proper Tension

Proper tension is key to preventing the line from being too loose on the spool, which can cause loops to fly off during a cast.

  1. Hold the rod in one hand and reel with the other.
  2. Use your non-reeling hand to pinch the line lightly against the rod blank just before the reel, using a soft cloth. This creates friction and ensures the line packs tightly onto the spool.
  3. Alternatively, you can place a pen or pencil through the center of the bulk spool and have a friend hold it, applying light pressure to the sides of the spool as you wind.

Step 6: Fill the Spool Evenly

Wind the line onto the reel at a steady pace. Make sure the line is distributing itself evenly across the height of the spool. Most modern spinning reels have good line-lay systems, but it’s good practice to watch it.

Continue winding until the line is filled to about 1/8th of an inch (or 2-3mm) from the outer lip of the spool.

Warning:

  • Underfilling the spool will significantly reduce your casting distance as the line has to fight against the tall lip of the spool.
  • Overfilling is the primary cause of “wind knots” and tangles, as loose loops of line will jump off the over-packed spool during a cast.

Once filled, cut the line from the bulk spool, and you’re ready to rig up and fish!

Part 2: Spooling a Baitcasting Reel – The Importance of Tension

Baitcasting reels are the choice for heavy-duty applications and precision casting. While they aren’t prone to line twist in the same way spinning reels are, they are susceptible to a different issue: backlash. The number one cause of horrific backlashes is line that was spooled too loosely. Under the pressure of a hard cast, the outer layers of line can dig into the looser layers underneath, causing the spool to stop abruptly while the lure continues, resulting in an epic bird’s nest.

Step 1: Prepare Your Setup

Mount the baitcaster on your rod. Take the tag end of your line and feed it through the line guide on the reel’s level-wind mechanism and then out through the guides on your rod.

Step 2: Tie the Arbor Knot

Most baitcasting spools have holes or perforations. You can wrap your line around the spool and tie an arbor knot just like you would on a spinning reel. Alternatively, you can pass the tag end through one of the holes in the spool and tape it down securely with a small piece of electrical tape before you begin winding. For braided line, this tape method is often preferred.

Step 3: Apply Firm, Consistent Tension

This is the most critical part of spooling a baitcaster. The line MUST be packed on the spool under significant tension.

  1. The best method is to have a friend insert a pencil through the bulk spool. They should then wear gloves or use a cloth to squeeze the sides of the spool, creating significant drag as you wind the line onto your reel.
  2. Go slowly and steadily. You should feel a good amount of resistance as you turn the handle. The goal is to pack the line so tightly that you cannot dig your thumbnail into it once it’s on the spool.

Step 4: Engage the Level-Wind

Ensure the level-wind mechanism is engaged and moving back and forth across the spool as you reel. This is what ensures the line is distributed evenly. Do not try to guide the line with your fingers; let the reel do the work.

Step 5: Fill to the Correct Level

Just like with a spinning reel, fill the spool to about 1/8th of an inch from the edge. Overfilling a baitcaster will cause the line to rub on the reel’s frame, and underfilling will reduce casting performance.

A Note on Backing and Braid

If you are using expensive fluorocarbon or slippery braided line, it’s common practice to first fill about half the spool with a cheaper monofilament “backing.” This saves money and provides a base that braided line can bite into, preventing it from slipping on the slick arbor. After filling with backing, join the backing to your main line using a strong line-to-line knot like the Double Uni Knot. Then, spool your main line on top, maintaining that crucial tension.

By investing a little time and care into properly spooling your reel, you’re setting yourself up for a more enjoyable, efficient, and successful day on the water. I have completed the initial research phase and have a solid foundation of information to write a detailed article on how to install fishing line on a reel. I’ve gathered specific instructions for both spinning and baitcasting reels, the two most common types. I have information on the importance of line direction for spinning reels to avoid twist and the need for proper tension on baitcasters to prevent backlashes. The searches also yielded details on using backing, the recommended knots like the arbor knot for attaching the line to the spool and the uni-to-uni knot for connecting backing to the main line, and the ideal fill level for the spool. I also found information about common mistakes and how to avoid them.

I believe I have enough information to create a comprehensive and lengthy article without needing further Google searches. I can now proceed to synthesize this information into a well-structured and detailed guide for anglers.

Therefore, I will now proceed with writing the article.

A detailed, lengthy article on how to install fishing line on a reel.

From Spool to Spool: The Definitive Guide to Installing Fishing Line on Your Reel

A day on the water can be made or broken by the simplest of things, and the way you’ve spooled your fishing line is a prime example. Properly installed line casts smoother, farther, and with fewer tangles, while a poorly spooled reel is a recipe for frustration in the form of bird’s nests, line twist, and lost fish. This comprehensive guide will walk you through the nuances of installing fishing line on the two most popular types of reels: spinning and baitcasting. By the end, you’ll have the knowledge and confidence to spool your reels like a seasoned pro.

The Fundamentals: What You’ll Need and Why It Matters

Before we dive into the specifics of each reel type, let’s gather our tools and understand some universal principles.

Essential Tools:

  • Your Rod and Reel: It’s always best to spool your line with the reel attached to the corresponding rod. This allows you to use the rod’s guides to help manage the line.
  • A Spool of New Fishing Line: Whether it’s monofilament, fluorocarbon, or braid, choose a line that’s appropriate for your target species and fishing style.
  • Line Cutters or Sharp Scissors: For clean, precise cuts.
  • A Soft Cloth or Gloves: To apply tension to the line without burning or cutting your fingers.
  • A Pen or Pencil (for baitcasters): To hold the filler spool.
  • Electrical Tape (optional but recommended for braid): To prevent braided line from slipping on the spool.

Key Concepts:

  • Line Memory: Monofilament and fluorocarbon lines have a tendency to “remember” the shape of the spool they were packaged on. This can lead to coiling and tangling if not addressed during the spooling process.
  • Line Twist (Spinning Reels): This is the bane of many spinning reel users. It occurs when the line is spooled onto the reel in a way that fights its natural coil, causing it to twist and eventually form frustrating knots.
  • Backing: This is an older, less expensive line (typically monofilament) that is spooled onto the reel before your main fishing line. There are two primary reasons for using backing:
    1. Cost Savings: High-performance lines, especially braid, can be expensive. By filling a portion of your spool with cheaper backing, you can use less of your pricey main line.
    2. Preventing Braid Slippage: Braided lines are notoriously slick and can slip on a smooth reel spool under pressure. A monofilament backing provides a surface for the braid to bite into, preventing this issue.
  • Spool Capacity: It’s crucial not to overfill or underfill your reel’s spool. A good rule of thumb is to leave about 1/8th of an inch of space between the line and the lip of the spool. Overfilling leads to line jumping off the spool, while underfilling will significantly reduce your casting distance.

Spooling a Spinning Reel: Conquering the Twist

Spinning reels are the workhorses of the fishing world, and spooling them correctly is all about managing line twist.

Step-by-Step Instructions:

  1. Prepare Your Reel and Rod: If there’s old line on your reel, remove it completely. Attach your reel to your fishing rod and thread the new line through the first line guide closest to the reel.
  2. Tie an Arbor Knot: Open the bail of your spinning reel. The bail is the wire arm that you flip to cast. With the bail open, use an arbor knot to secure the line to the spool. An arbor knot is essentially two overhand knots. First, tie an overhand knot around the main line. Then, tie a second overhand knot in the tag end of the line. When you pull the main line, the second knot will jam against the first, cinching down on the spool. Trim the tag end.
  3. The All-Important Line Direction: This is the most critical step for preventing line twist. Place the filler spool on the floor with the label facing up. The line should be coming off the filler spool in a counter-clockwise direction. As you reel, the bail of a spinning reel rotates in a clockwise direction. By having the line come off the filler spool in the opposite direction, you are counteracting the twist that the reel naturally imparts.
  4. Apply Tension and Start Reeling: Pinch the line lightly between your thumb and forefinger using a soft cloth or glove, about a foot above the reel. This tension is crucial for laying the line tightly and evenly on the spool. Begin turning the reel handle at a steady pace.
  5. Check for Line Twist: After about 15-20 cranks of the handle, pause and let some slack develop in the line between the reel and the first rod guide. If the line starts to twist and coil up on itself, your line is coming off the filler spool in the wrong direction. Simply flip the filler spool over so the label is facing down and continue spooling. The line should now hang relatively straight.
  6. Fill the Spool: Continue reeling and applying tension until the line is about 1/8th of an inch from the edge of the spool.
  7. Cut and Secure: Cut the line from the filler spool and thread it through the remaining guides on your rod. Tie on a lure or hook to keep the line from retracting through the guides.

Pro-Tip for Braided Line: If you’re spooling with braid and not using a monofilament backing, tie your arbor knot and then place a small piece of electrical tape over the knot and line on the spool. This will give the slick braid something to grip and prevent it from slipping.

Spooling a Baitcasting Reel: The Art of Tension

Baitcasting reels are favored for their power and precision, but they are also infamous for their ability to create “backlashes” or “bird’s nests.” Proper spooling with consistent tension is your best defense against these tangled messes.

Step-by-Step Instructions:

  1. Prepare Your Reel and Rod: Mount your baitcaster on its rod. Take the end of your new line and thread it through the rod’s line guides, starting from the tip and working your way down to the reel. Then, thread the line through the reel’s line guide (the small opening that moves back and forth).
  2. Secure the Line to the Spool: Most baitcaster spools have small holes in them. A simple and effective way to secure the line is to pass it through one of these holes, wrap it around the spool, and then tie an arbor knot or a couple of overhand knots around the main line. Tighten it down and trim the tag end.
  3. Set Up Your Filler Spool: Unlike a spinning reel, you want the line to come off the top of the filler spool in the same direction that the baitcaster’s spool rotates. The easiest way to achieve this is to place a pen or pencil through the center of the filler spool. Have a friend hold the pencil, or you can place it between your feet, allowing the spool to rotate freely.
  4. Apply Firm, Consistent Tension: This is the most critical step for a baitcaster. Using a soft cloth or gloves, pinch the line firmly as you begin to reel. The line should lay on the spool very tightly. If the line is spooled too loosely, the top layers will dig into the layers below it during a cast, causing a nasty backlash.
  5. Fill the Spool Evenly: Reel at a slow, steady pace, making sure the line lays evenly across the spool. Your reel’s line guide will help with this, but keeping an eye on it is good practice. Continue until the line is about 1/8th of an inch from the edge of the spool.
  6. Cut and Secure: Cut the line from the filler spool and tie on your lure or hook.

Using Backing on a Baitcaster:

If you’re using a monofilament backing with a braided main line, first spool on enough monofilament to cover the bottom of the spool. Then, tie your braid to the monofilament using a reliable line-to-line knot, such as a Double Uni Knot or an FG Knot. Trim the tag ends of the knot very closely, and then continue spooling with the braid, maintaining firm tension.

By taking the time to master these techniques, you’ll not only save yourself countless headaches on the water but also improve your casting and overall fishing success. A well-spooled reel is a testament to a prepared angler, and it’s a fundamental skill that will serve you well for years to come.

Posted on

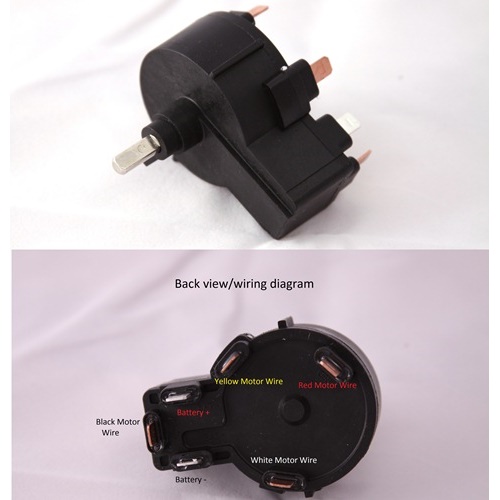
Restoring Control: A Detailed Guide to Replacing the 5-Speed Switch on Your Minn Kota Endura Trolling Motor

For countless anglers, the Minn Kota Endura trolling motor is a reliable workhorse, silently propelling them to prime fishing spots. Its simplicity, durability, and effectiveness have made it a freshwater staple. However, like any piece of frequently used equipment, components can wear out. One common culprit for erratic speed control or complete loss of function is a faulty 5-speed rotary switch.

At ReelSchematic.com, we believe in empowering anglers to tackle common repairs, saving time and money. This comprehensive guide will walk you through the process of replacing the 5-speed switch on your Minn Kota Endura trolling motor, restoring precise control and getting you back on the water with confidence.

Disclaimer: Working with electrical components carries inherent risks. Always disconnect the trolling motor from its power source (battery) before beginning any repair. If you are uncomfortable with any step, or if your motor is still under warranty, it’s best to consult a certified Minn Kota service technician.

Understanding the 5-Speed Switch

The Minn Kota Endura, particularly older models, typically uses a mechanical rotary switch located on the top of the control head. This switch has detents for five forward speeds (1-5) and three reverse speeds (R1-R3), along with an “Off” position. Internally, as you rotate the knob, the switch engages different electrical contacts, which in turn connect to various resistors or windings within the motor to deliver different levels of power, thus controlling the speed. Over time, these internal contacts can corrode, wear out, or become damaged, leading to inconsistent speeds, only certain speeds working, or the motor failing to turn on at all.

Tools and Materials You’ll Need:

Before you begin, gather the following:

  • Replacement 5-Speed Switch: Ensure you purchase the correct replacement switch for your specific Minn Kota Endura model. Minn Kota parts are often model-specific. Check your motor’s serial number and consult Minn Kota’s parts diagrams or a reputable dealer like MikesReelRepair.com.
  • Screwdrivers:
    • Phillips head screwdriver (various sizes may be needed for control head screws).
    • Flathead screwdriver (small, for prying or releasing wire terminals on some switches).
  • Wire Strippers/Cutters: If your new switch requires wiring, these will be essential.
  • Heat Shrink Tubing and Heat Gun (or Electrical Tape): For insulating new wire connections. Heat shrink tubing provides a more durable and water-resistant seal.
  • Crimping Tool and Electrical Connectors (Optional, but recommended): If your new switch requires cutting and re-crimping wires, having proper crimp connectors (e.g., spade connectors, butt connectors) will ensure secure connections.
  • Needle-Nose Pliers: Useful for manipulating small wires or connectors.
  • Marker or Camera: To label wires or take photos of the original wiring configuration.
  • Multimeter (Optional, but Recommended): For testing continuity and confirming the new switch is functioning correctly before reassembly.
  • Shop Towels or Rags: For cleaning.
  • Dielectric Grease (Optional): For protecting electrical connections from corrosion.

Step-by-Step Replacement Procedure:

Step 1: Safety First – Disconnect Power!

This is the most critical step. Before touching anything on the trolling motor, disconnect the battery cables (both positive and negative) from your boat’s battery. Even if the motor is off, there’s still a potential for electrical shock or damage if the battery is connected.

Step 2: Accessing the Control Head

The 5-speed switch is housed within the trolling motor’s control head (the main body where the speed knob is located).

  1. Remove the Speed Knob: The speed knob is usually held in place by a small Phillips head screw on the side or top of the knob itself. Unscrew this screw and carefully pull the knob straight off. If it’s stubborn, a gentle wiggle might help. Be careful not to lose the screw or any washer that might be underneath the knob.
  2. Remove the Control Head Screws: Look for screws on the underside or sides of the control head. These are typically Phillips head screws. There may be a few, strategically placed to secure the two halves of the control head together. Unscrew all of them.
  3. Carefully Separate the Control Head Halves: Once all screws are removed, gently pry apart the two halves of the control head. Take your time and be gentle, as there may be wires running between the halves. You’ll likely find that the top half, which contains the switch, will lift away.

Step 3: Documenting and Disconnecting the Old Switch

This is where organization is key. The 5-speed switch will have several wires connected to it. The number and color of wires can vary slightly by model year, but generally, you’ll see a main power input wire and several output wires corresponding to the different speeds and reverse.

  1. Take Photos: Before disconnecting any wires, take clear, well-lit photos of the existing wiring configuration from multiple angles. This will be an invaluable reference when connecting the new switch.
  2. Label Wires (If Necessary): If you’re concerned about remembering the connections, use a marker to label each wire with its corresponding terminal number or position on the old switch. Sometimes, the new switch may have different terminal numbering, so comparing it to your photos will be crucial.
  3. Disconnect Wires: Carefully disconnect each wire from the old switch.
    • Spade Connectors: Many switches use spade connectors that simply pull off the terminals. Use needle-nose pliers if they are tight, but avoid pulling directly on the wire itself.
    • Screw Terminals: Some switches may have small screws holding the wires in place. Unscrew these to release the wires.
    • Soldered Connections: In rare cases, older switches might have soldered connections. If this is the case, you’ll need a soldering iron to de-solder and re-solder the connections. However, most DIY-friendly Endura switches use simpler connectors.
  4. Remove the Old Switch: Once all wires are disconnected, the old switch itself is usually secured by a nut on the outside of the control head, or it may simply press-fit into a slot. Unscrew the retaining nut (if present) and carefully remove the old switch from the control head.

Step 4: Installing and Wiring the New Switch

Now it’s time to install your replacement switch.

  1. Mount the New Switch: Insert the new 5-speed switch into the opening in the control head. Ensure it’s oriented correctly, aligning any tabs or keyways. If there’s a retaining nut, tighten it to secure the switch.
  2. Connect the Wires: This is the most critical part. Refer to your photos and any labels you made.
    • Match Wire Colors/Positions: Connect each wire to the corresponding terminal on the new switch. Pay close attention to matching the old configuration precisely. Even if the terminal numbers on the new switch are different, the wire colors and their original positions relative to the “off” position are what matter.
    • Secure Connections:
      • Spade Connectors: Ensure spade connectors are pushed firmly onto the terminals. Give them a gentle tug to confirm they are secure.
      • Screw Terminals: If your new switch uses screw terminals, insert the bare wire end and tighten the screw securely. Avoid overtightening.
      • New Wires/Crimping: If your new switch came with pigtails or requires you to cut and re-crimp, ensure you strip about 1/2 inch of insulation from the wire end. Use a crimping tool and appropriate electrical connectors (e.g., butt connectors if joining two wire ends, or new spade connectors if attaching to terminals). Crimp them firmly, ensuring a strong mechanical and electrical connection.
      • Heat Shrink/Tape: After crimping, slide heat shrink tubing over the connection and heat it with a heat gun until it shrinks tightly, providing insulation and weather protection. If using electrical tape, wrap it tightly and securely around the connection.
    • Dielectric Grease (Optional): Before pushing on spade connectors or tightening screw terminals, apply a small dab of dielectric grease to the metal contacts. This helps prevent corrosion and ensures a good electrical connection.

Step 5: Testing the New Switch (Pre-Reassembly)

Before buttoning everything up, it’s highly recommended to perform a quick test.

  1. Reconnect Batteries (Briefly): Carefully reconnect the positive and negative battery cables to your boat’s battery.
  2. Test Functionality: With the propeller clear of obstructions and water, slowly rotate the new speed switch through all its forward and reverse settings.
    • Does the motor turn on and off correctly?
    • Does it engage all five forward speeds and three reverse speeds?
    • Does the speed increase/decrease as expected with each detent?
    • Does it turn off completely in the “Off” position?
  3. Listen and Observe: Listen for any unusual sounds or smells. If anything seems wrong, immediately disconnect the battery and re-check your wiring.
  4. Disconnect Batteries Again: Once you’ve confirmed the switch is working, immediately disconnect the battery cables again before proceeding to reassembly.

Step 6: Reassembling the Control Head

  1. Route Wires Neatly: Ensure all wires are tucked neatly inside the control head and are not pinched or crimped as you bring the two halves together.
  2. Reassemble Control Head Halves: Carefully align the two halves of the control head and gently press them back together.
  3. Reinstall Control Head Screws: Secure the control head halves by reinserting and tightening all the Phillips head screws you removed earlier. Do not overtighten.
  4. Reinstall Speed Knob: Place the speed knob back onto the switch shaft, ensuring it aligns with the “Off” position when the switch is in the off position. Reinsert and tighten the small screw that secures the knob.

Step 7: Final Test and Ready for the Water!

  1. Reconnect Batteries: Once everything is fully reassembled, reconnect the positive and negative battery cables to your boat’s battery.
  2. Final Test: Perform a thorough test of all speeds, forward and reverse, to ensure everything is working perfectly.
  3. Clean Up: Clean up any tools and dispose of the old switch.

Troubleshooting Common Issues:

  • Motor Still Not Working:
    • Double-check all wire connections. A loose connection is a common culprit.
    • Ensure the battery is fully charged.
    • Check the circuit breaker or fuse (if your boat has one) for the trolling motor.
    • Verify you have the correct replacement switch for your model.
  • Only Certain Speeds Working:
    • This usually indicates a faulty connection to the wires for the non-working speeds. Re-inspect those specific connections.
    • Less common, but possible, a manufacturing defect in the new switch itself.
  • Propeller Not Turning (but motor hums):
    • Check for fishing line or debris wrapped around the propeller shaft.
    • Inspect the prop pin for damage or shearing.
    • This is usually a prop-related issue, not a switch issue.
  • Switch Feels Loose or Jumpy:
    • Ensure the retaining nut on the switch (if applicable) is fully tightened.
    • Make sure the control head screws are snug.

By following these detailed steps, you can confidently replace the 5-speed switch on your Minn Kota Endura trolling motor, restoring its functionality and extending its lifespan. A little DIY effort can save you money and keep you fishing without interruption! For diagrams and specific part numbers for your Minn Kota Endura, always visit ReelSchematic.com’s extensive library of parts and schematics.

Posted on

How to Clean Up and Repair a Water Leak in Your Minn Kota Trolling Motor

A trolling motor is the silent workhorse of many angling adventures, providing precise boat control and stealthy approaches to fish. However, when that workhorse starts to “cry” with a water leak, it’s a clear signal that immediate attention is required. Water ingress into the lower unit of a Minn Kota trolling motor can lead to catastrophic failure, corroding sensitive electrical components, seizing bearings, and ultimately rendering your valuable motor useless.

At ReelSchematic.com, we understand the importance of keeping your gear in top condition. This comprehensive guide will walk you through the process of diagnosing, cleaning up, and repairing a water leak in your Minn Kota trolling motor. While some steps require a degree of mechanical aptitude, this article aims to empower you with the knowledge to tackle this critical issue, potentially saving you significant time and money.

Disclaimer: Working with electrical components and mechanical assemblies requires caution. If you are uncomfortable with any of these steps, or if the damage appears extensive, it is highly recommended to seek professional assistance from a certified Minn Kota service center.

Understanding the Enemy: Why Water Leaks Happen

Before we dive into the fix, let’s understand the common culprits behind water leaks in Minn Kota trolling motors:

  • Damaged Propeller Shaft Seals: This is by far the most common cause. The seals around the propeller shaft are designed to prevent water from entering the lower unit. Over time, these seals can wear out, crack, or become damaged by fishing line, debris, or impact.
  • Worn or Damaged O-Rings: O-rings are used in various places, such as around the end cap of the lower unit or where the motor housing components join. Like propeller shaft seals, these can degrade, flatten, or get pinched, compromising the seal.
  • Cracked or Damaged Lower Unit Housing: While less common, a severe impact with an underwater obstruction can crack the aluminum housing of the lower unit, creating an entry point for water.
  • Improperly Torqued End Cap Bolts: If the bolts holding the end cap in place are not tightened correctly after a repair or maintenance, the seal can be compromised.
  • Corroded Wires or Connections: In rare cases, severe corrosion within the motor, often due to previous water ingress, can create pathways for water, though this is usually a symptom of a pre-existing leak.

Phase 1: Diagnosis – Is There Really a Leak?

Before you tear apart your motor, confirm the presence and approximate location of the leak.

  1. Initial Inspection:
    • Visual Check: After using your motor, look for any oily residue or milky discoloration on the propeller shaft, around the propeller, or near the seams of the lower unit. This “milky” appearance is often emulsified gear oil (if your model uses it) or simply mixed water and grease.
    • Propeller Wiggle Test: Gently try to wiggle the propeller. Excessive play can indicate worn bearings or a compromised shaft seal.
  2. The Submersion Test (Controlled Environment):
    • Gather Supplies: A large bucket or tub, warm water (not hot), and paper towels.
    • Preparation: Remove the propeller from your trolling motor. This is crucial for accessing the seals.
    • Submersion: Carefully submerge only the lower unit (the bullet-shaped part that houses the motor and propeller shaft) into the water. Ensure the entire lower unit is covered, but do not submerge the shaft or control head.
    • Observation: Look closely for a steady stream of small bubbles emanating from any particular spot. Bubbles indicate a leak. Pay special attention to:
      • Around the propeller shaft.
      • Around the edge of the end cap (the very back of the lower unit, behind the prop).
      • Any cracks or seams in the housing.
    • Rotate and Test: Slowly rotate the motor and try wiggling the shaft to see if the bubbles appear under stress.
    • Power On (Carefully!): If you’re certain no water will reach the upper electrical components, you can briefly power on the motor while submerged to see if the rotation exacerbates the leak. However, be extremely cautious and only do this if you are confident in your setup.
  3. Oil Check (If Applicable):
    • Some Minn Kota motors (older models or specific designs) use oil in the lower unit. If your model does, a milky, frothy appearance of the oil when drained is a definite sign of water contamination. Consult your owner’s manual to determine if your model uses lower unit oil and how to check it.

Phase 2: The Cleanup – Preventing Further Damage

Once a leak is confirmed, the clock is ticking. Water inside the motor is a destructive force.

  1. Disconnect Power IMMEDIATELY: Before doing anything else, disconnect all power to the trolling motor. Unplug it from the battery or remove the battery terminals. Safety first!
  2. Disassemble the Lower Unit (Carefully!):
    • Propeller Removal: Start by removing the propeller. Usually, this involves loosening a nut or bolt. Note the order of any washers or spacers.
    • End Cap Removal: The end cap is typically held on by several screws or bolts. Remove these carefully. The end cap might be tight due to the O-ring seal. You may need to gently pry it open.
    • Internal Component Removal:
      • Armature/Motor Assembly: Carefully slide out the entire motor assembly (armature, brushes, commutator, etc.) from the lower unit housing. This is often a snug fit. Take note of how everything is oriented.
      • Bearings and Seals: Pay close attention to the bearings and seals at both ends of the shaft within the lower unit. These are often the culprits.
  3. Assess and Document Damage:
    • Visual Inspection: Look for signs of corrosion (green, white, or black residue) on the motor windings, commutator, brushes, and electrical connections.
    • Bearing Inspection: Check the bearings for rust, gritty feeling when rotated, or excessive play.
    • Seal Inspection: Examine the propeller shaft seals and O-rings. Look for cracks, tears, flattening, or hardening. Use a magnifying glass if necessary.
    • Housing Inspection: Check the inside of the lower unit housing for cracks, pitting, or significant wear.
    • Take Photos: Document everything with photos. This will be invaluable for reassembly and if you need to order replacement parts.
  4. The Drying Process (Crucial!):
    • Rinse with Isopropyl Alcohol (IPA): For electrical components, this is your best friend. IPA (at least 90% concentration) displaces water and evaporates quickly, leaving minimal residue.
      • Method: Gently rinse the affected electrical components (armature, commutator, brush assembly, wiring connections) with IPA. You can use a spray bottle or a small brush. Do NOT use water!
      • Avoid Submerging Windings: While IPA is safe, try not to completely submerge the motor windings for prolonged periods unless absolutely necessary.
    • Desiccant / Drying Chamber: Place all components in a warm, dry area. Consider using:
      • Rice/Silica Gel: A container filled with uncooked rice or silica gel packets can draw out moisture.
      • Dehumidifier: A room with a dehumidifier is ideal.
      • Warm Air: A gentle fan or a hairdryer on a low, cool setting (held at a distance) can help air circulation and evaporation. DO NOT use high heat, as this can damage insulation and plastic parts.
    • Extended Drying Time: This is not a quick process. Allow components to dry for at least 24-72 hours, or even longer for heavily saturated motors. Patience here will prevent future issues. Ensure absolutely no moisture remains.
  5. Clean Corroded Contacts (If Present):
    • If you find any corrosion on electrical contacts or brush surfaces, gently clean them using a very fine grit sandpaper (600-800 grit), a pencil eraser, or a specialized electrical contact cleaner spray. The goal is to restore good electrical conductivity.

Phase 3: The Repair – Sealing the Breach

Once everything is thoroughly dry and clean, it’s time to replace the compromised components and reassemble the motor.

  1. Order Replacement Parts:
    • Based on your diagnosis, you’ll likely need a new propeller shaft seal kit and potentially new O-rings for the end cap.
    • If bearings are rusted or rough, order new ones.
    • If you suspect a cracked housing, this is a more significant repair, possibly requiring professional welding or a full lower unit replacement.
    • ReelSchematic.com Resources: Check our diagrams and parts lists for your specific Minn Kota model to ensure you order the correct parts. Have your motor’s serial number handy.
  2. Installing New Seals and O-Rings:
    • Propeller Shaft Seals:
      • Carefully remove the old seals from the shaft housing. You might need a small pick or screwdriver. Be careful not to scratch the metal surfaces.
      • Lubrication: Lightly lubricate the new seals with a marine-grade grease or silicone lubricant before installation. This helps them seat properly and prevents damage during assembly.
      • Pressing In: Gently press the new seals into place. Some kits might include a small installation tool. Ensure they are seated squarely and fully.
    • End Cap O-Ring:
      • Remove the old O-ring.
      • Clean the O-ring groove thoroughly.
      • Lightly lubricate the new O-ring with marine grease and seat it firmly into its groove on the end cap. Ensure it’s not twisted or pinched.
  3. Reassembly of the Lower Unit:
    • Lubricate Bearings: If replacing or reusing bearings, lightly lubricate them with appropriate marine-grade grease.
    • Slide in Armature: Carefully slide the motor armature and associated components back into the lower unit housing. Ensure brushes are properly seated on the commutator. You may need to gently push the brushes back into their holders to allow the commutator to pass.
    • Reinstall End Cap: Align the end cap with the housing, making sure the O-ring stays in its groove. Gently press the end cap into place.
    • Tighten Bolts/Screws: Secure the end cap with its screws/bolts. Crucially, tighten these bolts evenly and in a criss-cross pattern. Over-tightening one side can deform the O-ring seal. Consult your Minn Kota manual for specific torque specifications if available.
    • Reinstall Propeller: Attach the propeller, ensuring any washers or spacers are in the correct order. Tighten the propeller nut securely, but do not over-tighten, as this can damage the shaft or prop.

Phase 4: Verification – The Leak Test (Again!)

After reassembly, it’s absolutely vital to re-test the motor for leaks before you put it back on your boat.

  1. Submersion Test: Repeat the controlled submersion test from Phase 1. Submerge the lower unit and look for any bubbles.
  2. Pressurized Test (Optional, Advanced): Some technicians use specialized tools to slightly pressurize the lower unit with air and then submerge it. This can reveal very small leaks. However, this requires specific equipment and knowledge and is beyond the scope of a typical DIY repair.

Phase 5: Preventative Measures – Protecting Your Investment

Once your Minn Kota is leak-free, adopt these practices to prevent future water ingress:

  1. Regular Propeller Inspection:
    • After Every Trip: Make it a habit to remove your propeller after every few trips (or certainly if you’ve hit anything) and inspect behind it.
    • Remove Fishing Line: Fishing line is a silent killer of propeller shaft seals. It can wrap around the shaft, cut into the seals, and create pathways for water. Always remove any fishing line immediately.
    • Check for Debris: Clear any weeds, monofilament, or other debris that might be wrapped around the shaft.
  2. Periodic Lower Unit Inspection:
    • Visual Check: Annually, or more often if you fish heavily, visually inspect the entire lower unit for any signs of cracks, loose bolts, or damage to the end cap seal.
    • Oil Check (If Applicable): If your motor uses lower unit oil, check its condition annually. If it’s milky, change it and investigate for leaks.
  3. Proper Stowing and Storage:
    • Drainage: When stowing your motor, ensure the lower unit has a chance to drain any standing water.
    • Protection: Protect the motor from impacts when trailering or storing.
  4. Avoid Impacts:
    • While Minn Kota motors are durable, direct impacts with rocks, stumps, or other underwater hazards can crack the housing or damage internal components, leading to leaks. Exercise caution, especially in shallow or unfamiliar waters.
  5. Use Genuine Parts:
    • When replacing seals, O-rings, or other components, always opt for genuine Minn Kota replacement parts. Aftermarket parts may not meet the exact specifications, potentially compromising the seal.

Conclusion

A water leak in your Minn Kota trolling motor is a serious issue that demands your attention. By carefully following these steps for diagnosis, cleanup, and repair, you can effectively address the problem, prevent costly damage, and extend the life of your valuable equipment. Remember, vigilance and proactive maintenance are your best allies in keeping your trolling motor running silently and reliably, ensuring countless more successful days on the water. If you ever feel out of your depth, don’t hesitate to consult a professional service center – your investment is worth protecting.

Posted on

Stop the Slip! How to Keep Braided Fishing Line Secure on Your Spool

Braided fishing line is a fantastic choice for many anglers due to its incredible strength, thin diameter, and lack of stretch, which provides enhanced sensitivity. However, these same properties, particularly its slickness, can lead to a frustrating problem: the entire mass of braided line slipping or spinning freely on the reel spool, especially under pressure. This can happen when you’re fighting a fish (imagine your drag screaming, but no line is actually being taken!) or even during a powerful cast.

Fortunately, this is a common issue with well-established solutions. Here’s how to ensure your braided line grips your spool securely:

Why Does Braid Slip?

Unlike monofilament or fluorocarbon, braided lines have a very smooth, almost waxy texture and no memory. This means they don’t naturally “bite” into the typically smooth metal or graphite surface of a fishing reel’s arbor (the core of the spool). Without something to grip onto, the entire spooled line can rotate around the arbor as one unit.

The Best Ways to Prevent Braided Line Slippage:

There are three primary and effective methods to combat this issue:

  1. Monofilament Backing (The Most Popular Method):
    • How it Works: You first spool a layer of monofilament line onto the reel’s arbor. Monofilament has more texture and “stickiness” than braid and will grip the spool effectively. The braided line is then tied to this monofilament backing.
    • Steps:
      1. Tie Monofilament to Spool: Securely attach monofilament line to your reel’s arbor using an arbor knot or a couple of wraps and a uni knot.
      2. Spool the Backing: Wind on enough monofilament to cover the arbor completely and provide a good base. The amount will vary depending on your reel size and how much braid you intend to use. A common approach is to fill anywhere from 1/8 to 1/3 of the spool with mono. Some anglers use just enough to make several layers over the arbor (e.g., 10-20 yards), while others use more to save on the amount of expensive braid needed to fill the spool.
      3. Connect Braid to Mono: Tie your braided line to the monofilament backing using a strong line-to-line knot. The Double Uni Knot or an FG Knot (if you’re proficient) are excellent choices. Ensure the knot is cinched down tightly and trim the tag ends closely.
      4. Spool the Braid: Wind your braided line onto the reel over the monofilament backing, applying firm tension to ensure it lays tightly and evenly.
  2. Electrical Tape or Specialized Arbor Tape:
    • How it Works: A layer of tape is wrapped around the arbor of the spool, providing a textured, grippy surface for the braid to adhere to.
    • Steps:
      1. Clean the Arbor: Ensure the spool’s arbor is clean and dry.
      2. Apply Tape: Wrap one or two layers of good-quality electrical tape (vinyl works well) or specialized fishing arbor tape tightly and smoothly around the arbor. Ensure the tape covers the area where the line will initially be spooled. Some anglers prefer to tie their braid on first with an arbor knot and then tape over the knot and the first few wraps of line.
      3. Tie Braid to Spool (over tape): Securely tie your braided line directly to the taped arbor using an arbor knot or a uni knot, cinching it down firmly so it “bites” into the tape.
      4. Spool the Braid: Wind your braided line onto the reel, applying firm tension.
  3. Using a “Braid-Ready” Spool:
    • How it Works: Some modern fishing reels come with “braid-ready” spools. These spools often have a textured rubber band or a knurled surface integrated into the arbor. This provides the necessary friction for the braid to grip directly without needing backing or tape.
    • Steps:
      1. Check Your Reel: Consult your reel’s manual or inspect the spool arbor for a rubberized strip or a noticeably textured surface.
      2. Tie Braid Directly: If your spool is braid-ready, you can often tie your braided line directly to the arbor using an arbor knot or uni knot. Cinch it down tightly.
      3. Spool the Braid: Wind the braided line on with good tension.
      • Note: Even with braid-ready spools, some anglers still prefer a short monofilament backing or a wrap of tape for extra peace of mind, especially with very slick braids or for heavy-duty applications.

Tips for Success:

  • Spool Tightly: Regardless of the method you choose, always spool your braided line onto the reel under firm, consistent tension. This prevents the braid from digging into itself under pressure, which can also cause issues.
  • Knot Choice: When using monofilament backing, a reliable line-to-line knot is crucial. Practice your knots to ensure they are strong and have a slim profile.
  • Don’t Overfill: Leave about 1/8 inch (2-3mm) of space between the spooled line and the lip of the spool to prevent casting tangles.
  • Initial “Bedding In”: After spooling, some anglers like to soak the spooled braid in water and then let it dry thoroughly while still on the reel. This can help the line settle and pack tighter. You can also achieve this by making a few long casts and retrieves with a heavy lure.

By taking one of these simple preventative measures, you can eliminate the frustration of braided line slippage and fish with the confidence that your line will stay put when it matters most. Choose the method that works best for you and enjoy the many benefits of fishing with braid!

Posted on

Smooth Drags, More Fish: A Guide to Replacing Drag Washers in Your Ambassadeur Casting Reel

The iconic Abu Garcia Ambassadeur casting reel is a testament to enduring design and robust performance. A key component to its fish-stopping power is its drag system. Over time, however, drag washers can wear out, compress, or become contaminated, leading to jerky, inconsistent, or weak drag pressure. The good news is that replacing them is a straightforward maintenance task that can significantly improve your reel’s performance and longevity.

This guide will walk you through the process of replacing the drag washers in your Ambassadeur casting reel, ensuring you have the smooth, reliable drag needed to confidently battle your next trophy fish.

Why Replace Your Drag Washers?

  • Smoother Drag: New washers provide consistent pressure, eliminating the jerkiness that can lead to lost fish.
  • Increased Drag Power: Worn washers can slip. Fresh ones restore maximum drag capability.
  • Improved Longevity: Contaminated or degraded washers can damage other parts of the drag system.
  • Upgrade Opportunity: This is a great time to upgrade from stock washers to higher-performance aftermarket options like Carbontex or HT-100 for even better smoothness and durability.

Before You Begin: Gather Your Tools and Parts

  • Replacement Drag Washers:
    • Compatibility: Ensure you have the correct size and type of drag washers for your specific Ambassadeur model (e.g., 5500, 6500, C3, C4). Consult your reel’s schematic or reputable reel parts suppliers.
    • Material:
      • Felt/Fiber (Stock): Often come pre-greased. Good for general use.
      • Carbon Fiber (Carbontex, HT-100): Offer superior smoothness, power, and durability. Usually require a very light coat of specialized drag grease like Cal’s Tan, Deuthlon Power Drag Grease or Shimano Star Drag Grease if applied dry. Some come pre-greased.
  • Reel Schematic: Indispensable for seeing the correct order of washers. You can usually find these on the Abu Garcia website or fishing reel forums.
  • Small Phillips Head Screwdriver: For removing the handle-side plate screws.
  • Wrench for Handle Nut: Often a 10mm or 11mm wrench, or the one supplied with some Ambassadeur models.
  • Small Flat Head Screwdriver or Pick: Useful for removing e-clips or manipulating small parts.
  • Needle Nose Pliers: For handling small components.
  • Drag Washer Grease (if using ungreased carbon washers): Such as Cal’s Universal Reel & Drag Grease or Shimano Star Drag Grease. A very light application is key.
  • Cleaning Supplies: Isopropyl alcohol, cotton swabs, a small brush, and a clean cloth for cleaning old grease and debris.
  • A Well-Lit Workspace and a Container: To keep small parts organized and prevent loss.

Step-by-Step Replacement Guide

1. Prepare Your Workspace & Reel: * Lay down a clean cloth or mat. * Ensure your reel is free of line, or at least that the line won’t interfere. * Loosen the drag star completely by turning it counter-clockwise until it offers no resistance.

2. Remove the Handle Assembly: * Handle Nut Cap: If your reel has a small cap over the handle nut, carefully pry it off with a small flat-head screwdriver or pick. * Handle Nut Retainer: Remove the small screw holding the handle nut retainer plate (if present). * Handle Nut: Using the appropriate wrench (often 10mm or 11mm for many Ambassadeurs), unscrew the handle nut. Remember: typically, this unscrews in a standard counter-clockwise direction. * Handle: Lift the handle assembly straight off the drive shaft. * Drag Star: Slide the star-shaped drag adjuster off. Pay attention to any curved tension washers (“Belleville” or “spring” washers) underneath it; note their orientation (e.g., “() ()” or “( ) ( )”). This is critical for proper drag function. * Spacers/Bearings: Note any other spacers or bearings that might be on the drive shaft above the side plate.

3. Remove the Handle-Side Sideplate: * Carefully unscrew the two or three Phillips head screws that secure the handle-side (right side) plate to the reel frame. These are often called “thumb screws” if they are knurled for tool-less removal on some models, or standard screws on others. * Gently lift the side plate away from the frame. It might require a little wiggle. Be mindful of any shims or washers that may be present on the spool shaft or inside the side plate. The main gear, pinion gear, and drag stack may stay with the side plate or remain on the drive shaft.

4. Access and Disassemble the Drag Stack: * The drag stack is located within or around the main gear. * Carefully lift the main gear off the drive shaft (if it didn’t come off with the side plate). * The drag washers are a series of metal and non-metal (your drag material) washers stacked in a specific order within the main gear or around the drive shaft. * Crucial Step: Lay out the old drag washers in the exact order they come out. Take a photo with your phone before fully disassembling if you’re unsure. The sequence typically alternates between a metal washer and a drag material washer. Note the keyed metal washers (with “ears” that fit into slots in the main gear) and the round metal washers. * There’s usually a thick metal washer at the very bottom of the stack (inside the main gear) and often one on top, just under the gear sleeve or main gear.

5. Clean the Components: * Thoroughly clean the main gear, especially the recess where the drag washers sit. Use isopropyl alcohol and cotton swabs to remove all old grease, oil, and debris. * Clean the metal drag washers that you will be reusing (if your kit doesn’t replace all metal parts). Ensure they are smooth and free of burrs. If any metal washers are significantly warped or damaged, they should also be replaced.

6. Prepare and Install the New Drag Washers: * Greasing (if applicable): If you’re using carbon fiber washers like Carbontex and they came ungreased, apply an extremely light, even coat of specialized drag grease to each side of the carbon washers. You want just enough to make them look wet, not goopy. Too much grease can reduce drag pressure. Pre-greased stock felt washers usually don’t need additional grease. * Reassemble the Stack: Referring to your schematic (or the order you noted during disassembly), begin re-stacking the washers into the main gear or onto the drive shaft. * Typically, you start with a metal washer (often a keyed “eared” washer) at the bottom of the main gear. * Follow with a new (greased, if necessary) drag material washer. * Then another metal washer (this one might be round or keyed). * Continue alternating metal and drag material washers according to the schematic. * Ensure the keyed metal washers have their “ears” correctly seated in the slots inside the main gear. * The last washer on top of the stack before the gear sleeve or other components is usually a metal washer.

7. Reassemble the Reel: * Main Gear: Place the main gear (with the new drag stack installed) back onto the drive shaft in the frame, ensuring it meshes correctly with the pinion gear. * Handle-Side Sideplate: Carefully align the side plate with the frame and the drive shaft. Ensure any internal components or shims are correctly positioned. Gently press the sideplate into place. If it doesn’t sit flush, don’t force it; re-check alignment. * Secure the side plate with its screws. * Spacers/Bearings: Reinstall any spacers or bearings that sit above the side plate on the drive shaft. * Drag Star Spring Washers: Place the curved tension washers back onto the drive shaft in their original orientation (e.g., “() ()”). * Drag Star: Screw the drag star back on. * Handle Assembly: Reinstall the handle, handle nut, retainer (if present), and nut cap. Tighten the handle nut securely but don’t overtighten to the point of stripping threads.

8. Test the Drag: * Tighten the drag star. Pull line from the spool (if spooled) or try to turn the spool by hand while holding the handle. * The drag should engage smoothly and provide increasing resistance as you tighten the star. * If the drag feels jerky or weak, you may need to re-check the washer order, ensure keyed washers are seated, or that you haven’t over/under greased (if applicable).

Important Tips:

  • Take Your Time: Patience prevents lost parts and mistakes.
  • Schematic is Your Best Friend: Refer to it often, especially for washer order and spring washer orientation.
  • Keep it Clean: Contaminants are the enemy of a smooth drag.
  • Light Grease is Right Grease (for Carbon): For carbon washers, less is more.
  • Don’t Force Parts: If something doesn’t fit, re-evaluate.
  • Regular Maintenance: Consider cleaning and re-greasing your drag (if using greased carbon washers) annually or after heavy use or submersion to maintain peak performance.

Replacing the drag washers in your Ambassadeur is a rewarding task that will noticeably improve your fishing experience. With a smooth, reliable drag, you’ll be ready to tackle whatever bites next!

Posted on

Revive Your Cast: A Step-by-Step Guide to Replacing the Levelwind Shaft on Your Ambassadeur 6500C3

The Abu Garcia Ambassadeur 6500C3 is a legendary workhorse among fishing reels, prized for its durability and smooth performance. However, like any mechanical device, parts can wear out with use. The levelwind shaft, also known as the worm shaft or worm gear, is a critical component responsible for evenly distributing line across the spool during retrieve. If you notice your line bunching up or the levelwind mechanism sticking, it might be time to replace this shaft.

This guide will walk you through the process of changing the levelwind shaft in your Ambassadeur 6500C3, getting you back on the water with a perfectly functioning reel.

Before You Begin: Gather Your Tools and Parts

  • New Levelwind Shaft: Ensure you have the correct replacement part for your Ambassadeur 6500C3 model. Consult your reel’s schematic or a reputable parts dealer. The part number is often #5205 (worm screw) or similar, but always double-check.
  • Reel Schematic: Having a diagram of your reel is invaluable. You can typically find these on the Abu Garcia website or various fishing reel forums.
  • Small Phillips Head Screwdriver: For removing side plate screws.
  • Small Flat Head Screwdriver or Pick: Useful for manipulating small clips or parts.
  • Pawl Cap Wrench (Optional but Recommended): A specialized tool (often Abu Garcia part #10752 or similar) makes removing the pawl cap easier and prevents damage. Pliers can be used carefully if a wrench isn’t available, but be cautious not to strip the cap.
  • Needle Nose Pliers: For handling small components.
  • Reel Oil and Grease: Essential for lubricating parts during reassembly.
  • Cleaning Supplies: Cotton swabs, a small brush, and a clean cloth for cleaning parts.
  • A Well-Lit Workspace and a Container: To keep small parts organized and prevent loss.

Step-by-Step Replacement

1. Prepare Your Workspace & Reel: * Lay down a clean cloth or mat to work on. * Wind off any remaining fishing line from the spool. * Loosen the drag star completely.

2. Remove the Handle-Side Sideplate: * Unscrew the handle nut cap (if present). * Remove the e-clip or c-clip holding the handle nut. * Unscrew the handle nut and remove the handle assembly and drag star. Keep these parts in order. * Carefully unscrew the two (or sometimes three) side plate screws holding the handle-side (right side) plate to the frame. * Gently lift the side plate away from the frame. Be mindful of any shims or washers that may be present on the spool shaft or inside the side plate.

3. Remove the Spool: * With the handle-side plate removed, the spool can usually be easily lifted out of the frame. Set it aside in a safe place.

4. Access the Levelwind Mechanism (Palm-Side/Left Side): * Now, focus on the palm-side (left side) of the reel frame. * Remove the Pawl Cap: This small, often slotted or knurled cap (part #5177 or similar) is located on the front of the line guide carriage. Use your pawl cap wrench or carefully use pliers to unscrew it counter-clockwise. * Remove the Pawl: Once the cap is off, the line guide pawl (part #5176 or similar) can be removed. It might fall out, or you may need to gently tip the reel or use your pick to retrieve it. This is a small but crucial part – don’t lose it! * Remove the Line Guide Retaining Clip/Plate: On the side of the frame (usually the left side plate if it’s still attached, or on the frame itself if the left plate is integral or has been removed for deeper cleaning), there’s typically a small retaining clip or plate (e.g., part #5178) that holds the end of the levelwind shaft. This may be held by a small screw or simply clip into place. Carefully remove this.

5. Remove the Old Levelwind Shaft: * With the pawl and retaining clip removed, the levelwind shaft (worm screw, part #5205) and the line guide carriage (part #5174 or similar) should now be free. * Gently slide the levelwind shaft out of the frame. The line guide carriage will come with it or can be slid off the shaft. * Note the orientation of any shims or small bushings that might be on either end of the old shaft.

6. Clean and Inspect: * Take this opportunity to clean the area where the levelwind mechanism sits. Use cotton swabs and a brush to remove old grease, dirt, and debris. * Inspect the line guide carriage and pawl for any wear or damage. If the pawl is worn (e.g., a groove is visible on its “tooth”), it’s highly recommended to replace it along with the shaft for optimal performance.

7. Install the New Levelwind Shaft: * Lightly grease the new levelwind shaft with quality reel grease. * Slide the line guide carriage onto the new shaft. Ensure it’s oriented correctly (refer to your schematic if unsure). * Insert the new levelwind shaft, with the line guide carriage, back into the frame. Make sure any shims or bushings are correctly placed. * Align the end of the shaft with its slot or hole in the frame.

8. Reassemble the Levelwind Mechanism: * Reinstall the Line Guide Retaining Clip/Plate: Secure the clip or plate that holds the end of the levelwind shaft in place. * Reinstall the Pawl: Apply a small amount of fresh oil to the pawl. Carefully insert the pawl back into the line guide carriage. Ensure it seats correctly – the “tooth” of the pawl should engage with the grooves of the levelwind shaft. * Reinstall the Pawl Cap: Screw the pawl cap back on. It should be snug but not overly tight. Overtightening can damage the cap or bind the pawl.

9. Reinstall the Spool and Handle-Side Sideplate: * Place the spool back into the frame. * Carefully align the handle-side sideplate with the frame and spool shaft. Ensure any internal components or shims are correctly positioned. * Gently press the sideplate into place. If it doesn’t sit flush, don’t force it. Double-check that everything is aligned correctly. * Reinsert and tighten the side plate screws. * Reinstall the drag star, handle assembly, handle nut, and handle nut clip/cap in the reverse order of removal.

10. Test and Lubricate: * Turn the handle. The levelwind mechanism should now move smoothly back and forth across the front of the reel. * If it binds or doesn’t move correctly, you may need to disassemble the levelwind components again to check for proper pawl engagement or any obstructions. * Apply a drop of oil to the levelwind shaft where it enters the frame on both sides and to the handle knobs.

Important Tips:

  • Take Your Time: Rushing can lead to lost parts or incorrect assembly.
  • Keep Parts Organized: Use a small tray or magnetic mat. Laying parts out in the order they were removed is helpful.
  • Refer to Your Schematic: This is your best friend during disassembly and reassembly.
  • Don’t Force Anything: If a part doesn’t seem to fit, re-check its orientation and the schematic.
  • Cleanliness is Key: Old, gritty grease and dirt are enemies of smooth reel operation.
  • Moderate Lubrication: Too much grease or oil can attract dirt and hinder performance. A light, even coat is usually sufficient.

Replacing the levelwind shaft on your Ambassadeur 6500C3 might seem daunting at first, but by following these steps carefully, you can restore your reel to its former glory. A smooth, even line lay is crucial for casting distance and preventing line problems, ensuring many more successful fishing trips.

Posted on

Tools Needed for a Reel Repair

Your Fishing Reel Repair Toolkit: Essential Tools for Maintenance and Fixes

Keeping your fishing reels in top working order is crucial for performance and longevity. While complex repairs might require a professional, performing routine maintenance like cleaning, lubrication, and replacing simple parts is well within the reach of most anglers. However, attempting these tasks without the proper tools can lead to frustration, lost parts, or even damage to your valuable gear.   

Investing in a basic toolkit specifically for reel repair will save you time, money, and headaches in the long run. Here’s a breakdown of the essential tools you’ll need:

1. Precision Screwdrivers:

  • Why: Reels use various small screws, often Phillips head and flathead, to hold side plates, body covers, and internal components.
  • What to look for: A set of precision screwdrivers with multiple bit sizes is essential. Using the wrong size screwdriver is the fastest way to strip a screw head. Magnetic tips are a bonus for handling tiny screws.

2. Nut Drivers or Small Socket/Wrench Set:

  • Why: Handle nuts and sometimes drag stack retaining nuts require specific sizes to remove without marring the finish.
  • What to look for: A small metric socket set (common sizes are often 7mm, 8mm, 10mm, 11mm, 12mm) or dedicated nut drivers will work. Ensure they fit snugly. An adjustable wrench can work in a pinch but increases the risk of rounding off the nut.

3. Tweezers:

  • Why: Indispensable for handling tiny springs, clips, shims, bearings, and other small parts that are difficult to grasp with fingers.
  • What to look for: Fine-point tweezers (straight or angled) offer the best precision. Non-magnetic tweezers can be helpful when working near bearings.

4. Picks and Probes:

  • Why: Useful for manipulating small components, cleaning out tight grooves, removing o-rings, and guiding parts into place.
  • What to look for: Dental picks (available affordably online or at hardware stores) are excellent. Look for various tip shapes (straight, hooked, angled).

5. Small Needle-Nose Pliers:

  • Why: Good for gripping slightly larger components, bending small wires or springs (carefully!), and holding parts steady.
  • What to look for: Choose a pair with a fine tip suitable for delicate work.

6. Cleaning Brushes:

  • Why: Needed to scrub away old grease, dirt, sand, and grime from gears, housings, and other components.
  • What to look for: An old toothbrush is a great start. Small, stiff-bristled brushes (like specialized cleaning brushes or stiff artist brushes) are excellent for gears. Softer brushes can be used for more delicate areas.

7. Cleaning Solution / Degreaser:

  • Why: Effectively breaks down old, sticky grease and oil before re-lubrication.
  • What to look for: Use reel-specific degreasers or isopropyl alcohol (90%+). Avoid harsh solvents like gasoline or brake cleaner, which can damage plastic parts or finishes.

8. Lubricants (Oil and Grease):

  • Why: Absolutely critical for proper reel function. Oil is for fast-moving parts (bearings, handle knobs, line rollers), while grease is for slower, high-pressure parts (main gears, pinion gears, worm gears, slide mechanisms).
  • What to look for: Use only lubricants specifically designed for fishing reels. Quality reel oil (often synthetic) and reel grease (Teflon-based or other synthetics) are readily available. Do not use household oils (like WD-40 for lubrication, though it can help free stuck parts) or thick automotive greases.
  • 9. Lubricant Applicators:
  • Why: Allows for precise application of oil and grease exactly where needed, preventing over-lubrication.
  • What to look for: Precision needle oilers for oil, and small brushes, toothpicks, or dedicated grease applicators for grease.

10. Parts Tray / Organizer:

  • Why: Essential for keeping track of screws, springs, washers, and other small parts during disassembly. Losing a tiny e-clip can bring your repair to a halt.  
  • What to look for: A simple compartmentalized plastic tray or a magnetic parts tray works wonders.

11. Lint-Free Cloths or Rags & Cotton Swabs:

  • Why: For wiping down parts after cleaning and applying/removing excess lubricant.
  • What to look for: Microfiber cloths are ideal as they don’t leave fibers behind. Cotton swabs (like Q-tips) are great for cleaning tight spots and applying small amounts of grease.

12. Good Lighting & Optional Magnification:

  • Why: Reel parts are small and intricate. Seeing clearly is paramount to doing the job correctly.
  • What to look for: Work in a well-lit area. A dedicated desk lamp or even a headlamp can be very helpful. A magnifying glass or a hands-free magnifying visor can be a lifesaver for tiny components.

The Most Important “Tool”: The Reel Schematic!

  • Before you even remove the first screw, locate the schematic (exploded parts diagram) for your specific reel model. This is usually found in the original box or can often be downloaded from the manufacturer’s website. It shows the correct order and placement of every single part – it is your indispensable roadmap!

Getting Started

With these tools, you’ll be well-equipped to tackle routine cleaning, lubrication, and basic repairs on many spinning, baitcasting, and conventional reels. Remember to work slowly, stay organized (taking photos during disassembly can help!), use the right lubricants in the right places, and always refer to your schematic. Happy tinkering!

Posted on

How to Change a Bail Spring

Guide to Replacing a Spinning Reel Bail Spring

I. Introduction: Why Replace Your Bail Spring?

The bail mechanism is a fundamental component of any spinning reel, serving critical functions during both casting and retrieval. Its primary role is to guide the fishing line accurately onto the spool as the angler retrieves line, ensuring even distribution and preventing tangles. When casting, the bail is opened, acting like a gate to allow the line to freely unspool. Central to this operation is the bail spring, a small but vital part typically housed within one of the bail arm pivot points. This spring provides the necessary tension, creating the characteristic “snap” action that locks the bail firmly in the open position for casting and snaps it decisively closed for retrieval.

Due to the constant cycling between tension and release during normal fishing activities, the bail spring is subjected to significant mechanical stress. This repeated stress, potentially compounded by factors like grit intrusion or corrosion (especially in saltwater environments), makes the bail spring a common point of failure in spinning reels. Symptoms of a failing or broken bail spring are usually quite noticeable: the bail may refuse to stay open, fail to close automatically when the handle is turned (requiring manual closure), or feel generally sluggish, weak, or “mushy” in its action. The prevalence of bail spring issues across various sources indicates its status as a high-wear component, making familiarity with its replacement valuable for reel maintenance.

Fortunately, replacing a bail spring is often a manageable task for anglers possessing basic mechanical aptitude and the correct tools. Performing this repair at home can save both the cost of professional servicing and the downtime associated with sending the reel away. This guide provides a detailed, step-by-step process to confidently replace the bail spring in a typical spinning reel.

II. Understanding Your Spinning Reel’s Bail Mechanism

While fishing reels come in various types, including spincast and baitcasting models, this guide focuses specifically on spinning reels. This is because the bail arm and associated spring mechanism are characteristic features of spinning reels, whereas other types often employ different line management systems. For instance, baitcasting reels typically lack a bail arm altogether, relying instead on the angler’s thumb to control line release from the spool.

To effectively replace the bail spring, it is essential to understand the components of the bail assembly. These typically include:

  • Bail Wire: The prominent C-shaped metal wire that spans across the rotor.
  • Bail Arms: The structural components connecting the ends of the bail wire to the pivot points on the reel’s rotor.
  • Line Roller: Located at one end of the bail wire, this small roller guides the line onto the spool during retrieval. Its smooth operation is critical for preventing line twist and ensuring proper line lay.
  • Pivot Points/Screws: These are the points where the bail arms attach to the rotor, allowing the bail assembly to pivot open and closed. One of these pivot points typically houses the bail spring mechanism, secured by screws.
  • Bail Spring: The small torsion spring responsible for the bail’s snapping action. It is usually concealed under a cover plate at one of the pivot points.
  • Trip Mechanism: Internal components linked to the handle’s rotation that automatically trigger the bail to close when reeling begins. However, many anglers prefer to close the bail manually to reduce wear and prevent line issues.

**

It is important to recognize that the bail mechanism functions as an interconnected system. While a broken spring is a common culprit for bail issues, problems can also arise from other components. A bent bail wire, for example, can impede smooth movement and prevent proper closure, mimicking the symptoms of a weak spring. Similarly, a worn or dirty line roller can affect retrieval and casting, and loose pivot screws can cause misalignment and erratic function. Therefore, when diagnosing a bail problem, it is prudent to inspect these related parts for damage or misalignment, as the issue might not solely reside with the spring itself.

III. Essential Tools and the Right Replacement Spring

Successful bail spring replacement requires preparation, including gathering the necessary tools and ensuring the correct replacement part is obtained. Using improper tools or the wrong spring can lead to frustration, damage to the reel, or an unsuccessful repair.

Gather Your Tools:

A set of precision tools is essential for working with the small components inside a fishing reel. The following items are typically required:

  • Small Phillips head screwdrivers
  • Small flathead (slotted) screwdrivers (useful for prying or manipulating the spring)
  • Needle-nose pliers (for carefully handling the spring)
  • Small adjustable wrench or appropriate nut drivers (if needed for handle or rotor nut removal)
  • Tweezers (optional, but helpful for manipulating small parts)
  • Cleaning supplies: Cotton swabs (Q-tips), paper towels, a small brush (like an old toothbrush), and a suitable solvent (e.g., WD-40, white gas/Coleman fuel, isopropyl alcohol, or a dedicated reel cleaner)
  • Lubricants: High-quality reel oil (for bearings and pivots) and reel grease (for gears, if accessed)
  • Parts tray or small container(s) (to prevent loss of tiny screws and parts)
  • Safety glasses (highly recommended to protect eyes from flying springs or debris)
  • Large clear plastic bag (optional, working inside the bag can help contain the spring if it slips during removal or installation)

Finding the Correct Replacement Spring:

This is arguably the most critical preparatory step. Bail springs are not universal; they are specific to reel models and manufacturers.26 Using an incorrect spring will likely result in improper function or failure.

The key to obtaining the correct part is the reel’s schematic, often referred to as an exploded view diagram. These diagrams illustrate every component of the reel, assign part numbers, and show the correct assembly order.  Accessing the correct schematic is vital for identifying the exact bail spring part number needed and understanding how it fits within the mechanism. Attempting the repair without the proper schematic significantly increases the risk of errors, potential damage, and a non-functional reel. This underscores the importance of research before starting disassembly.

Sources for reel schematics include:

  • Manufacturer Websites: Many major brands (e.g., Abu Garcia 49, Lew’s 50, Van Staal 51, Pflueger 52, Daiwa 53, Penn 54, Seviin 55, 13 Fishing 56) provide schematics on their official websites, often in service or support sections.
  • Dedicated Schematic Websites: Online resources like ReelSchematic.com  and Mike’s Reel Repair  compile extensive libraries of schematics.
  • Repair Forums and Communities: Websites like AlanTani.com often feature discussions, tutorials, and user-uploaded schematics.
  • Parts Suppliers: Retailers specializing in reel parts, such as Mikes Reel Repair, often provide schematics or can help identify the correct part number.

To find the correct schematic, first identify the exact model name and number of the reel. This information is usually printed or engraved on the reel foot (where it attaches to the rod), the rotor, or a side plate. Once the model is known, use the resources above to search for its specific schematic and locate the part number listed for the “Bail Spring” or equivalent term.

Table: Tools and Materials Checklist

Item Purpose Check
Reel Schematic (Correct Model) Part ID, Assembly Guide
Replacement Bail Spring Correct Part for Specific Reel Model
Small Phillips Screwdriver(s) Removing cover/bail arm screws
Small Flathead Screwdriver(s) Prying, spring manipulation
Needle-Nose Pliers Handling spring
Small Wrench/Nut Driver(s) Handle/rotor nut (if needed)
Tweezers (Optional) Handling small parts
Cleaning Solvent Degreasing spring housing, parts
Cotton Swabs (Q-tips) Cleaning small areas
Small Brush (Toothbrush) Cleaning debris
Paper Towels/Rag Wiping parts clean
Reel Oil Lubricating pivots, line roller
Reel Grease Lubricating gears (if gearbox opened)
Parts Tray/Container(s) Organizing screws and small parts
Safety Glasses Eye protection
Clear Plastic Bag (Optional) Containing spring during removal/installation

IV. Step-by-Step Bail Spring Replacement Guide

With the correct replacement spring and tools gathered, and the schematic readily available, the replacement process can begin. Work methodically and carefully to avoid losing parts or damaging the reel.

  1. Preparation:
  1. Workspace Setup: Ensure the work area is clean, well-lit, and organized. A light-colored mat or surface helps in spotting small dropped parts. Avoid working over carpeted areas.
  2. Schematic Access: Keep the reel’s specific schematic visible for reference throughout the process.
  3. Safety Measures: Put on safety glasses. If desired, place the reel rotor area inside a large, clear plastic bag before manipulating the spring to catch it if it flies off.
  4. Part Organization: Use a parts tray or small containers to keep screws and components segregated and organized as they are removed. Taking photos at each disassembly stage with a smartphone can be invaluable for reassembly.
  1. Disassembly:
  1. Locate Bail Arm Screws: Identify the screws securing the bail arms to the rotor at the pivot points. Typically, one screw is located on each side. The bail spring mechanism is usually housed under one of these arms, often beneath a small cover plate.
  2. Remove Spring Cover (If Present): If there is a cover plate over the spring mechanism, carefully remove the small screw(s) holding it in place. Lift the cover off. Be aware that the spring underneath might be under tension and could shift or pop out.
  3. Remove Bail Arm Screw (Spring Side): Using the appropriate screwdriver, carefully loosen and remove the main screw holding the bail arm to the rotor on the side containing the spring.8 Note the order of any washers or small parts located under the screw head or bail arm. Place these securely in the parts tray.
  4. Separate Bail Wire (Highly Recommended): To make handling the spring and bail arm easier, it is strongly advised to detach the bail wire from the bail arm on the spring side. This is usually done by removing the screw that holds the line roller assembly together. Carefully disassemble the line roller, laying out the roller, bearings/bushings, and washers in the exact order and orientation they were removed to ensure correct reassembly. This step isolates the bail arm containing the spring, simplifying the most challenging part of the process. Trying to manage the spring tension while the entire bail wire assembly is attached can be very difficult.
  1. Replacing the Spring:
  1. Identify and Remove Old Spring: Before removing the old or broken spring, carefully observe its exact position and orientation within the housing and how its ends engage with the rotor and the bail arm. Note which leg goes into which slot or post. Use needle-nose pliers or tweezers to carefully lift the old spring out. 
  2. Clean the Spring Housing: Use a cotton swab dipped in cleaning solvent to thoroughly clean the cavity or post where the spring sits in the rotor. Remove all traces of old grease, dirt, sand, or debris. Ensure the area is clean and dry before installing the new spring. Generally, avoid applying grease directly into the spring cavity unless specifically indicated by the manufacturer’s schematic, as it can sometimes impede spring action.
  3. Install New Spring: This step requires precision and careful attention to the schematic.
  • Orientation is Critical: Position the new spring exactly as the old one was oriented, referencing the schematic and any photos taken during disassembly. Torsion springs typically have specific bends, a long leg and a short leg, or hooks that must engage correctly with corresponding holes, slots, or posts on the bail arm and the rotor housing. A common configuration involves the short end inserting into the rotor housing and the long end engaging the bail arm.
  • Proper Seating: Ensure the spring is fully seated in its designated pocket or correctly positioned around its guide post.
  • Pre-loading (Applying Tension): This is often the most challenging step and where many repairs falter. To function correctly, the spring must be “loaded” or tensioned before the bail arm is fully secured. This typically involves placing the bail arm over the seated spring and then rotating the arm (often counter-clockwise or clockwise , depending on the reel design) against the spring’s resistance while simultaneously aligning the screw hole. This rotation puts the necessary pre-load on the spring. It may require holding the bail arm firmly in this tensioned position with one hand while starting the retaining screw with the other. Failure to apply this pre-load correctly will result in a bail that does not snap open or closed properly. 
  1. Reassembly:
  1. Reattach Bail Arm (Spring Side): While maintaining the necessary tension on the spring (as achieved in the pre-loading step), carefully position the bail arm onto its pivot post on the rotor. Ensure the spring remains correctly engaged with both the rotor and the arm. Start the main bail arm screw, threading it in carefully while holding the arm in place. Once the screw is started, tighten it securely, but avoid overtightening, which could strip the threads or damage the rotor. Check that the bail arm pivots smoothly without excessive binding.
  2. Reattach Bail Wire (If Separated): Carefully reassemble the line roller, any associated bearings or bushings, and washers onto the bail wire end, ensuring they are in the exact order and orientation noted during disassembly. Attach the bail wire back to the bail arm using the line roller screw. Tighten the screw securely.
  3. Reinstall Cover Plate (If Applicable): Place the bail spring cover back over the mechanism and secure it with its screw(s).
  4. Reattach Opposite Bail Arm Side (If Loosened/Removed): Ensure the bail arm on the side opposite the spring is correctly seated on its pivot and tighten its retaining screw securely.

V. Testing Your Repair and Troubleshooting Common Issues

After reassembly, thorough testing is crucial before using the reel for fishing. Operating the bail mechanism several times will confirm if the replacement was successful.

Functional Test:

  1. Open Bail: Flip the bail wire fully open. Does it stay firmly in the open position without feeling loose or wanting to creep closed?
  2. Manual Close: Manually push the bail wire closed. Does it snap shut with positive authority and without hesitation?
  3. Automatic Close (Optional Test): Slowly turn the reel handle. Does the bail trip mechanism engage smoothly and cause the bail to close automatically? While functional, remember that manually closing the bail is generally recommended for longevity and line management.

If the bail operates correctly in these tests, the repair is likely successful. If issues arise, consult the following troubleshooting guide:

Troubleshooting Guide:

  • Problem: Bail Won’t Flip/Snap Shut (Feels Sluggish, Mushy, or Weak)
  • Possible Cause: Incorrect spring installation. The spring might be oriented incorrectly, not fully seated in its housing, or, most commonly, not properly pre-loaded with tension during reassembly.
  • Possible Cause: Dirt, debris, or old, sticky grease remaining in the spring housing or pivot mechanism, causing friction.
  • Possible Cause: The bail wire or bail arm itself is slightly bent or deformed, causing it to bind against the rotor or other components, preventing smooth movement.
  • Solution: Carefully disassemble the spring-side bail arm again. Double-check the spring’s orientation and seating against the schematic. Ensure the pre-loading step is performed correctly during reassembly. Thoroughly clean the spring housing and pivot area again. Inspect the bail wire and arm for any bends or misalignment; gently tweak or straighten if necessary, using smooth-jawed pliers or by hand, checking frequently.
  • Problem: Bail Feels Loose or Has Excessive Play
  • Possible Cause: The main bail arm pivot screws (on one or both sides) are not fully tightened.
  • Possible Cause: The bail wire is bent, or the bail arms are misaligned, preventing a snug fit at the pivots.
  • Possible Cause: Worn pivot points on the rotor or bail arm (less common unless the reel is very old or heavily used). Consult the schematic for proper assembly.
  • Possible Cause: The main rotor nut (under the spool) is loose. While not directly related to the spring replacement, a loose rotor can cause the entire bail assembly to feel wobbly.
  • Solution: Check that both bail arm pivot screws are securely tightened. If screws repeatedly loosen, consider applying a small drop of removable thread locker (like Loctite Blue). Carefully inspect the bail wire alignment and adjust if needed. If the rotor itself feels loose, remove the spool and check the rotor nut for tightness (note: some rotor nuts may have reverse threads or a locking screw).
  • Problem: Bail Closes Unexpectedly During a Cast
  • Possible Cause: Although the spring is new, incorrect installation (weak pre-load) could potentially contribute.
  • Possible Cause: A bent or misaligned bail wire/arm might be positioned too close to the trip mechanism, causing it to engage prematurely.
  • Possible Cause: Wear in the internal bail trip components.
  • Possible Cause: The reel handle rotating due to the casting momentum can sometimes inadvertently trigger the automatic bail closure.
  • Solution: Re-verify the spring installation and pre-load. Meticulously check the bail wire and arm alignment, ensuring adequate clearance from trip mechanisms when open. Adjust alignment if necessary. Inspect internal trip components for obvious wear if comfortable disassembling further (refer to schematic). Ensure the handle is securely tightened.

Most post-repair issues trace back to the intricacies of the reassembly process, particularly the correct orientation and tensioning of the spring, or overlooking related alignment problems with the bail wire or arms. Patience, careful observation, and strict adherence to the reel’s schematic are the keys to resolving these common troubleshooting scenarios.

VI. Final Checks and Preventative Care

Once the bail is functioning correctly according to the tests, perform a few final checks and consider preventative measures to maximize the lifespan of the repair and the reel.

  • Final Inspection: Give the entire bail assembly a final visual inspection. Ensure all screws associated with the bail arms, spring cover, and line roller are present and tightened appropriately. Confirm all parts appear correctly seated according to the schematic.
  • Lubrication: Apply a small drop of quality reel oil to the bail arm pivot points and directly to the line roller bearing or bushing. Work the oil in by opening and closing the bail a few times and spinning the line roller. If the main gearbox was opened during the repair (not typically necessary for just a bail spring), apply appropriate reel grease sparingly to the gear teeth.
  • Preventative Habit: Manual Bail Closure: Adopt the practice of manually closing the bail with a hand after each cast, rather than relying on turning the handle to trip it closed. This technique significantly reduces the impact and stress on the bail spring and the internal trip mechanism, prolonging their life. It also helps ensure the line seats correctly on the roller before retrieval begins, minimizing the chance of line twist.
  • Regular Cleaning and Maintenance: Remember that regular care benefits all reel components. Rinsing the reel thoroughly with freshwater after each use, especially in saltwater conditions , helps prevent corrosion and removes grit. Periodic disassembly (at least annually) for cleaning and re-lubrication keeps internal mechanisms, including the bail system, operating smoothly and extends the overall life of the reel.

By following these steps carefully, replacing a spinning reel bail spring is an achievable maintenance task. Addressing the issue promptly and incorporating preventative habits like manual bail closure and regular cleaning will ensure the reel continues to perform reliably for many fishing trips to come.

Posted on 2 Comments

How to fix a fishing reel

For both seasoned anglers and novices alike, the fishing reel is an indispensable tool in the pursuit of the catch. Yet, like all finely tuned instruments, fishing reels require regular maintenance and occasional repair to function at their best. Neglecting these essential tasks can lead to a range of problems, from minor annoyances to complete equipment failure at critical moments. Understanding how to maintain and repair your fishing reel not only ensures a smoother, more enjoyable fishing experience but also extends the life of your equipment, saving you time and money in the long run.

This blog post will delve into the essential world of fishing reel repair. We’ll explore the different types of reels, identify common issues that plague anglers, and provide step-by-step guides to address these problems. Whether you’re facing a tangled spool, a faulty drag system, or worn-out gears and bearings, this comprehensive guide aims to arm you with the knowledge and confidence to tackle reel repair and maintenance. Let’s embark on this journey to ensure your fishing adventures are never cut short by equipment failure.

Understanding Fishing Reel Types and Their Common Issues

Fishing reels come in various designs, each tailored to specific fishing techniques and environments. Understanding the nuances of each reel type is the first step in effective maintenance and repair. Here, we explore the three main types of fishing reels—spinning, baitcasting, and fly fishing reels—their common issues, and general maintenance tips.
Spinning Reels

Overview: Spinning reels are favored for their versatility and ease of use, making them a popular choice among beginners and seasoned anglers alike. They are designed for casting light to medium lures and offer excellent control and accuracy.

Common Problems:

Line twists and tangles, often resulting from incorrect spooling or the use of inappropriate line types.
Bail spring failures, which can prevent the bail from flipping back over after a cast.
Drag system issues, leading to inconsistent or overly tight drag.

Maintenance Tips:

Regularly clean and lubricate the spool shaft and drag system.
Check the bail spring and replace it if it shows signs of wear or damage.
Ensure the line is correctly spooled to prevent twists and tangles.

Baitcasting Reels

Overview: Baitcasting reels offer precision and control for experienced anglers, ideal for casting heavier lures and targeting larger fish. They are mounted above the rod and require a bit more skill to use effectively.

Common Problems:

Backlashes, or “bird’s nests,” caused by the spool spinning faster than the line is cast.
Brake system malfunctions, affecting casting distance and accuracy.
Gear and bearing wear, leading to reduced performance and noise during use.

Maintenance Tips:

Practice proper casting techniques to minimize backlashes.
Clean and lubricate the brake system regularly.
Inspect gears and bearings for wear and lubricate them as needed.

Fly Fishing Reels

Overview: Fly fishing reels are designed to hold fly line and backing. They are simple in design but crucial for managing line during casting and playing fish. Fly reels are typically used in freshwater environments, especially for trout and salmon.

Common Problems:

Line memory and coiling, which can affect casting distance and accuracy.
Corrosion, particularly in reels used in saltwater without proper cleaning.
Drag system issues, impacting the ability to play and land fish effectively.

Maintenance Tips:

Store the reel and line in a way that minimizes coiling and memory.
Thoroughly clean and dry the reel after use in saltwater.
Check the drag system regularly, cleaning and lubricating to ensure smooth operation.

Basic Fishing Reel Maintenance

Maintaining your fishing reel is crucial to ensure its longevity and optimal performance. Regular, basic maintenance not only prevents common issues but also saves you from costly repairs or replacements down the line. Here’s how you can keep your reels in top shape through routine cleaning, lubrication, and inspection.
Routine Cleaning

Dirt, sand, and saltwater are the main culprits behind most reel problems. After each use, especially in saltwater conditions, it’s essential to gently rinse your reel with fresh water. Avoid high-pressure water as it can push salt and debris further into the reel mechanisms. Use a soft brush and mild detergent to clean the reel body, handle, and spool. Ensure the reel is thoroughly dried after cleaning to prevent rust and corrosion.
Lubrication

Proper lubrication is vital for smooth operation and protection against wear and tear. Use a high-quality reel oil and grease recommended by the manufacturer. Apply oil to bearings, spool shafts, and handle knobs to ensure smooth movement. Use grease sparingly on gears and other moving parts inside the reel. Over-lubrication can attract dirt and lead to a build-up of grime, so apply lubricants judiciously.
Checking for Wear and Tear

Regularly inspect your reel for signs of wear, corrosion, or damage. Pay close attention to the line roller, bail spring, and drag system, as these are high-wear areas. Check the integrity of the reel foot, screws, and fittings for any signs of corrosion or loosening. Early detection of wear and damage can prevent more significant issues down the line.
When to DIY vs. When to Seek Professional Help

Many routine maintenance tasks can be performed at home with basic tools and the right lubricants. However, if you encounter more complex issues such as a malfunctioning drag system, internal gear problems, or significant corrosion, it might be time to seek professional help. Reel manufacturers often offer repair services, or you can visit a local tackle shop for assistance. Professional servicing is also recommended if you’re not comfortable disassembling and reassembling your reel.
Step-by-Step Guide to Repairing Common Issues

Fishing reels, like any mechanical tool, can encounter various issues through regular use. Here, we provide detailed instructions on how to address some of the most common problems, ensuring you can get back to fishing with minimal downtime.
Fixing a Tangled Spool

Tangles and loops in the spool are common, especially with spinning reels. To fix this:

Remove the spool from the reel.
Unwind the tangled line carefully, cutting away any knots that can’t be untangled.
Re-spool the line, ensuring it’s laid evenly and under slight tension to prevent future loops.

Replacing Worn-Out Gears and Bearings

Worn gears and bearings can affect the reel’s performance, making retrieval difficult or noisy.

Disassemble the reel according to the manufacturer’s instructions to access the gears and bearings.
Clean all parts with a solvent and inspect for wear or damage.
Replace any worn or damaged gears and bearings with new parts.
Lubricate the new parts and reassemble the reel.

Repairing a Faulty Drag System

A malfunctioning drag system can make it difficult to set the drag properly, affecting your ability to fight and land fish.

Disassemble the drag system, noting the order of washers and other components.
Clean all parts with a solvent and inspect for wear.
Replace any damaged components, and lubricate lightly with reel grease.
Reassemble the drag system, adjusting for smooth operation.

Solving Line Retrieval Issues

Problems with line retrieval can stem from several issues, including a dirty or damaged line roller, worn bearings, or improper spooling.

Inspect the line roller for damage or debris and clean or replace as necessary.
Check the bearings for wear or corrosion and lubricate or replace them.
Ensure the line is correctly spooled, without twists or overlaps.

Preventive Maintenance Tips

Preventive maintenance is key to avoiding many common reel issues. Here are some best practices for reel care:

Always rinse your reel with fresh water after use, especially in saltwater conditions.
Regularly check for signs of wear or damage, especially before and after trips.
Store your reels in a cool, dry place, preferably with the drag loosened to relieve tension on the springs.
Periodically remove the spool and apply a light coat of grease to the main shaft to prevent corrosion.

Regular maintenance and timely repairs are crucial for the longevity and performance of your fishing reels. By following the guidelines outlined in this post, you can ensure your reels remain in top condition, ready for whatever the water throws at you. Remember, a well-maintained reel is not just a tool but a faithful companion on your fishing adventures, capable of bringing in the catch of a lifetime. So, take the time to care for your reels, and they will serve you well for many seasons to come.